The Hinged Joint
Description
This section is from the book "Woodwork Joints", by William Fairham. Also available from Amazon: Woodwork joints.
The Hinged Joint
One of the most common forms of hinged joint in use to-day is that formed by using the "butt" hinge, and many troubles experienced by the amateur, such as "hinge-bound," "stop-bound," and "screw-bound" doors, etc., are due to a lack of knowledge of the principles of hingeing. Hinges call for careful gauging and accurate fitting, otherwise trouble is certain to occur.
A "Bound"door or box lid is said to be hinge-bound when the recess which contains the hinge is cut too deep. The frame and the body portion engage too tightly when closed, the result being that the door has always a tendency to open a little. This fault may be in many cases remedied by packing behind the hinge with one or two thicknesses of good stiff brown paper. For packing purposes such as this paper will be found to be of much more value than thin strips of wood or knife-cut veneer, the latter always having a great tendency to split when a screw or bradawl is inserted.
A stop-bound door is the name applied when the door is not finished to exactly the same thickness as originally intended. This causes the door to bind on the stops at the back, as shown at Fig. 221 . The difficulty may be remedied by thinning the door a little at the back, or slightly rounding away the portion whichbinds.
Screw-bound is a common fault often overlooked by the amateur. It is caused by using screws of which theheads are too large for the countersunk holes in the hinge, and may be avoided by slightly sinking the holes in the brasswork with a countersink or rose-bit.

Fig. 221. - Stop-bound Door.
Alignment
Another fault that is fairly common is having the axes of the hinges out of alignment. Especially is this the case when three hinges are used to hang a wardrobe or other large door. It is absolutely necessary in all cases that the exact centres of the pivot-pins of the hinges should be in a straight line.
Particular attention to alignment is necessary when the body and the door frame are shaped on the face side. A familiar example that every reader may inspect for himself is the curved side of a railway carriage body and railway carriage door, where he will notice that a specially wide hinge has to be used at the bottom of the door to give the necessary alignment. Hinges fixed on work with their centres out of truth are often overlooked by the inexperienced worker, and this is a frequent cause of creaking.
Gauging
Fig. 222 is a sketch of a brass butt hinge, open. Fig. 223 illustrates a similar hinge closed, and shows the gauge set so that the point of the marker is exactly to the centre of the pivot-pin. This distance we will call C. Now turn to Fig. 224 . The distance C has been gauged from the face side of the frame. The gauge is then set to the thickness of the hinge at its thickest portion, and to prevent "hinge-bind" see that the gauge is set on thefineside. Remember that the tapered point of the steel spur or marking awl will part the fibres of the timber a little more than the fine point, and give you a wider gauge line than was anticipated when you set the gauge. The inexperienced worker nearly always overlooks this. The result is a hinge-bound door, the cause of which is not discovered by theworker because he is so sure that he has set the gauge correctly. The distance B, Fig. 226 , shows the line gauged for the thickness of the hinge.
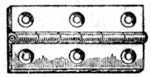
Fig. 222. - Butt Hinge.
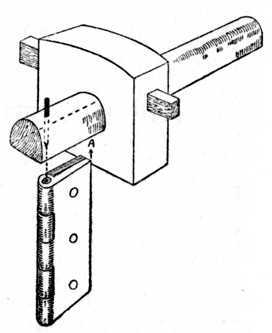 Fig. 223. - Gauging.
Position Of Hinges
Another difficulty to the beginner is the position for his hinges, and it may here be stated that the general rule is to carry a line across the face of the work from the inside of the cross rail and place the hinge at E, as Fig. 224 .
Continue to:
My Books

