Chapter I. Fitting Up A Workshop. How To Build The Shop
Description
This section is from the book "Handy Man's Workshop And Laboratory", by A. Russell Bond. Also available from Amazon: Handy Man's Workshop And Laboratory.
Chapter I. Fitting Up A Workshop. How To Build The Shop
The interest taken by a man or boy in a shop that he himself has built will amply repay the small outlay of the first cost.
Fig. 1 shows the inside view of a workshop good enough for any amateur, no matter what his station in life may be. The framework was put up by a first-class mechanic, but the furnishings are all home-made, such as even a boy will be able to construct. Such a shop as this is hardly necessary for the average young mechanic, the object of the sketch being more to show how a shop can be fitted up inside. The lathe, and also a jig saw, not shown, will be described later, as will also the bench, drawing table, and other accessories.
A shop about 9 feet by 12, inside dimensions, will be ample enough, and if it is made as an addition to the house, but three extra sides will be necessary, or if built in a corner, as is sometimes convenient, then but two extra sides will be needed.
The ground must be leveled, and prepared for the six piers, which can be of concrete, brickwork, or timber. If of timber, let them be 6 to 9 inches square by 2 feet long, buried in the ground about 18 inches. Holes should be dug of suitable depth and the stumps dropped in, care being taken to get them the proper distance apart, 9 feet by 12, out to out, so that the sides of the building, when erected, will be flush, and not have to be cut around the piers, or offset in an unworkmanlike manner. The first pier can be permanently set by ramming broken bricks and earth into the hole with a piece of heavy timber brought down on end. The remaining piers are leveled up from this one, by means of a builder's level.
Since it is a very important matter that these piers should be true and level with each other, it will be well to make a suitable straight-edge, or leveling board, for this purpose. This can be 12 or 16 feet in length, cut from a 1-inch board, and shaped as shown in Fig. 2. A hand-hole is formed in the center at the top, and a small shelf, upon which is placed the spirit level, is nailed to one side, immediately below. The leveling edge must be planed very true, while the small shelf on the side must be made exactly parallel with it. Place the level upon the shelf, and, holding the leveling board on the tops of each pair of piers successively, commencing with the permanent one. level them all by raising or lowering them in their respective holes, when they should be permanently set, as was the first.

Fig. 1 - A model workshop for the amateur.
Fig. 2 - A builder's level.
The wall plates or bottom framing are made from 4x6 timber, half jointed at each corner, and secured to each pier with ten-penny nails driven in from either side. The four corner piers being 9x12 feet out to out, one pair of the 4x6 timbers will be 12 feet in length, and the other 9 feet. The framework must form a perfect right angle at each pier, which can be tested by means of the carpenter's square or laid out in the following manner:

Fig. 3 - Laying out a square corner.

Fig. 4 - Temporary bracing for corner posts.
Along the inside edge of the framework lay off a line 3 feet in length on one timber and 4 feet on the other, when the two timbers must be closed, or opened, until the distance between these two points measures exactly 5 feet, as shown in Fig. 3.
The posts, or studding as they are sometimes called, are made from 3 x 4-inch timbers. Two are cut 10 feet 6 inches in length, and three are made 7 feet 6 inches long. The ends are cut true and square, to get a good bearing, when the posts are set up. The rear posts can be secured to the side of the house, after being trued with a plumb bob, or level, and can be secured to the bottom plate or framing by toe-nailing; but the two front corner posts, after being erected plumb, and secured to the framing, must be held temporarily, in the manner illustrated in Fig. 4. The top plates and rails are next put up. Make a half joint at the front, and nail the other ends to the rear posts with nails driven through cither side. The other door-post is erected, then the intermediate rails and the door lintel. Rails and door lintel are 2x3 inches.
The rafters are made of 2 x 4-inch timber, notched where they rest upon the plates, which are 2 inches by 3. One rafter can be cut to the proper length and notched, using it for a templet, or as a guide for cutting the others. The two end rafters should be seured to the plates first, by driving in tenpenny nails through the sides, as in the case of the floor joists, then the others may be evenly spaced from end to end, about 2 feet apart.
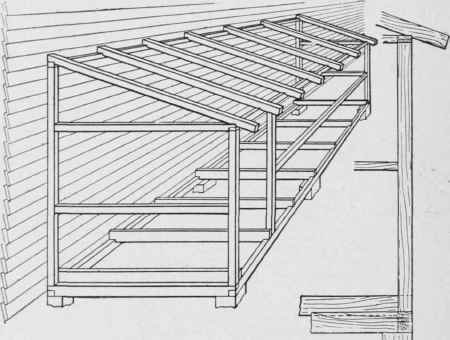
Fig. 5 - Setting up the frame of the shop.
The framework of the building is now complete, as shown in Fig. 5. A detail of construction is shown at the right. Rough boards, with a space between them of about one inch, are laid the joists for the roof, and secured with eightpenny nails.
The sides can either be made of tongue-and-groove boards, or ordinary boards like the roof, only built close, with narrow strips of wood nailed over the joints as in Fig. 6.
Space must be left in the sides for the windows and doorway; the latter should measure 2 feet 6 inches by 6 feet 6 inches. The windows had better be double sliding, on three sides of the building, to get a good light. If 10x8 glass is used, the framework or sash will be about 2 feet 4 3/4, inches by 1 foot 11 5/8 inches high. The window openings in the sides of the building, therefore, should be 1 foot 11 inches high by 4 feet 8 inches long for a double sash. They should be centrally located in the sides and front, the boards being cut flush with the top of the middle rails, to which they are nailed. The boards at the top of the opening are nailed to an inside strip, 2 1/2 by 1 1/4 inches, detailed in Fig. 7, which sketch also shows the grooves in which the sash moves. A tongue-and-groove connection should be made where the two sashes meet, or a strip of wood should be nailed on either, to overlap the other, and keep out the wind and rain.

Fig. 6 - Cracl s in the siding covered by narrow strips.
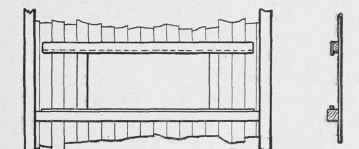
Fig. 7-A window opening, showing grooves for sash.
The flooring, which can be made of ordinary boards or a cheaper grade of tongue-and-groove boards, planed on one side only, are cut to fit close up to the sides, and around the studding or and nailed to the joists with eightpenny nails. The joists are 2x4, notched 1 inch, as shown.
It will be noticed that the first board of the sides, nearest the house, is notched all the way down, to fit up snugly against the weather boards. This is done by means of a pencil and a small stick, held as in Fig. 8. The stick is traced along the outline of the weather boarding, while the pencil, being held against the upright board of the shop, makes an exact copy of the outline, as guide for the saw. Narrow boards, sometimes called plates.
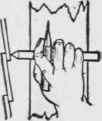
Fig. 8 - Tracing a profile of the weather boards.
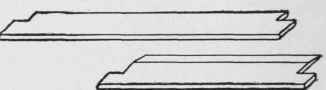
Fig. 9 - Sills for the door and windows.
are nailed all around the top of the sides, under the eaves of the roof, notching them out where the joists of the roof come through. The door can be made of the same stuff as the sides, strength-ened with battens as shown in Fig. I. A diagonal batten can be put on also, letting it bear top and bottom against the horizontal batten-, and taking care to let it slope in the right direction, the lower end being near the hinges. Hinges and a latch, also a draw-bolt, are all the furnishings necessary for the inside, and a padlock for the outside. A plain narrow frame can be put around the outside of the windows, and a sill made (Fig. 9) from 1-inch stuff, for the door and windows, will improve the appearance. A door-step can be made from the same stuff as the sides or from [-inch boards, nailed to the front of the shop, before the tread is put on. The ground should be made level, and a large stone, or bricks, put under the bearing edge.
The roof is covered with tar paper, which can be made of sheets of brown paper covered with pitch and sanded, or it can be purchased already prepared. Commence at the eaves, allowing enough to tuck under the eaves on both sides and in front. The next layers are allowed to lap over by about 2 inches, and the last one is tucked under the weather boarding, on the side of the house. Large-headed galvanized nails are used to hold the tar paper or felt covering to the roof; or barbed wire-nails with tin caps will do. Space them not less than 2 or 3 inches apart, all along the edges of the laps, and under the eaves of the roof. (See Fig. 10.)

Fig. 10 - Exterior view of the finished building.
The shop should be given two coats of paint on the outside to match the house or surrounding buildings. A small stove, either oil, gas, or coal, will nicely heat the shop in cold weather, a chimney connection being made in the roof or one of the sides if a coal stove is used. - 3 *
Continue to:
My Books

