How To Fasten The Harness On The Pack Basket
Description
This section is from the book "Time Out for Living", by Ernest DeAlton Partridge and Catherine Mooney. Also available from Amazon: Time Out for Living.
How To Fasten The Harness On The Pack Basket
Diamond-O Pack Frame.* The Diamond-O Pack Frame meets many of the requirements that experts will lay down for good packs. It is strong, light to carry, and comfortable on the back. This frame is not very difficult to make, either. The following material is needed:
1 board 5/16 inch by 1 1/4 inches by 8 3/4 inches 1 board 5/16 inch by inches by 9 1/2 inches 1 board 5/16 inch by 1 1/4 inches by 10 1/2 inches
1 board 5/16 inch by 2 inches by 16 inches
2 boards 5/16 inch by 2 inches by 24 inches
19 No. 12, f-inch copper belt rivets and burs
2 3/4 inch metal dees
2 f-inch by 5-inch web straps
1 2-inch by 18-inch webbing
1 pair web shoulder straps with snaps
The boards should be of a strong, light wood such as oak, ash, or maple. You will notice that the wood needed is all 5/16 inch thick. If you can secure some pieces approximately this thick, it will be a simple matter to cut them to the proper length and width yourself.
One piece of wood, number 4 in the diagram on page 59, must be bent into an arc. Bend it in the following way:
1. Make a mold by driving large nails into a block of wood, or by nailing small blocks on a larger block, as shown in the diagram on page 59.
2. Steam the piece of wood in a large boiler for about half an hour. To steam the wood, put it on two half bricks in the bottom of your boiler and then add water halfway up the bricks. Cover the boiler and steam for thirty minutes.
3. Bend the wood into the mold you have made and leave it there until it dries thoroughly.
Remember that the board should be bent slightly more than you want it to be when finished because it will straighten out to some extent.
* This pack is named after the Diamond-O Boy Scout Camp near Oakland, California, where it was developed.
The pack frame is fastened together with No. 12, 3/4-inch copper rivets and burs instead of nails or screws. They make the joints much stronger. Holes exactly the right size should be drilled for the rivets. Try your drill out in a spare piece of board before you drill in your pack-frame boards and see that the rivet fits very snugly. Place your rivets in about the same positions as shown in the diagram.
It will help you get the pack together straight and the holes bored in the proper places if you will draw, on a large sheet of wrapping paper, a diagram of your pack in the actual size it will be when finished. Then you can lay your boards on this diagram as you mark the holes. In this way it is possible to make the frame the right shape. Bore the holes in the small pieces of board first and then mark through these onto the other boards. In this way the holes will be properly placed.
The two long pieces, A and By must be bent slightly at the bottom end so that they fit onto piece 4 correctly. This bending can be done after steaming as described above for piece number 4, except that A and B need not be placed in a mold but can be twisted as they are fastened down to piece 4. Piece number 2 should be fastened on last and should be placed after trying the frame on your back. For short persons, piece 2 should be nearer the bottom of the pack than for tall persons, so that the webbing along the bottom fits into the small of the back.
The edges on the ends of piece 4 should be rounded slightly so that they will not cut the webbing after it has been stretched over the end. The best way to round them to just the right degree is to sandpaper them.
The cotton webbing for the straps and the bottom of the frame can be secured at a hardware store or harness shop if you ask for "trunk webbing" or "army webbing" and give the proper width. Since it may be necessary to order it in advance, several persons should give their orders at the same time.
Note how the wide straps and the narrow ones are fastened together with sewing and rivets. See also how the snaps and dees are fastened to the straps. The metal dees and snaps can be purchased at a harness or hardware store.
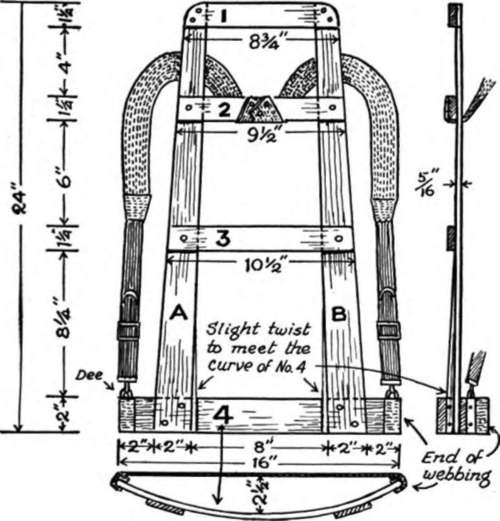
Nos. 1, 2, and 3 are on this side, of frame.. No.4 is on far side. Webbing rests on your back across the hips.
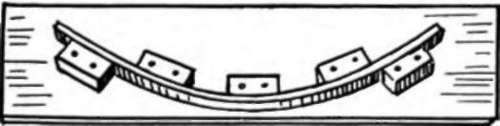
Mold for No.4 piece, made of blocks of wood or large nails.
Diagram of the Diamond-O Pack Frame.
The frame should be well sandpapered and then finished with a good soaking of linseed oil or some wax preparation such as Minwax or floor wax.
Continue to:
My Books

