Chapter Fifteen. Weaving
Description
This section is from the book "Arts And Crafts In The Elementary School", by Joan Dean. Also available from Amazon: Arts And Crafts In The Elementary School.
Chapter Fifteen. Weaving
The craft of weaving is very closely connected with the business of selecting and relating pattern and texture. I have stressed in earlier chapters the need to train children for the task of choosing clothes and furnishings in adult life. This kind of training becomes particularly important when we are dealing with the raw materials of clothes and furnishings, as we are in weaving.
At its more advanced levels, weaving is a craft requiring considerable patience and concentrationmuch more than can be expected of the average Junior school child. There is, nevertheless, a tremendous amount of valuable work which can be done at this stage, which affords the maximum number of opportunities to explore the possibilities of the craft, and which lays a good foundation for more advanced work, if the opportunity for this occurs later.
I do not think there is any need for elaborate looms with Junior children. With intelligent top Juniors there may be a place for the two-shaft heddle loom, but generally speaking, children of this age find setting up the loom so tedious a business, that they are bored before they get to the more interesting business of weaving. Usually the needs of Juniors can be met with the kind of looms they can make for themselves. One of these can be made from four pieces of wood: two about one inch square in section and two about two inches by half an inch will do admirably. These will need to be about a foot in length, although the thicker ones may well be longer. They need to be rubbed smooth with sandpaper and nailed together to form a firm framework. A row of nails is then set at each end, placed approximately a quarter of an inch apart. The size of the framework and the setting of the nails can be varied according to the materials available for making the loom and the kind of work to be done on it. A loom for making small rugs, for example, would obviously need to be larger and would need a wider setting for the nails, than a loom for finer work. Old picture-frames can sometimes be pressed into service as looms, and all sorts of scraps of wood can be used in this way.
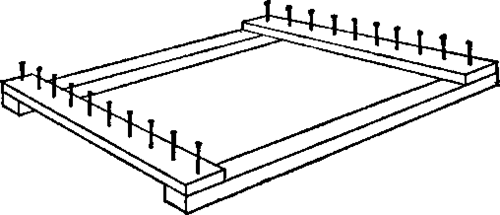
Home-made loom

Setting up the loom

Using a "shed" stick
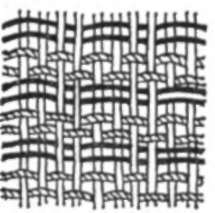
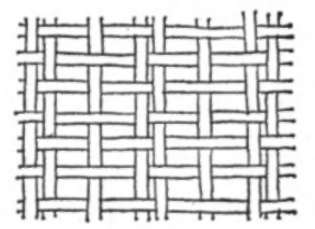
The loom, once made, can be set up by winding wool or string from one end to the other, tying it at the beginning and the end. Unless you are using a pretty thick yarn, it is better to use it double. Take a ruler or flat stick and weave it in and out right across the loom. This is not strictly necessary, but it saves a great deal of time when you are weaving, because you can turn the stick on its side in alternate rows and pass the weft thread straight through between the warp threads. Its technical name is a shed stick. Weaving can now begin. Where double yarn is used, it is better to make both threads separate parts of the weaving, rather than to treat them as a single thread. The aim is to get a square mesh. If you are getting the basket effect shown in the second diagram, you need a thicker or perhaps a double warp thread.
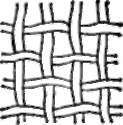
Good mesh
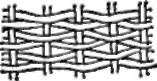
Bad mesh
Quite a variety of weaving can be produced with this simple loom. A number of variations can be obtained by using threads which vary in thickness and texture. Thus we get an interesting effect by putting together shiny threads, such as silk, and matt threads such as wool. Variations in thickness of thread also add interestrug wool and knitting wool, for example, give another variation. Gimps of different kinds are effective, and so are strips of cellophane and cut strips of scrap material, not to mention Christmas string and ribbon and raffia. If children are encouraged to look for interesting threads to weave into their cloth and to consider carefully the relationship of one thread to another, some valuable experience will be gained.
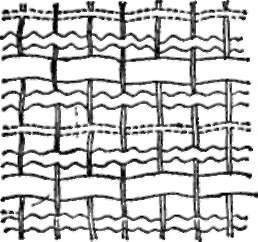
Pattern obtained by using a variety of threads
Variations can also be produced in the weaving itself. Patterns can be made, for example, by varying the number of threads over and under which the weft or weaving thread passes. The best patterns are often made with the simplest variations. Thus a pattern of over two threads and under two threads for several rows, alternating with some rows of plain weaving, will produce an interesting pattern, and the children can be encouraged to discover and use others. They usually need persuading to continue the pattern for enough repeats for it to be clearly seen, however.
Pattern obtained by variations in the weaving
Spaced warp
A spaced warp is another good way of making patterns. In winding the warp on to the loom, the yarn is wound twice round some nails, and others are missed out. This variation in the warp will make a pattern when woven.
One of the problems of learning to weave is that of tension, particularly tension in the weft threads. Most beginners pull them tighter and tighter, making a neck in the weaving. As one becomes more experienced, one learns to gauge tension and so to avoid this, but it is rather discouraging for children and, of course, many pattern effects are lost. A simple way of avoiding it with the looms I am suggesting is to fix bicycle spokes at each side of the weaving. They can be slotted through staples at each side of the weaving, and fixed in position with Sellotape. After each row of weaving the thread must be passed round the spoke. When the weaving is finished, the spoke is removed and it will be found that reasonable tension has been retained throughout. We must not lose sight of the fact, however, that this is only a prop, and that the weaver must eventually learn to gauge tension.
Continue to:
My Books

