Clay Modelling And Pottery. Part 4
Description
This section is from the book "Arts And Crafts In The Elementary School", by Joan Dean. Also available from Amazon: Arts And Crafts In The Elementary School.
Clay Modelling And Pottery. Part 4
4. Working in relief. Some quite interesting work can be done in relief. Clay can be rolled out into thick slabs, and shapes or figures cut from the slabs. These can be finished in two ways, which can also be combined:
(a) Textures can be formed on the shape or figure by pressing various things into the soft clay to leave a mark. Suitable objects might be shells, nuts, ends of pencils or tools or scissor handles, pieces of frosted glass and many other things.
(b) A relief picture can be built up either with thin slabs of clay placed on top of each other or by modelling in relief on the original slab.
This sort of work, can, of course, be carried out in combination with other materials. A clay figure, for example, might be clothed in scraps of fabric and seated in a cardboard car. This sort of mixture of media should help to make children aware of the relationships of different materials and the suitability of different materials for different jobs.
If you intend to fire modelling, it is important to see that the clay is not too thick at any point, and even more important to see that each piece of clay that is added is pressed firmly into position. If air is left between parts of the model it may expand in firing and blow the model apart, and in doing this, damage other work in the kiln. To prevent this, each model should be hollowed out, so that the clay is at no point thicker than half an inch and is thinner than this wherever possible. This can most easily be done with a loop of wire, while the clay is still soft. It may be necessary to remove parts of the model, hollow them out and then replace them. If this is done, care should be taken to avoid trapping air inside. Painting of models with underglaze paints is best carried out after the first or biscuit firing, but this then needs to be fired on to the model before glazing can take place. With quite a number of colours it is possible to paint the raw clay, before the model is fired at all. Some colours fade however. It is, in any case, wise to fire and glaze some samples of the underglaze colours you are using, as you cannot really tell from the colour of the powder what the appearance of the finished work will be.
If you are not going to fire work, it is possible to paint it with ordinary powder colour. I think this is best done when the model is half dry. If it is completely dry, the damp of the paint may crack it. It is possible to harden work considerably by drying it in an ordinary domestic oven. While this is probably a good idea, in that it does make the work a little more permanent, it should be clearly recognized that the temperature which can be reached is very much below that of a kiln, and that the results are not really comparable. Work painted and baked in this way can be varnished.
Work in modelling and work in pottery will naturally take place side by side, and children will probably discover for themselves quite a number of ways of making pots. The following methods at least should be explored:
1. Thumb pots. This is one of the simplest ways of making a pot, and one which can be used by children from the Infant stage upwards. It consists of making a ball of clay, then making a hole with the thumb and moulding the pot outward from the hole. The shape is carefully moulded with the hand. The sides can be flattened by pressing something flat, such as a piece of wood, against them and the pot can be decorated in any of the ways suggested below.
2. In a similar way small pots can be moulded over the bottoms of jars and bottles. Bottles which slope outward from the base are best for this purpose. The clay can be rolled into a ball and pressed on to the jar or it can be rolled flat first and then pressed into position. Such pots should not be left to dry on the jar, however, as clay shrinks as it dries and this will cause cracks. If the pots stick, they may be left for a short time, so that they dry a little, but should not be allowed to dry too much. Powdered flint sprinkled on to the jars before work is commenced will help to prevent sticking.

Stages in the making of a thumb pot and a section through the finished pot.
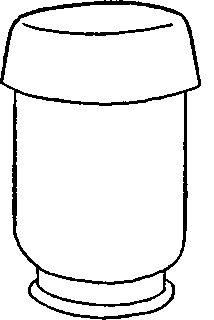
Pot moulded on the base of a bottle or jar

Coil pot
3. Coil pots. These are made from coils of clay placed one on top of the other. Each coil should be rolled out as evenly as possible, using the tips of the fingers. The base of the pot can be made from coils, but is generally better made from a slab of clay, which may be rolled out with a rolling-pin made of dowelling. The base can be cut to shape with a knife. Each child will need some slip or liquid clay. Instructions for making slip will be found later in this chapter, but for this purpose I think it is most easily made by each individual for himself. Roll some clay into a ball, and make a hollow in the ball with the thumb. Fill the hollow with water and stir it round with a finger. This will probably result in sufficient slip for the particular job on hand, and more can be made as necessary. This is used to stick each coil to the next. Put slip all round the base at the edge and lay the first coil in position, pressing it well down and joining the ends as invisibly as possible. Now coat this coil with slip and lay the next on topand so on until the pot is the required shape and size. Pots built in this way have a tendency to come apart between coils and it is therefore very necessary to see that each layer is well coated in slip and well pressed down. It is possible to finish work by filling in the gaps between the coils with soft clay. This means that some of the quality of the coil pot is lost, but it does give a surface for decoration and is a wise move with very large pots. Another way of finishing coil pots is to make a series of impressions with a tool on each coil, pressing it down on to the coil below. This gives an attractive finish and also binds the coils together. It is also possible to use this as a method of building up figures and models.
Continue to:
My Books

