Collage And Creative Embroidery. Continued
Description
This section is from the book "Arts And Crafts In The Elementary School", by Joan Dean. Also available from Amazon: Arts And Crafts In The Elementary School.
Collage And Creative Embroidery. Continued
Each child should have a plain or possibly lightly patterned piece of material for the background of her picture. It is, I think, more valuable if there is a choice of background materials, so that children can see the effect of working with different materials. Dark or dull-coloured background materials often give the best results, since brightly coloured pieces show up well against them. The children then decide what their pictures are to be about, and start selecting and cutting their materials. It is possible to use a successful collage picture as a kind of pattern, but I think it best to avoid following it too slavishly, because the medium is not quite the same. Each child should have the opportunity to select from a wide variety of materials. There should be at least a variety of plain and patterned pieces, of matt and shiny surfaces, of rough and smooth textures. Many of the oddments we found useful for collage work are useful heresuch things as ribbons, braid, sequins, lace, beads, buttons, feathers, fur, cord and raffia. Most of these can be collected over a period of time at very little cost. Once the main shapes have been cut out and the general plan of the picture is clear, the pieces can be stuck into position with cold-water paste. When older children and adults do this kind of work raw edges need to be turned in to prevent fraying. This is usually too difficult with young children and the use of paste helps to keep the edges from looking untidy. Once the work is dry, the children can add stitchery according to their ability. Small details can be added with beads, sequins, ribbons and braid. Christmas string and ribbon may also look attractive.
The final picture should be stretched over a piece of hard-board and framed. The hardboard should be slightly smaller than the picture itself. If the background material has not got a firm edge, then it should first be bound with braid, or be stitched by machine. Lay the hardboard in position on the material, and turn the material edges over it. Join a long piece of linen thread or other strong yarn to one corner of the material. Stitch right across the hardboard to the opposite material edge. Bring the thread back and stitch again about an inch farther along. Continue in this way right across the back of the picture. Stitch the other two edges in a similar way. The picture should now be fully stretched and ready for framing. (See diagram.)
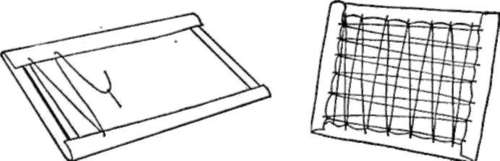
Preparing an applique picture for framing.
A quicker but less final way of finishing work is to cut a piece of stiff cardboard to at least two inches less than the size of the work in each dimension. Place the work on it and turn the material edges over it. There should now be a folded square of material at each corner. Stitch or pin the material of these squares. This should hold the picture in position on the cardboard.
This is one kind of creative embroidery. The real basis of embroidery, however, is stitchery, and one of the reasons for the present uncreative attitude to embroidery is that we do not explore stitches fully enough. Embroidery design is something which should grow out of the stitches we use, and we should try to promote this attitude in children from the beginning, encouraging them to explore the possibilities of whatever decorative stitches we teach, by using them and combining them to make individual patterns and pictures. It is also necessary to encourage them to use stitches for fillings as well as for bands of embroidery. Let us consider, for example, the three stitches which are often among the first decorative stitches taught in the Primary schoolrunning stitch, cross stitch and blanket stitch. With these we can produce an infinite variety of patterns, using them combined in various ways, one on top of another, and in varied sizes and colours. Once we have taught the stitches, we should encourage children to discover how many different ways there are of using them. To this end, it is often a good idea for children to have their own samplers for experimenting with stitches. When decoration is needed for the work they have in hand, they can try out a number of stitches and select the most suitable. Specially good combinations of stitches can be recorded on a class sampler, so that everyone can see them.
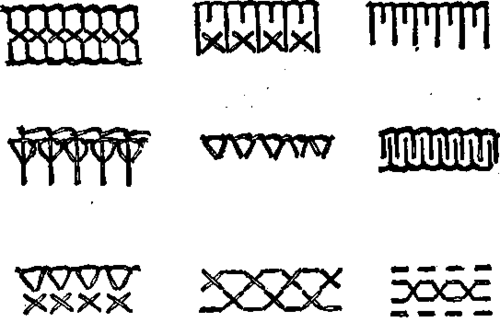
Embroidery stitches combined to form decorative bands.
In the early stages of Junior needlework the choice of suitable material for work is of necessity rather limited by the children's ability. We can, however, offer a wide choice of threads, varied both in colour and texture, so that children can come to appreciate, for example, the relationship of a shiny thread and a matt thread.
One good way of encouraging children to use stitches inventively and creatively is by making embroidery pictures, carried out directly in stitches on the material, without preliminary drawing. This sort of work encourages children to think directly in terms of stitches, and not in terms of drawings translated into embroidery, which have a place at a much later stage. Embroidery pictures also offer scope for the use of filling stitches.
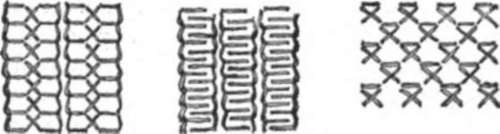
Embroidery stitches used as filings
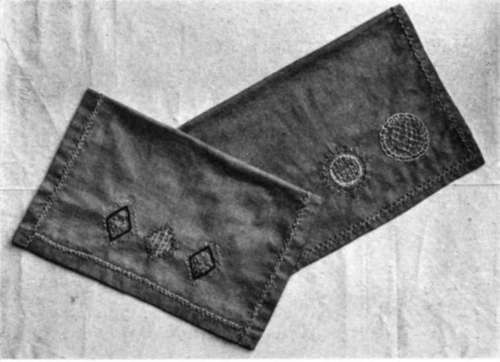
10-year-old. Traycloths
This work was planned to encourage children to build up designs from simple stitches (Chapter 7)
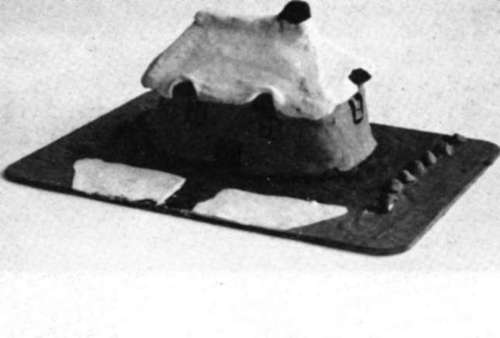
11-year-old. Clay model of a house
(Chapter 8)
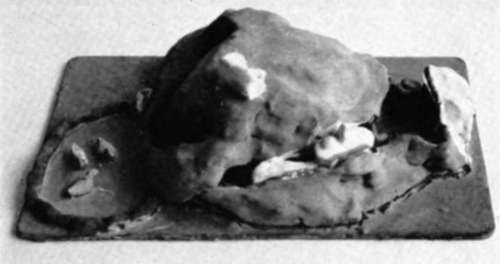
11-year-old. Clay model of a railway
The station is on the right and the train goes round the hill, through the tunnel and by the duckpond (Chapter 8)
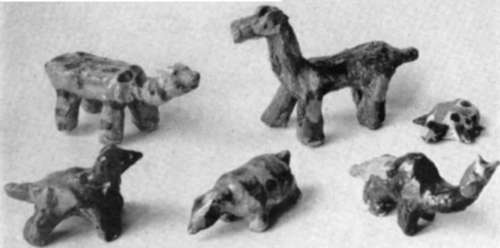
6- and 7-year-olds. Imaginary animals, made in clay and finished with paint and varnish (Chapter 8).
Although we tend to think of needlework principally as a craft for girls, I can see no reason why boys should not be given the opportunity of doing this kind of work, just as I feel that girls should be given the chance to do woodwork. It is, in fact, highly desirable.
Continue to:
My Books

