Puppetry. Part 2
Description
This section is from the book "Arts And Crafts In The Elementary School", by Joan Dean. Also available from Amazon: Arts And Crafts In The Elementary School.
Puppetry. Part 2
Papier mache heads can also be made by the better-known method of modelling in Plasticine and covering the model with layer after layer of thin paper, pasting between each layer, until the paper is strong enough by itself to allow the removal of the Plasticine. This method produces a firm light head, but does take a long time to do, and is too tedious a method for younger children. The pasting of the layers is speeded up if size is used instead of paste. This also allows the finished head to remain rather nearer the original model, for fewer layers of paper are needed and the features of the model are in consequence less obscured. It is also a help to paint each layer after pasting; in this way one can be certain that each layer covers every part of the head. The original model should be very much exaggerated. The Plasticine of the model can usually be removed through the neck, which should not be covered at the base, or a section at the back of the head can be removed with a knife and replaced when the Plasticine has been taken out. Penknives or loops of strong wire are among the best methods of removing it. When the head is finished, a card tube, made to fit the first finger, should be inserted and fixed into position with strips of newspaper.
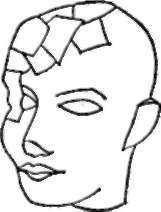
Puppet head modelled in plasticine is covered with a number of layers of small pieces of paper pasted into position.

The piece at the back of the head is replaced when all the plasticine has been removed, and is stuck into place again with small pieces of paper. A cardboard tube is placed in the neck to reinforce it. This, too, should be fixed into position with small pieces of paper.
A variation on the simple glove puppet is the rod-and-glove puppet. This has much better movement and yet it is within the scope of Junior children. The head is made in one of the ways suggested, the neck being either a tube or stick, according to the kind of character the puppet is to portray. The main part of the glove is merely two rectangles of cloth stitched together. The arms are tubes of material with hands at the ends. Through each hand is passed a long piece of stiff wire, or a bicycle spoke. The head and body is then worked with one hand and the arms worked by means of the wires. The waist of the puppet should come at the operator's wrist.
Rod-and-glove puppet
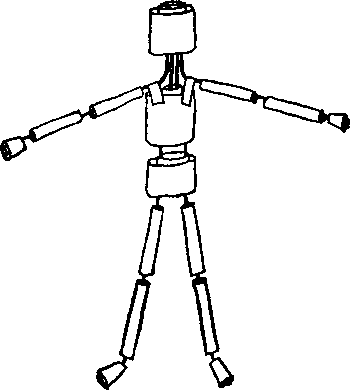
Puppet with legs
Children often ask about making legs for puppets. These are not really necessary for glove puppets, but they can, if required, be made in the following way:
Make two tubes of material, one for each leg, from the same material as the main part of the glove. Pad them slightly and attach them to the glove at the waist. Feet, made either of fabric and padded, or of small pieces of wood covered with material, can be added.
Hands are best omitted at the early stages. Later they can be cut out in cardboard and stitched to the end of the glove, or, better still, cut out of two pieces of material and made part of the glove.
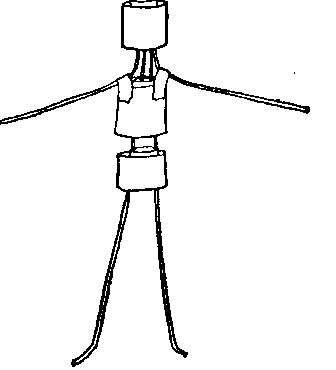
At the top of the Junior school there will be some children who are capable of making and working simple marionettes. There are many ways of making marionettes, but possibly the simplest for school purposes is the marionette made of rolled-up newspaper and tape.
Four strips of tape are needed, two for the marionette's arms, and two, coming from the head, down through the body, to make the legs. They are arranged as in the diagram. Paper is then rolled round the tapes to make the head and body, and then the legs and arms. Legs and arms should be made in three sections, if hands and feet are requiredone section for the upper leg or upper arm, the second for the lower part of the leg or arm, and the third, shorter section, for the hands or feet. The newspaper can be fixed in position by sticking, or tying, or sewing, or a mixture of all three. The puppet is then dressed like a doll. The clothes can be padded here and there if desired to make the figure a more lifelike shape, and a good deal of the modelling of the clothes may, if necessary, be done by pinning, as the pins can be stuck right into the rolled-up paper.

Tapes in position for making a marionette
Making the head and body
Making the legs, feet, hands and arms

Marionette control
When the figure is completed, and dressed, a control is needed. The simplest form of this is a cross of wood. Strings are attached to the head, back and arms of the puppet, and by pulling on these the operator can make the puppet move. To work the legs, a separate piece of wood is needed, which can be fixed to the wooden cross by a hook. The strings should be attached to the legs just above the knees. Many variations on this control can be worked out, but working a marionette is a matter of considerable skill and needs much practice.
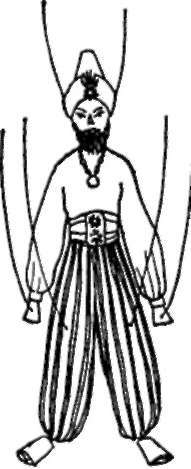
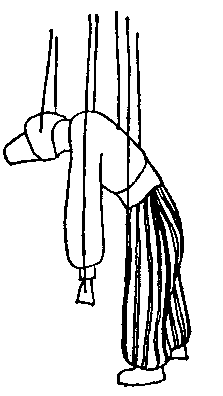
Front and side views of finished marionette with strings attached
Puppets are made to use. Sometimes one becomes so interested in the making of them that one loses sight of this. Whether you set out to do a definite play, with each child making a puppet for a particular character, or whether each child just makes any puppet of his own choice, sooner or later you will need a stage and scenery. If you have the use of a proper puppet stage or can make one, this is ideal, but it seems more important to me to have a stage of some kind as you go along than only to have the opportunity of using a proper stage when all the puppets are finished. Scenery, too, should be undertaken at the same time as the puppets. If you do this, children who finish early can get on with planning and acting plays, inventing some for themselves if the other children in a planned play are not yet ready. It gives everyone an idea of what the end-product is going to be, and the children can see what their puppets are going to look like in action as they make them.

Puppet stage improvised with chairs
If you have no proper puppet stage and do not wish to make one, there are a number of ways of improvising, which give reasonable results. The only really essential part of a puppet stage is that part which hides the actors and creates the illusion. It is perfectly possible, therefore, to use a piano or low cupboard for this purpose. Scenery can be pinned on the wall behind. A stage can also be improvised from two chairs. These are stood on a desk or pair of desks, and a long stick placed across the backs. From this a curtain is draped, hiding the performers. Almost every classroom offers this sort of opportunity for improvising.
Continue to:
My Books

