Puppetry. Part 3
Description
This section is from the book "Arts And Crafts In The Elementary School", by Joan Dean. Also available from Amazon: Arts And Crafts In The Elementary School.
Puppetry. Part 3
Making a wooden puppet stage is, however, by no means beyond the ability of Junior children. A very simple one, which can be placed on a desk, and which folds flat when not in use, can be made as follows:
Take two pieces of wood, each one inch square and four feet long, four pieces one inch square and two feet long, and eight pieces one inch square and three feet long. The plan of the stage and the methods of jointing are shown clearly in the diagrams, although the joints can be fixed with brackets if preferred. The sides of the stage should be covered with material or hardboard. Curtain runners and curtains can be put up, although this will interfere with the folding of the stage. It is probably best to mount the curtains and runners on another piece of wood which can be hooked on to the stage itself.
If you wish to make a full-sized stage, the same methods can be adopted, but you will obviously need thicker wood, and the whole structure will need to be on a larger scale. You will, in particular, need to make a proscenium opening which is high enough to hide a fairly tall child when he is standing. A plan for combining a puppet stage with a Wendy house and shop will be found in the woodwork section.
A stage for marionettes requires a "bridge"a wooden bar, on which the operator can rest his arms at a comfortable height. Once again it is possible to improvise with a plank of wood resting on chairs standing on tables. It is also possible to plan a glove puppet stage which can be used as a marionette stage when turned round, the proscenium opening acting as the bridge. This is usually too narrow for a fmished performance, but the operation of marionettes is so skilled that it is not very likely that Juniors will need more than an improvised stage.

Plan for the three sections of the stage
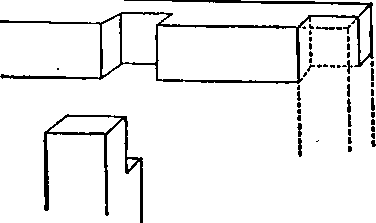
One method of jointing

The finished stage. The three sections are jointed with hinges. The top of the stage can be finished with a piece of hardboard or even with cardboard. The side sections and the parts at the side of the front should be covered with hardboard, cardboard or material. Making a folding glove puppet stage.

Marionette stage improvised from two chairs and a plank.
Whatever stage you use, your scenery will need to be considerably larger than the proscenium opening, otherwise only the members of the audience directly in front of the stage will have a convincing view. With small and improvised stages, scenery can be hung on the wall behind. With a full-sized stage, it can be fixed across the back of the stage (see diagram). If you are hanging your scenery from a wall you will find it easier if you fix each piece of scenery to a ceiling slat or thin wooden batten. A string loop on the scenery then goes over a nail or hook in the wall.
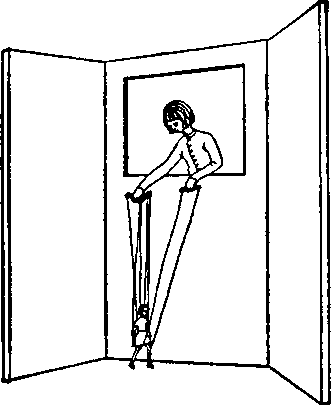
Using a glove puppet stage fox marionettes
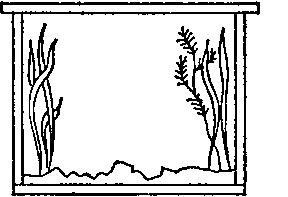
Glove puppet stage with scenery in position

Marionette stages will need the scenery hanging from the bridge itself. It is also necessary with a marionette stage to have small pieces of scenery at each side, so that the puppets can "walk" on and off the stage, without the machinery of their movement being too evident (see p. 94).
Scenery can be painted on all kinds of things, but since it needs to be very large, it must also be strong. One of the most satisfactory materials I have used for scenery has been old blinds. Many schools have a number tucked away which are a relic of wartime. They are usually of strong material and can be used again and again, each successive piece of scenery being sponged off to make way for the next. Sheets of strong wrapping paper are also good. If no other suitable material is available, then a very serviceable background can be made, by pasting numbers of sheets of newspaper together.
Before you start painting, coat your scenery with size. This will prevent paint rubbing off too easily. This is a necessary precaution, because scenery tends to get rather rough handling. Powder colour is perfectly satisfactory for scene painting, but rather extravagant, because a lot is needed. Distemper powder colours from a decorator's are probably cheaper and equally satisfactory, or you can buy proper scene-painting colours from stage suppliers. If you do not wish to paint scenery, some very satisfactory results can be obtained by using collage. This way of producing scenery gives naturally the large simple shapes that are an essential of good scenery.
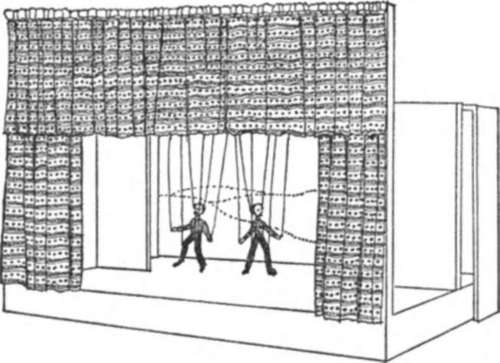
Marionette stage with scenery in position. Notice the provision of "wings" at the sides of the stage to hide exits and entrances.
Although I feel in general that Primary school art and craft work should be carried out in the medium for which it is finally intended, so that, for example, work should not be planned or started in pencil, if it is to be carried out in paint, I think it may be necessary with older Juniors to plan scenery on a small scale first. This is probably a good introduction to the more adult way of working. Scenery is so much larger than the average picture that it is very difficult to envisage it as a whole. A rough plan on a small scale is probably a help, although the finished scenery will almost certainly be nothing like it. If it is at all possible, let the scene painters work where they can get back from their work and see it from a distance. If you have a blackboard and easel, for example, scenery can be pinned to it or hung over it, and the scene painters can be encouraged to retreat to the farthest corner of the classroom to survey their work, at frequent intervals. Start by mapping out the whole scene in chalk or painted lines. Then get the large areas painted, finishing with the details. Puppets and scenery must combine well, so get children to stand in front of it with their puppets from time to time and discuss the relationship of the colours of scenery and puppets. Try to avoid having too many pieces of scenery for one play. Scene changing wastes time.
Just as clear simple shapes are needed in puppets and scenery, so also are they needed for properties. A doll-sized version of the real tiling is often completely ineffective. When considering puppet properties, one must forget about correct size relationships. The property must be big enough for the audience to see what it is. In general, properties are best made of card, paper and papier mache. Remember in planning puppet plays that puppets find it difficult to hand things to each other.
Screen for shadow puppetry

Shadow puppets.
Another kind of puppetry which is well worth a little experiment is shadow puppetry. Make a screen by stretching tracing paper across an old picture frame and hang this in the proscenium opening of your puppet stage. Get the children to make very simple cut-outs of animals or people with one limb jointed as described earlier. Imaginary animals and never-never-land people often produce the most interesting results here. Use these cut-outs to experiment with the silhouettes which can be produced. You will need to do some experimenting with the position of the lighting until you find the best place for it. When the children have grasped the idea and when the lighting is right, try the following:
1. Puppets which have inserts of coloured cellophane.
2. Puppets which are partly made from coloured gelatines.
3. Puppets which have parts of the card cut away and the spaces filled with paper which has been cut into patterns.
4. Scenery which is placed round the edge of the stage and which does not move. It can be made in paper or card, or a mixture of these and of coloured cellophane and gelatines.

Shadow puppets in use

10-year-olds. Puppet characters for children's own play
(Chapter 10)

11-year-old. Tool box
(Chapter 12)

Student's work. Repeating pattern using a number of media. The background was made by dabbing with paint on a dry brush, and the pattern with cut paper, some additions being made in paint (Chapter 13)

Pattern structures. 10-year-old. Irregular pattern made with potatoes (Chapter 13)
Continue to:
My Books

