Paper Folding
Description
This section is from the book "How To Build Games And Toys", by B. W. Pelton. Also available from Amazon: How To Build Games And Toys.
Paper Folding
Throughout the years children of all ages have been amused by folding paper in various ways to produce their own simple toys, especially when other means or materials for entertainment are lacking. In spite of the flood of factory-built playthings which are presently available, this simple form of amusement can become a reliable source of interest under many circumstances.
Paper Aeronautics
Everyone is familiar with the paper glider with which school children (and some of their elders) have harassed teachers and audiences. It is folded from a piece of typewriter paper in the orthodox manner illustrated in Figure 6.4. Nothing novel about that. However, if there is an air-minded uncle or older brother at hand, it is possible that with nothing more complicated than this little paper plane, he can deliver a highly interesting lecture on elementary aerodynamics, with practical illustrative examples.
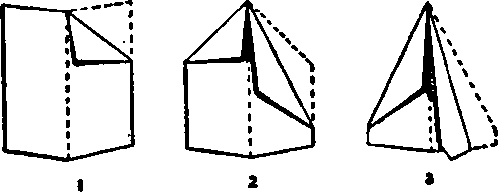
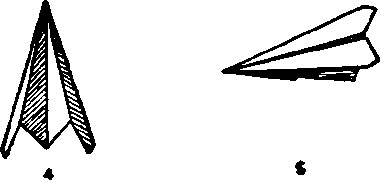
Fig. 6.4. Folding a glider.
For instance, he may fold a plane from the same paper with a wider wing spread which will travel much slower than the slimmer models because of its lower wing loading, which he explains is its weight, divided by the surface area of its wings. Again, by folding the wings downward the model will roll or "barrel" in flight, whereas when they are tilted slightly upward, the dihedral angles thus formed will counteract the tendency to spin and produce lateral stability.

A. FLYING WINS
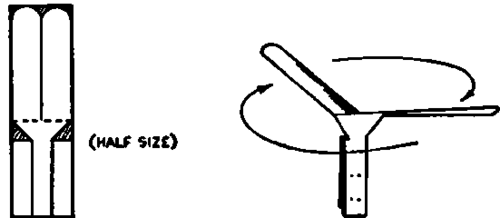
B. HELICOPTER
Fig. 6.5. Paper airplanes.
This will naturally bring up the subject of directional stability, or the ability to maintain a straight course in flying. By bending up the rear edge of one of the glider wings and the other down, the action of the ailerons is simulated, when they are adjusted to cause the plane to circle. Reversing the bends reverses the direction of the circle.
This brings the discussion to the effect of the elevators, which is easily demonstrated by bending both rear edges up, with the result that the air stream will strike their upright surfaces and force the tail down and the nose up. Conversely, the glider will dive when both edges are bent down.
In order to differentiate between the effect of the ailerons as against that of the rudder, an identical glider is folded and its tail bent to the right, causing it to spin to the right. Here is where the aileron takes hold, to correct the effect caused by the rudder which in this case is underneath the wings. After a bit of testing for the proper angle to bend down the rear of the right wing, the model will turn evenly to the right without spinning.
For a comparison of efficiency in the directional stability afforded by the fuselage, Figure 6.5 shows how to fold a "Flying Wing." First square the paper by folding a diagonal to the long side, and cut off the excess length. Then fold it diagonally opposite, followed by a fold down the center in opposite direction, so that the triangular wing can be closed up as in 2. Then follow the diagram.
A few trials may prove the desirability of inserting a partially folded length of paper as a fuselage. Try the effect of bending it downward, then upward. To make the model stay in the air longer, give camber to the wing by pushing in at the tips to separate and curve the wing. Experiment with ailerons, by cutting flaps (6) and bending them down. Further tests with both types of models will not only produce spectacular stunting, but if reasoned out correctly, will afford an easy introduction to some of the principles of aerodynamics.
Before quitting this fascinating modem subject, we might as well please the younger airmen with an easy-to-make helicopter. From light cardboard or stiff paper 11/4in. wide by 43/8 in. long or larger, cut away the shaded portions indicated in B. The blades are then bent down horizontally in opposite directions and the body weighted by folding back the two sides and stapling them together. Released from a height, the rotating blades will check its descent with the windmill action of a real helicopter.
Continue to:
My Books

