III. Box Problems
Description
This section is from the book "Paper and Cardboard Construction", by G. F. Buxton, F. L. Curran. Also available from Amazon: Paper and cardboard construction.
III. Box Problems
In the selection of problems for elementary construction in paper and cardboard, the small box takes a place second only to the booklet. Both are important industrially and both furnish good drill in the careful manipulation of tools and material. The increased use of the box as a method of handling goods for the market, and the great variety of boxes used, show the value of the field for school purposes.
Many uses of the box occur to the live teacher. The collection of materials for science, the storage of small supplies, the planting of seeds, exhibits of illustrative material of many kinds, and the meeting of temporary needs as they appear, all furnish interesting connections between the hand work processes and the uses of box problems. Special shapes and types of construction not illustrated in this chapter will be needed, but the drawings and directions may be of service in making these adaptations.
It is obvious in public school classes, especially in the lower grades, that simple hand processes where the pupil makes the entire project from beginning to end, must form the basis for a course in elementary construction.
It is desirable, however, that common factory methods of box making be illustrated and described, and, if possible, a few pieces of work turned out by a modification of this duplicating process.
The arrangement of box problems by grades with kinds of material to be used, is as follows:
121 Square box (Thin tag board). 122. Square tray (Medium tag board). 123 Rectangular tray (Heavy tag board).

First Problems In Box Making Box Problems.
221 Small square box (Box board).
222 Rectangular open box (Box board).
223 Box with reinforced corners (Box board).
321 Covered small box (Box board and plain cover paper).
322 Pencil box with fitted cover (Box board, plain cover paper, manila wrapping paper).
323 Candy box (Folding bristol).
324 Folding box (Folding bristol).
Fourth Grade
421 Pin box with cover (Box board and plain cover paper).
422 Post card box (Box board).
423 Original box (Thin strawboard, plain cover paper, rough cover paper).
424 Pen box (Strawboard, box board, plain cover paper, marble paper).
425 Sliding box (Box board, cover paper).
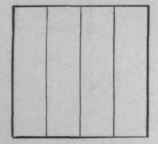
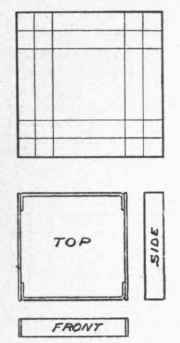
121. Square Box.
Thin tag board, 1 piece, 9'x 9".
Glue or paste.
Scissors.
Tag Board.
9"x 9"
Creased And Cut.

Partly Folded.
Box Complete.
Directions: a. Fold upper right corner to upper left corner, crease and open.
b. Fold upper right corner to center of top, crease and open.
c. Fold upper left corner to center of top, crease and open.
d. Fold lower left corner to upper left corner, crease and open.
e. Fold lower left corner to center of left edge, crease and open.
f. Fold upper left corner to center of left edge, crease and open.
g. Cut as indicated by dark lines.
h. Fold laps inside of box and paste or glue to ends.
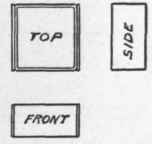
Note: - As this box is too flimsy for most uses, it is well to repeat the problem with thicker tag board, if time permits. By cutting and folding as shown below, a cubical box may be made for further practice. While paste may be found easier to use, glue is much more satisfactory if properly handled. It may be found more convenient to secure stock 8"x 8" in place of 9"x9".
Medium tag board, I piece, 6"x 6".
Glue or paste.
Scissors.

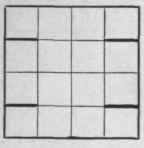
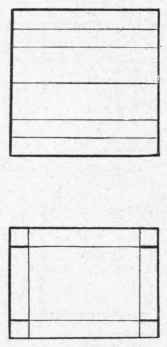
Showing Folds And Cuts.

Front And Back Folded Up.
Tray Complete.
Directions: a. Fold right to left and open.
b. Fold right and left to center and open.
c. Fold bottom to top and open.
d. Fold bottom and top to center and open.
e. Fold right edge to right crease, left edge to left crease, bottom edge to bottom crease, top edge to top crease, opening after each folding.
f. Cut as indicated by heavy lines.
g. Fold laps up at right angles.
h. Fold bottom and top edges up to make front and back of tray. i. Fold ends up and glue or paste to laps.
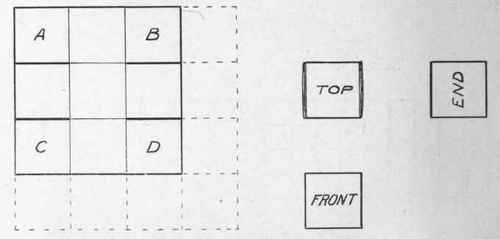
123. Rectangular Tray.
Medium tag board, 1 piece, 4"x 4".
Glue or paste.
Scissors.
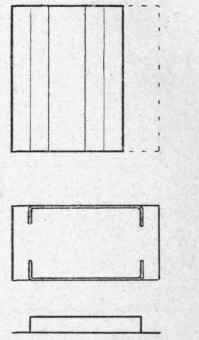

Steps In Making Rectangular Tray.
Directions: a. Fold bottom to top, bottom to center, bottom to bottom crease, and open.
b. Fold top to center, top to top crease, and open. When opened flat it will look like the first drawing.
c. Fold left to right edge, left to center, left to left crease, and open.
d. Fold right to center, and cut along new crease with scissors. Dotted line in second drawing shows part removed.
e. Fold cut edge to old center, as shown in second drawing. When opened flat this will look like the third drawing.
f. Cut along heavy lines for laps. Shown in fourth drawing.
Continue to:
My Books

