V. Envelope Problems. Part 2
Description
This section is from the book "Paper and Cardboard Construction", by G. F. Buxton, F. L. Curran. Also available from Amazon: Paper and cardboard construction.
V. Envelope Problems. Part 2

Paper Bag Cut To Size Envelope Problems b. Fold the left edge to within about one inch of the right edge and crease.
c. Fold the remaining one inch to the left and crease.
d. Fold the bottom up about one inch and crease.
e. Open the whole sheet and cut away the parts as shown in the drawing.
f. Refold in the same order and paste the laps on the outside.
Note: - If desired, small notches may be cut in the top edge after it is pasted to give a closer resemblance to the usual form.

Paper Bags.
242. Mailing Envelope.
Bond paper or flat writing-paper, 1 piece, 9"x 12".
Paste.
Rule, pencil, scissors.

Envelope Cut To Size.

Envelope Folded.
Directions: a. With the sheet on desk and long edges in horizontal position, lay out as indicated in drawing. The following order is suggested:
(1) Locate and draw horizontal lines, making measurements from the bottom of the sheet.
(2) Locate and draw vertical lines, making measurements from left edge of sheet.
(3) Locate and draw slanting lines.
b. Call attention to all cutting lines and consider shape.
c. Cut to lines.
d. Fold on light lines.
e. Consider final shape.
f. Paste end laps.
g. Paste bottom lap.
243. Long Mailing Envelope.
Bond paper, 1 piece, 9"x 12".
Paste.
Rule, pencil, scissors.

Envelope Cut To Size.
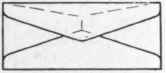
Envelope Folded.
Directions: a. Lay out in same manner as 242. Do not consider rounded corners until whole problem is laid out in straight lines.
b. Lay out rounded corners with pencil without measurements. The teacher should show on the blackboard how much the corners are to be rounded.
c. Cut to shape.
d. Fold and paste as in 242.
341. Photo Filing Envelope.
Light or medium tag board, 1 piece, 6"x 9".
Glue.
Rule, pencil, scissors.
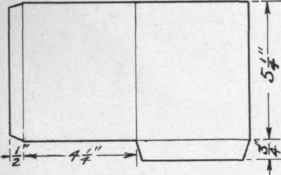
Photo Filing Envelope.
Directions: a. Locate and draw lines for folds as indicated in the drawing, - the first 1/2" and the second 4 3/4" from the left edge.
b. Locate and draw a line 3/4" from the bottom edge and parallel to it.
c. Draw the short slant lines as indicated.
Mailing And Filing Envelopes Envelope Problems d. Consider the shape to which the material is to be cut.
e. Cut on lines indicated.
f. Fold on light lines and consider final appearance.
g. Spread glue on laps and press firmly in place.
Note: - The bottom should be folded up on the outside, while the lap on the side may be folded either on the inside or on the outside. This envelope is suitable for filing 4"x 5" dry plates or films or unmounted photographs. Mounted photographs not over 4 1/8"x 5 1/8" can be filed comfortably in an envelope of this size.
342. Long Filing Envelope.
Medium weight tag board, 1 piece, 6"x 9".
Glue.
Rule, pencil, compass, scissors.

Long Filing Envelope.
Directions: a. Lay out lines for folds and cuts according to dimensions on the drawing. The order of procedure is suggested by directions in number 341.
b. Draw center line as shown in drawing.
c. With compass set at 1 1/4" radius describe an arc as shown at A. The center for this arc will be outside the sheet of tag board and any piece of waste paper may be used on which to extend the center line. The location of this center may be determined by the pupil.
d. Cut, fold, and glue in same manner as in number 341.
343. Large Filing Envelope.
Medium or heavy tag board, 1 piece, 9"x 12".
Glue.
Rule, pencil, scissors.

Large Filing Envelope.
Directions: a. Place the sheet of tag board on the desk with the short edges in a horizontal position.
b. Begin at left edge and make measurements on both top and bottom as follows,-2 1/8" from left edge, 4 1/4" from last point located, then 2 1/2" from last point.
c. Draw vertical lines thru these points.
d. In the same manner locate and draw the horizontal lines.
e. Locate points and draw lines for the slanting cuts.
f. Consider final shape before cutting.
g. Cut to shape indicated by heavy lines. h. Fold on light lines.
i. Consider the construction of the finished envelope as shown in the second drawing. j. Apply a thin coat of glue to the laps and press firmly in place. The top lap is left without gluing.

Envelopes.
441. Paper Bag with Folds.
Thin cover paper, I piece, 9"x 12".
Paste.
Rule, pencil, scissors.
Directions: a. Place the sheet on the desk with the long edges in a horizontal position.
b. Measure from lower left corner to right 4 1/2" and fold left edge to this point.
c. Measure from lower right corner to left 8 1/4" and fold right edge to this point, x represents the end view when folded. d. Paste the lap from end to end.
Continue to:
My Books

