260. Example Of Making A Small Mould
Description
This section is from the book "An Elementary Outline Of Mechanical Processes", by G. W. Danforth. Also available from Amazon: An elementary outline of mechanical processes.
260. Example Of Making A Small Mould
The work of making a mould of the pattern in Fig. 108 is here given briefly to show the essential steps in sequence. This is applicable in general to green sand and dry sand work. The completed mould is shown in Fig. 118.
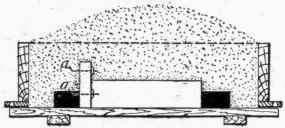
Fig. 123.
Having selected a suitable flask, place one-half of the pattern on the bottom board, as shown in Fig. 123. Place the drag bottom side up on the board, and sift about a half inch of facing sand over the surface of the pattern, then fill the drag heaping full from the pile of moulding sand, sifting part of it in. Earn this sand down firmly, but not too hard, and level it off even with the top edge of the flask by rubbing the sand surface with another bottom board, then lift the board and use the vent wire to probe several vent holes which will reach all parts of the pattern's surface. Dig down with the small trowel carefully until the wires aa can be reached and drawn out. Replace this sand and probe a few vent holes through it. Replacing the upper bottom board, turn the drag over and remove the other board, which is now on top.
The drag now rests right side up, as shown in Fig. 124. Place the cope and the other half of the pattern in position, as shown, and stick a riser stick R slightly into the sand, about 2 inches from the pattern. Sprinkle a layer of parting sand over the parting to keep the sand of the cope and that of the drag from sticking together. The cope is now filled, rammed, and otherwise prepared, as was described for the drag. The riser stick S is placed on the upper edge of the flange when there is enough sand in the cope to hold it up, and both sticks are withdrawn after the cope is vented.
When the cope is rammed and vented, lift it from the drag and remove the pattern by using the lifting screw. Rap it a few times to loosen the pattern before lifting. A little water squeezed from a swab around the edges of the pattern will help hold the sand in place. Patch the broken corners of the mould, cut the gate with a piece of bent tin, lift out any loose sand, and dust the mould surface with graphite or other dry facing.
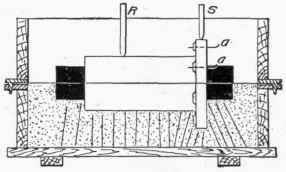
Fig. 124.
In the meantime the core-maker makes the core. The core box, shown in Fig. 111, is clamped and gradually rammed full of core sand. Two wires are rammed in with the sand along the axis of the core. One of these remains in the core to strengthen it, and the other is removed when the core is rammed up to leave a vent hole.
The core must be carefully removed from the box. It rests on some loose sand placed on an iron plate, and is slowly baked in the core oven. Cores are usually sprinkled with molasses water to make them more flinty when baked.
When the core is taken from the oven and cleaned, it is placed in its bearings in the drag, and the mould is closed and weighted ready for pouring.
Continue to:
My Books

