Chapter 5. Surface Finishing
Description
This section is from the book "Do It Yourself With Aluminum. 125 Projects For The Home Craftsman", by G. W. Birdsall. Also available from Amazon: Do It Yourself With Aluminum.
Chapter 5. Surface Finishing
Natural Finish
All aluminum is covered with a film of aluminum oxide which protects the underlying metal so that aluminum needs no paint or other coating to shield it from the weather. This is why bare aluminum will not rust away as does iron and steel.
Also this naturally bright, attractive finish of aluminum is usually preferred for most projects although aluminum will take a wide variety of mechanical, chemical, and even paint finishes where desired to match other surfaces.
To preserve aluminum's natural finish, clean the surface mechanically, as detailed below, and then apply wax, producing a long-lasting finish that will not pick up finger marks or dirt.
Cleaning
Before applying any finish, free the aluminum surface of heavy accumulations of dirt, dust, grease, or grime by rubbing hard with a clean cloth. Sandpapering and rubbing with steel wool or a wire brush will also clean the surface mechanically.
To make paint, lacquer, or varnish stick to aluminum, a chemically clean surface is required. Even a fingerprint will prevent proper adhesion. So before painting, the mechanically cleaned surfaces must be cleaned chemically by scrubbing with naphtha, dry-cleaning fluid, mineral spirits, lacquer thinner, or any product recommended by your paint store for preparing aluminum surfaces for paint. Then paint without further handling, using care to avoid touching the clean surface with the bare fingers.
Wax
Any aluminum surface shows finger marks readily. To avoid finger marking, apply a coat of paste wax after mechanically cleaning the surface. Let dry 10 minutes, and polish with a clean dry cloth. A wax finish will protect and enhance the appearance of any mechanical finish described below.
Lacquer
Clear automotive lacquer may be used in a similar manner to retain the original high luster of polished aluminum. First spray on a mist coat. When dry, apply a heavier coating. Tinted lacquers supply exceptionally attractive effects over aluminum. Be sure the surface is chemically clean before lacquering.
Paint
Where the aluminum may be subjected to severely corrosive conditions such as continuous outdoor exposure to salt spray along the seacoast, protecting with clear lacquer, aluminum paint, or a heavy coat of wax is recommended. If any aluminum surfaces outdoors (lawn furniture, screens, or storm windows) develop pits from corrosive attack, clean the surfaces thoroughly and apply a clear lacquer designed for outdoor service. Or paint them with an aluminum paint designed for outdoor service.
Of course, any color of paint or enamel can be used effectively with aluminum for a particular color scheme. Just be sure the aluminum surfaces are chemically clean. If possible, use a surface preparation especially recommended for aluminum before applying the paint.
Mech anical Finishes are easiest to apply and produce striking effects with aluminum. Here are some of the best:
Polishing
Use cloth buffing wheel at peripheral speed of 7,000 feet per minute with tripoli powder mixed with grease binder applied to wheel as the abrasive clement. Apply light pressure. For highest gloss, follow with open muslin huff at 8,000 feet per minute, using a softer silicon abrasive compound and extremely light pressure.
For hand polishing, use automobile body rubbing compound or pumice stone and oil.
Satin Finish
Ruh with fine steel wool, fine emery cloth, or sandpaper. Rub back and forth in one direction only. Wear plain cotton gloves to avoid finger marking while finishing. This will give a high gloss and even finish. To prevent finger marking, apply wax as above.
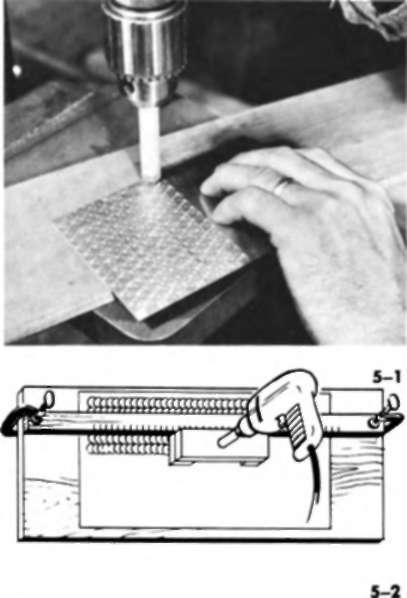
Damascene or Watch-case Finish (Fig. 5-1) is possibly the most beautiful of all the mechanical finishes. It is also known as an engine finish or sun-swirl finish. It is easy to make on plain aluminum sheet using a drill press fitted with a tool made as shown .... a 1/2" dowel rod with a soft rubber tip covered with fine emery cloth. Set drill press for slowest speed of tool. Touch work lightly. For the straight formal pattern shown, make contact in series of spots spaced 1/4" apart in a straight line. Then make next line overlap first by
To do this work with a portable electric drill, the dowel tool must be fitted with a 1/4" shank by drilling the 1/2' dowel and inserting a shank or by reducing the 1/2" dowel to 1/4" with a wood rasp or with a bench saw as in Fig. 4-16.
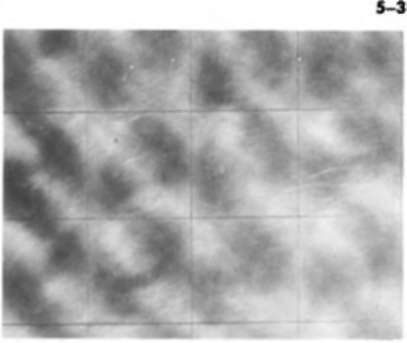
Next make the saddle block shown in Fig. 5-2, and drill a 33/64" diameter hole to take the dowel tool. Cut a straight edge 1" x 2" to the length desired for the setup (Fig. 5-2). Mark off front edge with 1/4" marks. Now ride saddle block against straight edge, and make row of spots spaced 1/4" apart along straight edge. Move straight edge 1/4" clamp, and make next row of spots.
Geometric Designs
Figures 5-3 and 5-4 illustrate two novel mechanical finishes
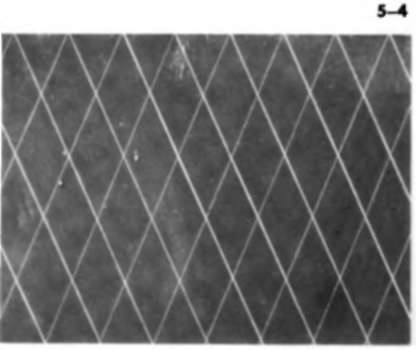
5-5 built around a geometric design. Figure 5-3 is ruled off in 2" squares, using a sharp nail or scriber to make a fairly deep mark. Use uniform pressure so lines themselves will be uniform. Hold scriber at right angles to straight edge, and tilt top slightly in direction of movement.
Now cut out a 2" square in heavy cardboard to use as a mask. Place this hole over each square, one at a time, and rub with medium-coarse steel wool in a circular motion. Result is series of swirl patterns inclosed in individual squares.
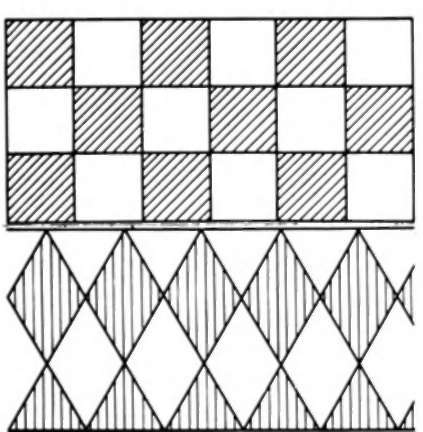
Another geometric design is the diamond (Fig. 5-4). Space off 1" marks along edge of sheet; then scribe a series of lines at a 60° angle up to the right and another series up to the left. They intersect to make the diamond pattern.
Squares, diamonds, and other designs may be enhanced further by graining alternate rows as in Fig. 5-5.
Fig. 5-6.
Rotary Sanding
Many novel surface designs are easily produced with motor-driven sanders and rotary electric tool sets.
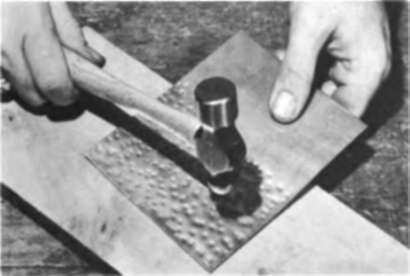
Ball Peening
Hammer plain sheet with small ball peen hammer with scrap wood hacking (Fig. 5-6). Use soft wood for deep effects, hard wood for shallow effects. Hammer with a steel plate backup to create a different effect. For a "leaf" design, use the flat portion of the hammer head.
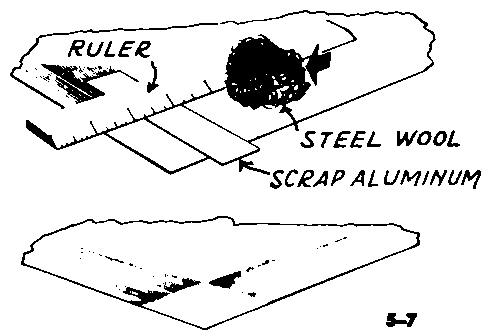
Design Graining
By graining (rubbing with coarse steel wool) various portions of a surface in different directions, a variety of surface designs can easily be created, using just a straightedge (ruler) as illustrated in Fig. 5-7.
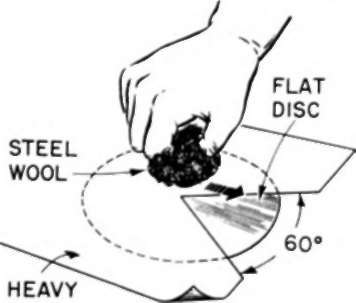
Figure 5-8 shows how to use a simple stencil to decorate a circular item. Grain one segment, then move stencil and grain next segment, etc. This makes a safe substitute for acid etching for many projects.
Fig. 5-8.

Continue to:
My Books

