Tube Connections. Part 3
Description
This section is from the book "Do It Yourself With Aluminum. 125 Projects For The Home Craftsman", by G. W. Birdsall. Also available from Amazon: Do It Yourself With Aluminum.
Tube Connections. Part 3
Hose-To-Tube Coupling
Figure 4-81 shows how to drive a standard hose connection into a piece of 3/4" tube, using a wood dowel rod to prevent damage to the coupling. This connection is handy for sprinklers, scrub-down brushes, and the like.
Sliding Doors can easily be inserted and removed if made from 1/8" thick tempered Masonite and set into 3/16" wide slots as shown in Fig. 4-82. Note that bottom slots are only 1/4" deep while top slots are 1/2" or 5/8". This allows door to be fitted into opening by inserting top of door into upper slot full depth, which then provides sufficient clearance to permit door to be placed in lower slot without falling out of opening. Here, cut door to height equal to distance between shelves plus 3/8".
Where shelves are 3/4" thick plywood and have sliding doors above and below them, reduce depth of slots to 1/8" for lower, 3/8" for upper. Door height then becomes distance between shelves plus If height of door opening is 1' or less, it may be necessary to cut upper slots slightly wider to provide sufficient clearance for easily inserting the doors in place.
Suspended Drawer Slides
To mount drawers underneath shelves or cabinets, form up a piece of plain aluminum sheet as shown in Fig. 4-83 and screw to underside of shelf or other support. Then cut slots in outside faces of drawers to fit into these slides. The result is a neat, handy drawer arrangement. Drawers can be placed close together by installing drawer slides back to back.
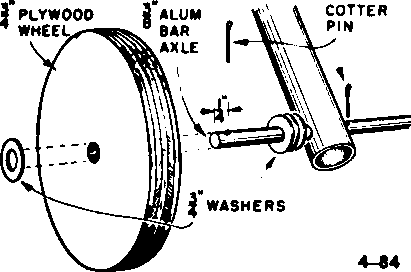
Wheel-and-axle Set (Fig. 4-84) makes projects easy to move about. Axle of 3/8" rod is readily attached to tube framework of serving cart and can be made any length required. The 3/4" thick plywood wheels are 4" to 6" in diameter. To seal against the weather where outdoor use is anticipated, seal the wood wheels with three or four coats of thin shellac. Then apply aluminum paint.
Cementing
When large areas of aluminum sheet are applied over a solid surface as on table tops, desk tops, and the like, it is best to cement the entire aluminum panel down solid to avoid projecting screwheads, rivetheads, or nailheads.
Also this prevents puncturing the sheet and thus keeps it intact to prevent leakage. Too, cementing prevents "oil canning" .... the same effect produced when squeezing the bottom of an oil can.
Aluminum, like all other metals, has no pores for the cement to attach into mechanically. To give the cement every possible chance to stick to the aluminum, roughen the surface with coarse emery cloth or sandpaper. This helps provide "teeth" into which the cement can "key," or anchor, itself.
Next, carefully clean off all dirt, grease, and grime by scrubbing with naphtha or dry-cleaning fluid. Likewise, see that the wood or other surface is clean. Apply cement to both surfaces, allow to partially set, and then squeeze the two surfaces together, maintaining the pressure until set. Be sure to follow detailed instructions of the maker of the cement you use.
For aluminum, a cement that remains partially "wet" is required because a hard-drying cement may break loose owing to the larger expansion and contraction characteristic of aluminum. Cements that remain tacky and so are recommended for use with aluminum include "Mastic #7 Tuff-Bond" (Goodloe E. Moore Co., Inc.) and "M-3 Cement" (Minnesota Mining & Mfg. Co.).
Soldering Aluminum is only recommended where the joint carries no mechanical load. Soldering is primarily for sealing a riveted, bolted, or mechanically interlocked joint such as Fig. 4-5 or 4-7.
Soldering must always be done with solder and flux especially designed for use with aluminum because this metal differs from other common metals in that it is always covered with a thin glass-like layer of aluminum oxide when exposed to air.
Ordinary soldering fluxes will not remove this oxide layer. So it is necessary to use a special flux designed for this particular work. Follow the maker's instructions to the letter. Most fluxes are designed to work with a particular solder. Be sure to use the recommended solder. Before soldering, always clean the work with sandpaper, steel wool, or a wire brush to remove all dirt, grease, and heavy oxide.
Aluminum fluxes and solders operate at temperatures up to 700 °F instead of the 400-600°F range of common solders. This means the work must be heated to a higher temperature range. But aluminum conducts heat away from the soldering point rapidly so that a large heat input thus is required .... much higher than available from the usual electric soldering iron. Even a 250-watt electric soldering gun will heat only small thin pieces of aluminum. Use an alcohol, gas, or gasoline torch for all aluminum soldering.
These heat requirements also make it impracticable to solder large or thick aluminum parts. So avoid attempting to solder aluminum rods and bars. Do-It-Yourself Aluminum sheet can be soldered without trouble with a little practice.
In general, there are three different types of aluminum soldering methods: The "friction" method involves covering the surface of the metal at the joint with a layer of molten solder and then abrading the surface down through this layer, using a sharp-pointed instrument or a wire brush to remove the oxide layer. The molten solder cover protects the aluminum surface laid bare so that the solder may bond to it. This abrading must be done carefully to assure that a sufficient portion of the area is "tinned."
In the second method .... "flow" soldering .... the flux employed chemically attacks and removes the oxide layer so that the solder can bond directly to the aluminum surface. A good flux and solder of this type will usually permit soldering with less difficulty than the first method.
In the third method, a new flux (called a "reaction" type) is employed which chemically reacts at the soldering temperature to deposit a layer of tin on the aluminum. Once covered with tin, it is easy to solder the aluminum.
Remember that the work must be brought up to temperature. So apply the torch flame to the work, preferably to the back or underside so that the flame does not play directly against the flux or solder. The flux will change appearance, fume, or smoke when the correct temperature is reached. Maintain work temperature while applying solder to tin the work surface.
After work surfaces are tinned, place them in position and flow additional solder in to complete the joint, being careful to apply the heat to the work, not to the solder itself.
Continue to:
My Books

