Tube Connections. Part 2
Description
This section is from the book "Do It Yourself With Aluminum. 125 Projects For The Home Craftsman", by G. W. Birdsall. Also available from Amazon: Do It Yourself With Aluminum.
Tube Connections. Part 2
End-To-End Joints
To connect two tubes of the same size permanently, join with an internal sleeve as detailed above and secure to both tubes with self-tapping sheet-metal screws (Fig. 4-63). Or connect with a 4" to 6" length of wood dowel rod. Drive part way in end of tube. Screw through tube into dowel. Then drive remainder of dowel into end of second tube and secure with screw.

T-Connections
For joining tube to tube (Fig. 4-64), drive wood dowel into end of one member and screw through top T-member into it as shown. Lock dowel into first member with self-tapping screw.
To make end of dowel and tube fit contour of second member precisely, use a jig (Fig. 4-65). Drill holes all the way through 2 x 4's for both T-members to the size of tube being used. Cut off top of jig on center line through top hole as shown. Drive dowel into tube end, and cut exact contour with scroll saw as shown.
In another method (Fig. 4-66) cut hole in top member of T to take second member which is inserted in first as shown and then locked with a through bolt, a pin, or self-tapping sheet-metal screws set in at an angle close to point where second member enters top member. Figure 4-67 shows how to cut hole required, using scooping action. Finish with rattail file to exact size and contour required.
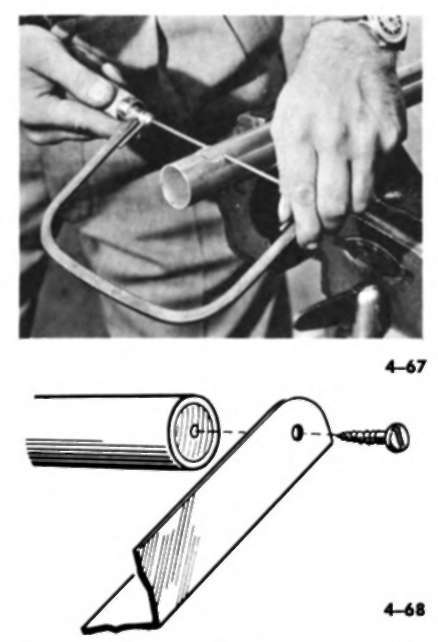
For tube to bar or angle, drive wood dowel in tube end and use wood screw as shown in Fig. 4-68. For maximum strength, use expanding slotted dowel and bolt as in Fig. 4-69.
Tube To Sheet
Hem edge of sheet (Fig. 3-5), and attach to tube with self-tapping screws, either on top or wrapping the sheet around tube and screwing underneath as in Fig. 425. Or slot tube on bench saw. Insert hemmed edge, and secure with self-tapping screws or through bolts (Fig. 4-70). Or drive a wood dowel rod lengthwise through tube to lock sheet into slot. In the latter case, do not hem sheet edge.


Tube-bar Joint (Fig. 4-71) has bar fitted into slot in tube made by drilling row of holes and smoothing with a flat file. If bar is notched as shown, joint is easily disconnected. For permanent connection, bolt clear through tube and bar.
Tube-To-Wood Joint
By notching the tube as shown in Fig. 4-72 to make a keyhole-type slot, the tube is made to engage a round-head wood screw set in the bottom of the V-cut edge of a wood panel. Adjust the depth of wood screw so that tube can be driven on. Wood stretchers between table legs often employ this joint.

Leveling Screw, Boltheads
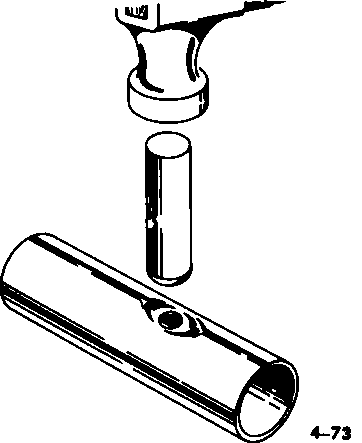
The appearance of tube connections is greatly improved by setting down screwheads or boltheads so they do not project above the tube surface. Round off the end of a 2" length of 1/2" dowel rod, and use as an indenter (Fig. 4-73). Drill the screw or bolt hole first, and use the hole to position the indenter. Hold it directly in line with hole, and strike the indenter squarely with hammer.
For best results, support tube in a jig made by cutting a slot the same width and depth as the tube in a 2 x 4. This will prevent tube from distorting, even under repeated blows of indenter.

Tube Shelf Support
Where a tube-and-angle frame supports wood shelving, use the design shown in Fig. 4-74. Bolthead is set below surface of tube by indenting (Fig. 4-73). Nut is hidden by a notch in end of shelf. Small flat-head wood screws up through countersunk holes in horizontal leg of the angle secure the shelf.
Edging Openings With Tube
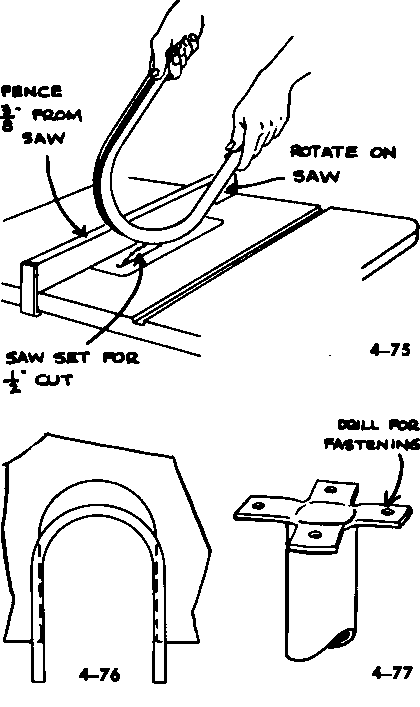
Edge the entrance to doghouse or any other opening in sheet as follows: Bend 3/4" tube to contour of opening. Then rotate tube against bench saw as shown in Fig. 475. This slits the outside of tube, allowing it to slide into opening in the sheet (Fig. 4-76).
Tube To Flat Base
To attach a 11/4" tube to a flat object, drill four 1/4" diameter holes equally spaced around the tube and down 11/2" or 2" from the end. Saw slots to edge of these holes, bend down the tabs so formed, flatten them, and drill for fastening (Fig. 477).

Tube To Wall
For clothes-closet rods and similar uses, tube can be attached endwise to wall surfaces by using wood blocks (Fig. 4-78). The U-shaped block permits easy removal of tube by just lifting that end.
To attach a length of tube parallel to a wall for a stair rail or similar use, make a bracket to go around the tube or underneath the tube as in Fig. 4-79. In the latter case, attach brackets to tube before mounting to wall. Insert nuts through open tube end. Brackets are 3/4" bar.
Tube Legs For Box Sections
To put tube legs on sheet-metal box sections such as planters, flower boxes, and magazine racks, turn in a 1/4" flange on the edges of the sheet to be attached to the leg, then interlock these flanges as shown in Fig. 4-80 and drive self-tapping sheet-metal screws through the interlocking corner into the tube forming the legs. This not only locks the corner of the box but assures a firm connection to the leg. Install a screw every 11/2" or 2" along the leg.

Continue to:
My Books

