Projects For Home Improvement. Part 2
Description
This section is from the book "Do It Yourself With Aluminum. 125 Projects For The Home Craftsman", by G. W. Birdsall. Also available from Amazon: Do It Yourself With Aluminum.
Projects For Home Improvement. Part 2
Screen Porch Or Breezeway
Any porch can easily be screened in completely with Do-It-Yourself screen sections. Divide porch or breezeway sides into panels 24" or 36" wide. Install 2" x 4" frames edgewise, per Fig. 13-6 and rabbet outer corners 7/16" deep, wide, to take the screen frames. Turn buttons made from 2" lengths of 1/8" x 3/4" bar lock the screen panels into the wood frames. For full height screens, install a horizontal rail all around the porch at 30" height. Then use screens below and another set above rail.
Fig. 13-4.
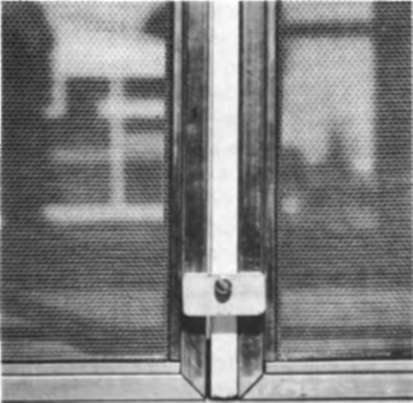
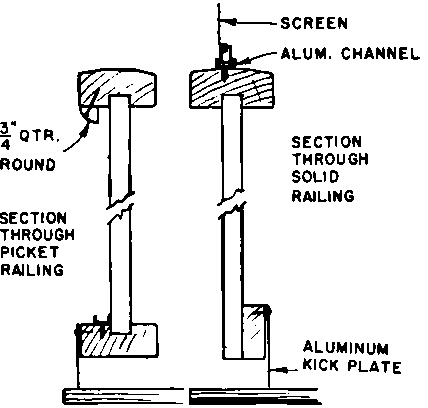
Fig. 13-7.
For stub-wall porches with picket railings, set 3/4" quarter-round under top rail and channel on top bottom rail as at left (Fig. 13-7) for holding screen panels. Screw on strips of embossed sheet to lower rail to close opening to floor. Install an aluminum channel along the top of the upper rail to receive screen panels. Use vertical meeting rails of 2" x 4" every 36" (or less as needed to make equal panel sizes).
Storm Windows
Do-It-Yourself Aluminum racks offer two ways of making storm windows and storm-door closures .... with glass or with sheets of clear plastic. The racks also contain detailed free instruction sheets for both materials, so there is no need to repeat directions here. One frame member is joined at corners with bolts; the other, with clips pushed into the hollow member. Both types are simple and easy to make.
Storm Doors
Any screen door is easily converted into a weatherproof storm door by installing panels carrying a sheet of clear plastic in an aluminum frame . . . . made exactly the same way as storm windows described fully in instruction sheets available free at the Do-It-Yourself Aluminum racks.
Push Rods to save screen doors are easily made of 3/4" or 1" tube, bent down and flattened at each end for screwing to door frame.
Screen-Door Brace
To keep screen doors from sagging and sticking, cut a length of 1/8" x 3/4" bar and attach it diagonally from the lower outside corner of screen door up at a 45° angle to the opposite side of screen door. Insert three round-head wood screws in each end to anchor securely. Wedge up outer edge of door when installing the brace on a door already sagging and sticking.
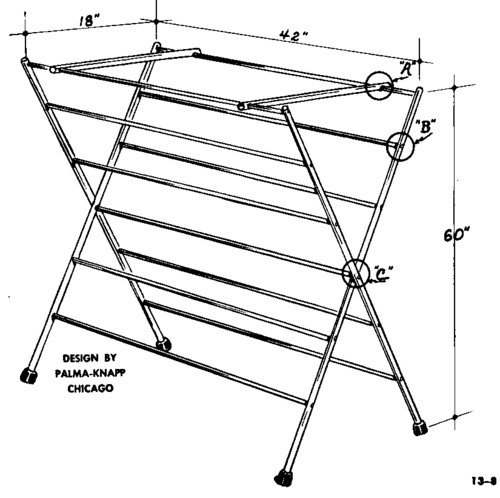
Folding Clothes Rack (Fig. 13-8) uses for the legs four 65" long pieces of 3/4" tube and two 20" lengths for the top crosspieces. The other 11 pieces are 3/8" rod, six cut 431/2" long and five cut 42" long. Prepare these rods for assembly by reducing a 1/4" section at both ends of all 11 rods to ;diameter, per Fig. 4-16.
Prepare legs to receive them by drilling a 3/16" hole 1" from the top end clear through leg. Then follow by enlarging the hole on the inside of the leg to 3/8" diameter with a drill of that size. Now insert end of one rod, and upset outer end to make a solid riveted connection, per Fig. 4-21. Notice that the five short rods go on "inside" legs, the six long ones on the "outside" legs. Now measure down 10", and make connection at "B" in the same manner. All other rods are tied into the legs in the same manner except the center one at "C."
Here a 3/8" hole is drilled clear through the inside leg as well, so the rod is riveted to the outside leg only. This allows the rack to be folded without twisting any of the connections. Two top crossbars (3/4" tube) have 3/8" holes drilled 1" in from one end. Be sure to slide these tubes onto top bar before end-riveting that bar into the two legs. At the other end of these crossbars, saw a notch in the bottom to latch into the top rod at "A." Add rubber crutch tips to the feet to complete the unit.
Storage Shelves
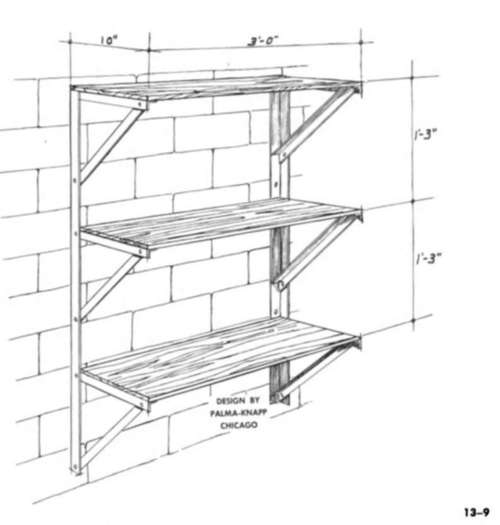
Figure 13-9 shows a method of attaching a series of shelves to basement wall, garage, back porch, or any other spot where some wall space may be available. Use 1/8 x 3/4" x 3/4" angle for the supporting framework. If the wall is masonry, use a Stellite drill in a portable electric drill or make holes by hand with star chisel and hammer. Insert expanding lead sleeves or other masonry attachment device available at your local hardware store.
Continue to:
My Books

