Projects For Home Improvement. Part 3
Description
This section is from the book "Do It Yourself With Aluminum. 125 Projects For The Home Craftsman", by G. W. Birdsall. Also available from Amazon: Do It Yourself With Aluminum.
Projects For Home Improvement. Part 3
Stepladder (Fig. 13-10) offers amazing lightness yet ample strength when made of 1/8" x 3/4" x 3/4" angle, tube, and 1/8" x 3/4" bar as marked on the drawing. Individual steps are 12" long, 5" deep, supported underneath the front edge by an angle riveted to side frame members. Start this project by cutting the top step 10" x 15" from 3/4" plywood. Cut an 18" length of 1/4" x 1" bar, turn down 11/2" at each end, and screw to underside of top. Attach the back legs, 6' lengths of 3/4" tube, to this bracket with bolts, using two nuts locked against each other to permit movement of leg against bracket.
Assemble each side frame from two 6' lengths of 3/4" angle with 5" long stretchers at extreme top and bottom, riveted in place. Now rivet the 15" lengths of angle between the two side frames, 9" apart, to support the steps. At this point, screw the upper stretcher of each side frame to the underside of the top panel. Attach the braces between the two back legs, and install the side braces between front and back legs as directed below. (Note that these are notched over bolts on the back legs so they can be unhooked for folding up the ladder.)

Now with frame assembled, stand it up with back legs 3' from front legs on the floor. Cut side braces (3/4" tube) to the correct length at this point, flatten ends, bolt to front frame, and notch. Adjust side frames so top panel lies horizontally, and attach bottom step, screwing through front stretcher into underside of step along front, setting a long screw into back of step through back member of side frame with step positioned horizontally. Install a second step in the same manner. Add ;1/8"x 3/4" bar cross braces to side frame now, and mount in the other steps. All steps are 1/2" plywood. Be sure to coat with sealer before assembling them into frame.
Put rubber crutch tips on back legs; screw rubber-faced block underneath front legs.
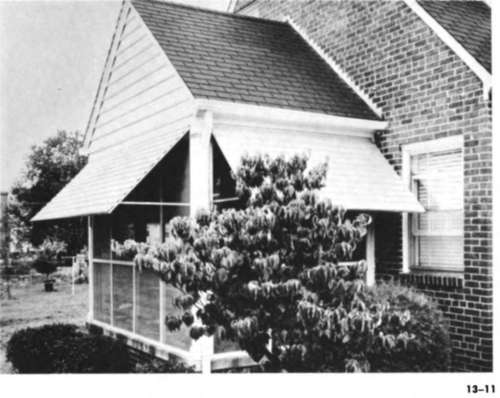
Awnings (Fig. 13-11) are suitable for porch or window. This is a simplified design that employs panels of aluminum which have been formed to look like ordinary wood clapboard siding. These panels are a standard product available at most building supply outlets. It is a simple matter to make an attractive awning using them. Corrugated or 5-V Crimp panels are also suitable.
Panels 2' wide are large enough for most people, although some prefer 3' wide .... the size shown in Fig. 13-11. Cut to length required by porch or window. Frame ends and bottom edge with 1/8" x 3/4" x 3/4" angle underneath and flush with edge of panel, using self-tapping sheet-metal screws.
For permanent installation, bend up a 1" flange along top edge so it lies flat against house. Secure it to house by putting Do-It-Yourself Aluminum trim strip on this flange and screwing through it into the wood with ordinary aluminum round-head screws.
After attaching top edge of awning to house, pull awning out to a 45° angle and measure horizontally to determine length required for brace, starting from a point about 6" from bottom edge of awning. Cut a 1/8" x 3/4" x 3/4" angle to this length plus 1". Cut and bend one end as in Fig. 4-47. Screw this end to house a distance down from top of awning equal to length of brace. Now extend brace horizontally to awning frame and rivet.
Bracket for House Numbers (Fig. 13-12) uses 1/8" x 3/4" bar. Start by cutting top slanting member 21" long and curling ends on 3/4" radius per Fig. 3-14. Next cut a piece 24" long and make a 90° bend in it 14" from one end. This is bottom member of bracket. Now rivet lower end of first member to long end of second member in approximate position shown in Fig. 13-12.
Cut another 24" piece of the 3/4" bar and form the "S" scroll per Fig. 3-18, using about a 1" radius for small curve,

Fig. 13-12.
3" radius for large curve. After forming to shape desired, fit into bracket frame, saw off any extra metal, and rivet to top slanting member.
Cut %" plywood panel 5" x 12", paint black and mount house numbers on it. Obtain these at your hardware or dime store, or cut from embossed sheet using your old house numbers as a pattern. Attacli letters to panel with small aluminum tacks or brads. Secure wood panel to bracket with round-head wood screws where scroll contacts lower bracket member. If vertical section is too long, cut off excess. Then attach to house with roundhead wood screws as indicated.
Laundry Chute (Fig. 13-13) will not rust clothes and prevents them from mildewing. Use perforated sheet for the panels, the union jack design being shown here. Make frame from 1/16" x 1" x 1" angles, joining corners as shown in Fig. 443, and using the framing system of Fig. 442.
Door is 1/4" plywood, hinged at the bottom for easy removal of clothes. Locate chute directly below a circular hole in floor cut to take gunny sack or flour sack which has bottom cut out and is tacked just inside floor opening. A hook on wall supports top of sack. Or locate sack in a cupboard to keep it from view. Or construct a plywood chute to feed container.

Fig. 13-13.
Fig. 14-1.
Continue to:
My Books

