Octagon
Description
This section is from the book "A Practical Workshop Companion For Tin, Sheet Iron, And Copper Plate Workers", by Leroy J. Blinn. Also available from Amazon: A Practical Workshop Companion For Tin, Sheet Iron, And Copper Plate Workers.
Octagon
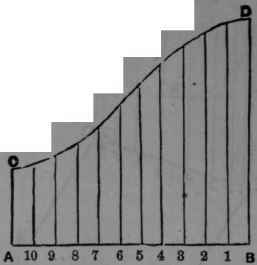
To Describe A Pattern For Tapering Octagon Top Or Cover
Erect the perpendicular line GE, fig. 35; draw the line AB at right angle to GE; make FE equal to the Slant height of the article, and draw the line CD parallel to AB; make AB equal in length to one of the longest sides of the base; make CD equal in length to one of the longest sides of the top, and draw the lines AG and BG, cutting the points AC and BD, G as a centre, with the radii GC and GA describe the arcs SO and PN; set off QR, HJ and LN equal to AB; set off PQ, RA, BE and JL equal in length to one of the shortest sides of the base; draw the lines PS, QT, RU, etc., cutting the centre at G. draw the linos PQ, QR, ST, TU, etc.
Fig. 35. Edges to be allowed.

Gutter Miter Joints
Fig. 36. To describe a Pattern for a Miter Joint at Right angles for a Semicircle Gutter.

Fig. 37.
Let the semi-circle ACB, fig. 36, be the breadth and depth of the gutter; draw the line AB; draw the lines AF and BE at right angle to AB; draw the line DE parallel to AB; make DF equal to AB, and draw the line FE; devide the semicircle into any number of equal parts from the points; draw lines parallel to AF as 1,2, 3, etc., then set off the line AB, fig. 37, equal in length to the semicircle ACB; erect the lines BD and AC at right angle to AB; set off on on the line AB, fig. 37, the same number of equal distances as in the semicircle from the points; draw lines parallel to BD, as 1, 2, 8, etc., make BD equal in length to AF, fig. 36; and AC equal in length to BE; also, each of the parallel lines bearing the same figure as 1, 2, 3, etc., then a line traced through the points will form the pattern required.
Miter Joints
Fig. 38. To describe a Pattern for a Miter Joint at any Angle for a Semi-circle Gutter.
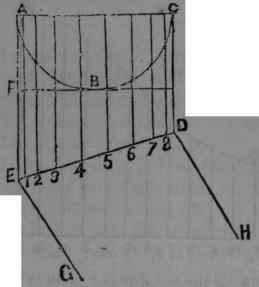
Fig. 39.
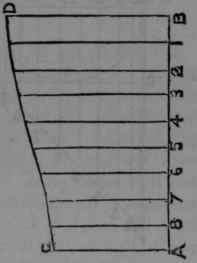
Let ABC, fig. 38, be the breadth and depth of the gutter; draw the line AC; draw the lines EG and DH; the angle required draw the line ED cutting the points E and D; divide the semi-circle into any number of equal parts, from the points draw lines parallel to AE, as 1, 2, 3, etc. Then set off the line AB, fig. 39, equal in length to the semicircle ABC; erect the lines AC and BD at right angle to AB; set off on the line AB, the same number of equal distances as in the semi-circle ABC; from the points draw lines parallel to BD, as 1, 2, 3, etc. Make BD equal to EA, and AC equal to DC; also, each of the parallel lines bearing the same figures as 1, 2, 3, etc., then a line traced through the points will form the pattern.
Miter Joints.
Continue to:
My Books

