Drawers. Continued
Description
This section is from the "Garments For Girls" book, by Celestine Leontine Schmit. Amazon: Garments For Girls.
Drawers. Continued
Making of the Closed Drawers
1. Join the two front and the two back pieces with either a French seam or a flat fell seam. If a flat fell seam is made, care should be taken

Fig. 48 that the fell of each back and front seam turns over to the same side. When joined together this seam should look like one continuous seam. 2. The inner leg seam may also be joined with a flat fell or a French seam. Take the back and the front pieces and pin them together carefully at the center seam. From this center, pin each one of the leg seams. This will help to make sure that the center seam matches exactly. The seam, whether French or flat, should first be pressed open as carefully as possible and then made as flat and as narrow as possible. A good width is 1/8" in fine material and never more than 1/4" in coarser materials.
Plackets
Cut a slit 8" long on each leg on the hip line and on the fold of the material.
The placket may be made as a continuous fell and bound placket or as a continuous bound placket. The latter is the easier to make.
1. Cut a piece of material 17" long and 2" wide for each placket and place the right side of the placket on the wrong side of the material.
2. Stitch these together with a plain seam.
3. Open this seam well and press it back on the placket.
4. Make 1/8" turn and lay the turned edge so as to cover the first stitches.
5. Stitch close to the edge of the turned hem. The second stitching will be on the right side.
6. Crease the edges of the placket very flat, and at the bottom of the slit fold the placket over on the back part of the drawers. (The placket now will form a facing. See Figs. 44 B, 46 D.)
7. At the bottom of the slit make two rows of stitching. This will hold the placket to the back and will reinforce the placket.
8. Pin the placket along the side back to the top of the drawers.
Stitch, by machine, two shirring threads 1/4" apart on both the front and the back part of the drawers.
The Bands
For closed drawers, the band is made in two parts. The back part is shorter than the front and laps over the front. The buttonholes are cut in the back parts and the buttons are sewed on the front parts. On account of the great strain on the button and the buttonholes, and in order to strengthen the materials, the bands are reinforced by doubling the material at these points. (See Figs. 44, 46.)
Finding the Length of the Back and the Front Part of the Band
To find out accurately the length of the back and the front part of the band:
1. Cut a piece of paper 1" wide and 1/2 the length of your waist measure.
2. Write on one end "center back" and on the other end "center front."
3. Fold this in the middle and make a pencil mark at that point. Each part will indicate 1/4 of your entire waist measure.
4. From the pencil mark, measure over 3/4" towards the center back and cut the paper. The part marked "center back" indicates the size of 1/2 the back band. The part marked "center front" indicates one-half the front band.
Cutting Parts of the Band
1. Cut a piece of material 2" wide and twice the length of the back part of the band, plus 1", which will be turned under to reinforce the band.
2. Crease these turn well and put in a contrasting thread to mark the center of the back.
3. Take the piece marked "center front." Cut another piece of material 2" wide, allow 1" on each end for the placket which extends along the front, and allow 1" more for the reinforcing of the band. A total of 4" must then be added to the length of the piece of paper marked "center front."
4. At each end of the band turn under the material allowed for strengthening the ends. Crease these turns well and mark with a contrasting thread the "center front."
Sewing the Band to the Drawers
1. Take the back part of the band and place it with the right side to the wrong side of the drawers.
2. Pin the place marked for the center back to the seam of the center back of the drawers.
3. Pin each end of the drawers (the end where the placket faces the drawers) exactly at the end of the band.
4. Draw up the shirr threads in the drawers to the same lengths as the band.
5. Put a pin at each end of the drawers and wind the shirr threads around them. This will hold the thread in place.
6. Adjust the gathers. Put most of the fullness at the center. There should be but little fullness for l 1/2" from each end.
7. Pin or baste the drawers carefully to the band.
8. Stitch the band and the drawers together with a plain seam.
9. Open this seam well and press it back on the belt.
10. Turn the edge under on the long cut edge of the band.
11. Place this turned edge so as to cover the raw edges and the first stitching of the band and pin or baste it down.
12. Make sure that the corners are square and even and finish each short end with an overhand stitch.
13. Stitch very close to the turned edge. The last stitching is thus made on the right side.
14. Take the front part of the band and repeat as you have done for the back with this exception - the shirring should be pushed toward the edges and away from the center.
Fitted Band
Required Measurements
The waist measure, the depth of the band.
Standard Measurements
Waist measure 27", depth of the band 3".
Drafting the Pattern
Cut a piece of paper 13" by 13" and mark the corners A, B, C, and D. AB represents the center front. A'E From A' measure one-third of the entire waist measure on the AB line, and locate E.
A'F From A' measure on a line parallel to the AC line the same distance as A'E, minus 3/4" and locate F.
A'G From A' on the AB line measure 3/4", and
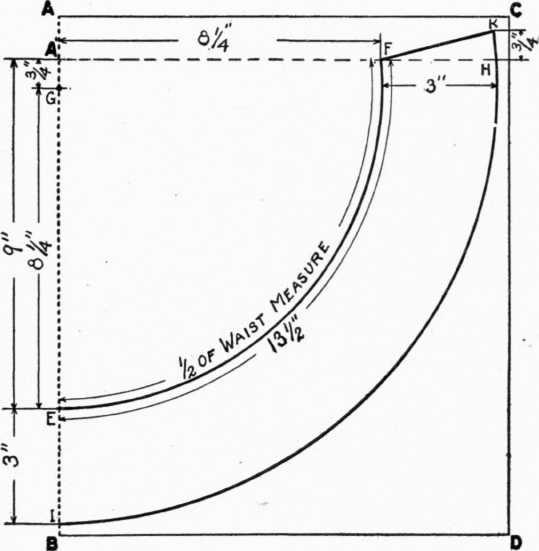
Fig. 49. - Fitted Band locate G. Put the point of the compass at G and swing it along the EF line. EI From E on the AB line measure 3", and locate I.
IH Place one point of the compass on G and from G as a center describe a curve until it touches the AC line. HK To obtain a little more fullness in the back extend the line from H 3/4", and locate
K. FK Connect F and K by a straight line.
Cutting Out the Pattern
Cut out the pattern on the line EF, FK, and IHK.
Mark IE "center front" and FH "center back."
Making of the Fitted Band
This band may be closed in the back or in the front. The closing depends on the garment for which it is made. Ordinarily the fitted band is made of double material but single material may also be used. The "peplum" of shirt waist and corset cover is cut after this pattern and is made of single material. Bands for underwear are ordinarily made of double material be-cause they are stronger and are more quickly and easily made.
Buttons and Buttonholes
A fan and barred buttonhole should be made at each end of the back part of the band. The buttons are sewed to the front part.
Finishing the Lower Edge of the Drawers
The lower edge of the drawers may be finished with a plain hem, lace, embroidery, or ruffle. For fullness of the ruffle, 1 1/2 times the width of the drawers is generally used. (See Figs. 44, 45, 50.) Sometimes the ruffle is made of the same material and then the full width on

Fig. 50. - Ruffle Attached with Lace the material on the JK line (see Figs. 44 E, 47) is used. In this case, stitch two gathering threads 1/4" apart, along the KJ line. Prepare a double band 1/2" or 3/4" wide and the width of the knee. Pin the middle of the band to the right side of the hip line of the drawers and the seam of the band to the side seam of the drawers. Draw up gathering threads to fit this band. Pin or baste this band evenly and securely to the drawers and stitch each edge down by machine. Sometimes if a rubber or a tape is run through, this band is stitched around the full width of the drawers and the rubber or tape will draw up the fullness and make it fit around the knee. The edge of the ruffle may be finished with a crocheted or embroidered scallop, with a lace edge, or with a plain narrow hem. If a plain hem is used, it should be cut to fit the drawers. (See Fig. 44 D.)
Teacher's Directions To Pupil
1. Draft the pattern.
2. Place the pattern on the material.
3. Cut out the material.
4. Reinforce the front and back part of the drawers.
5. Sew the front parts together.
6. Sew the back parts together.
7. Sew up the inner leg seam.
8. Cut and make the placket.
9. Prepare the band for the front and back.
10. Sew the band to the back part of the drawers.
11. Sew the band to the front part of the drawers.
12. Finish the bottom of the drawers.
Questions
1. Name different materials suitable for drawers.
2. How may drawers be finished around the bottom?
3. How may drawers be finished around the top ?
4. Should rubber be used in muslin drawers?
5. What trimming may be used for the bottom of the drawers?
6. Name the different types of drawers.
7. In what do they differ?
8. What seams are used in the making of drawers?
Continue to:
My Books

