


How To Build A Sailboat. III. Making The Frame
Description
This section is from the book "Amateur Work Magazine Vol3". Also available from Amazon: Amateur Work.
How To Build A Sailboat. III. Making The Frame
Carl H. Clark.
The next things to be gotten out are the moulds, or temporary forms, upon which the boat is shaped. There is one of these for every cross section laid out on the floor. They are made to the inside line of the cross section, as already mentioned, since they fit inside of the plank. Numbers 2, 3, 4, 5 are made as shown in Fig. 7, being cut out to fit over the centre-board logs, while the others are made as in Fig. 8. For this purpose any kind of cheap stock may be used, but they must be well braced and strong, as they must

Fig. 7.

Fig. 8].
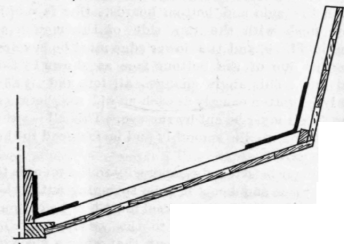
Fig. 9

Fig. 10.
fig 11.
be able to stand a considerable amount of strain. They must also be an accurate reproduction of the lines on the floor, and be alike on both sides. The projecting side pieces are left to fasten braces to. The centre lines should be marked across the lower part and also across the top brace, for use in setting up. The notch in the corner is made to fit a 2 1/2" x 1 1/4" piece, which is to be later fitted into place and beveled off to make a smooth surface. The top cross brace may be well fastened at the correct sheer height to make it easier to bend on the top strake of plank.

The moulds are set up in place on the keel at the proper points. It will be noticed that in the plan, the forward moulds are placed with their after faces on the mould line, and the after ones with their forward faces on the mould line. The reason for this is that the shape is desired at the mould point, and on account of the bevel, this would not be obtained otherwise. It wlil be necessary to bevel off the bottoms of the moulds somewhat to make them conform to the slant of the keel. They must be set up perfectly plumb or square with the W. L. and also square with the centre line fore and aft. The line already stretched from the middle of the stem to the middle of the stern-board, will help in setting them upright. A ribband 3" or 4" wide should be bent around near the tops and screwed to them and the stem and stern board with screws to hold them in place. They may be tested for squareness with the keel by measuring from the stem around this ribband to the mould, which should give equal lengths on both sides if the mould is square.

The center line marked on each cross piece will, when correctly set up, be directly tinder the line fore and aft. After the moulds are all adjusted, their fairness should be tested by bendiag a batten or thin board around them. If the board does not lie flat and eyen upon them the discrepancy should be noted and its cause looked up. It is always possible that small inaccuracies may occur during the process of transferring the shapes from the designer's drawing to the finished mould. Any small discrepancies may be left for correction until the moulds are ready to bevel.
The moulds are fastened temporarily to the keel by blocks of wood or small iron angle braces; the latter is best as fastening must be firm. When the moulds are all fairly in place they are braced diagonally from the braces overhead and also across the tops to each other and to the stern. In fitting the plank there is considerable strain brought upon the moulds and the bracing must be strong enough to stand it.
It has been noted that when the batten was laid on the moulds, it bore only on the corners. These corners must now be beveled off until it lies evenly on the surface, the whole thickness of the mould. The reason for placing the moulds as was done will now be seen, as the shape is only maintained at the edge nearer the middle of the boat; this edge being on the mould point. The corner piece 2 1/2" x 1 1/4" is bent around into the notches in each corner of the moulds. It must extend from the inside of the stem to the inside of the sternboard. At the stem it is let in a slight amount to give fastenings and on the stern-board it is fastened temporarily with amall angle braces which are later to be replaced with knees. This piece is designed to afford fastening for the joint between the side and bottom boards. One face of it is now flush with the top side of the mould as shown in Fig. 9, and the lower edge must be beveled off to the line of the bottom face as shown by the dotted line. This angle changes all fore and aft and can only be gotten exactly at each mould, and between the moulds it must be cut by the eye. This allows the bottom plank to lie smoothly and be fastened to the bilge stringer.
The stringer is fastened temporarily to the moulds to hold it in place and keep it from springing out of the notches. The rabbet in the keel must now be cut out evenly all along to conform to the varying angle of the bottom. It must be so cut that when a piece of board is laid on the mould, it will fit squarely into the rabbet and make a neat joint. The angle changes at all points and between the moulds it must be trimmed until a piece of board laid on the bilge stringer will fit squarely into it. At the stem the rabbet can be fitted by bending a narrow piece of board around the moulds and cutting to the proper angle. This rabbet is to be carefully cut and fitted, as the tightness of the garboard seam depends upon it. Before exerting any pressure upon the stem it should be braced sideways and have a brace under it extending to the floor to make sure that it is not forced out of line.
Continue to:


My Books

