Pattern Making For Amateurs. V. Plain Cored Cylinders - Small Gland
Description
This section is from the book "Amateur Work Magazine Vol3". Also available from Amazon: Amateur Work.
Pattern Making For Amateurs. V. Plain Cored Cylinders - Small Gland
F. W. PUTNAM
In the last chapter 1 explained the difference between green sand and baked sand cores, and the use of core boxes and core prints. In practice, usually, no regular hole less than 1" in diameter should be cored.
The' size and shape of holes govern, to a large extent, the construction of patterns. Fig. 29 shows the casting of a small gland. This is a very simple pattern, yet there are at least six different methods of making the pattern, any one of which might be followed. In all cases where the length of the casting nearly equals, or even exceeds, four times the diameter of the hole to be cored out, it has been found advisable to mold the pattern in a horizontal position, thus making use of a horizontal core. Even in short patterns when the diameter of the hole approaches that of the external diameter, this method is often found to be of great use, since it is difficult for the molder to tell when his core is accurately in place.
The following rules are used in the best pattern and foundry practice and should be constantly kept in mind:
1. A bole no deeper than its diameter should be formed by a green sand core.
2. Patterns where the holes are not longer than four times its diameter may be constructed so as to place the core in a vertical position.
3. Patterns where the hole is longer than four times its diameter, should generally be constructed as a "split" pattern and the core placed in a horizontal position.
Plain Cored Cylinders
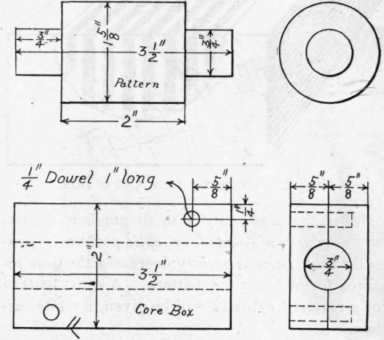
Fig. 22. Pattern and Core Box for Cylinder
Fig. 22 shows the pattern and core box for a plain cylinder 2" long and 1 5/8" diameter cored out for a 3/4 hole. We will assume that this casting is to finish up for a sleeve requiring an absolutely parallel hole. This cored hole then must be bored out parallel, and this can be much more readily done if the hole is cast parallel, because there will be less metal cut out. With these considerations in mind we will decide to use a horizontal core with this pattern.
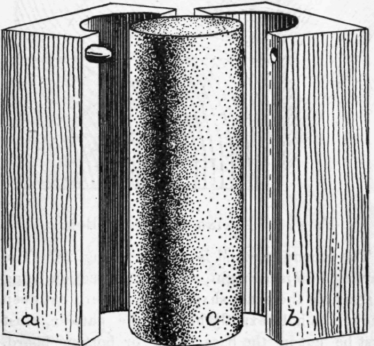
Fig. 23. Core and Core Box.
The kind of pattern to be made for this cylinder will depend principally on the number of castings required and the facilities at hand. When only a few castings are wanted a pattern will be turned out of one piece of stock, and having the same shape as the casting, core prints be added at each end to leave recesses in the mold to receive the ends of the core. A pattern turned in this way greatly simplifies the work of the pattern maker, but throws additional labor on the molder, who must mold the pattern in one of three ways. The first method is shown in Fig. 27, the molder being forced to cut down the parting line of the mold. The pattern is shown at a, and it will be seen that the molder has cut away the sand along the lines be and de so as to enable him to draw the pattern from the mold. This leaves the lower half of the mold simple enough, but the cope will have a heavy body of sand hanging from it, as shown at f. This generally is an objectionable feature and should be avoided if possible.

Fig. 24. Laying Out Cork Box.
The second method is shown in Fig. 28. The parting line is all right, the main objection being that a hole the exact shape of the pattern cut deep enough to hold exactly half of the pattern, must first be cut in the base board or bottom board. This involves considerable labor, and the pattern is very liable to stick to the base board when it is lifted from the nowel, and making it necessary to patch up the mold formed in the nowel by the pattern.
Third method: - If a large number of castings are wanted, the pattern maker may use the solid pattern by making what is called an odd side or match. In this case the pattern is first embedded half of its depth in plaster or oil sand. The odd side is made in a box, which must be of the same size as the flask to be used for molding. If this is made of plaster it is allowed to harden, and if made of oil sand, it is dried until the material has become very firm. The plaster or sand is usually made to adhere to the box by means of nails driven on the inside of the box. When this odd side or match is ready for use, the pattern is laid in place in the match and the nowel placed over it. Sand is then rammed in, after which the whole is turned over, the odd side removed, and the molding proceeds as usual.
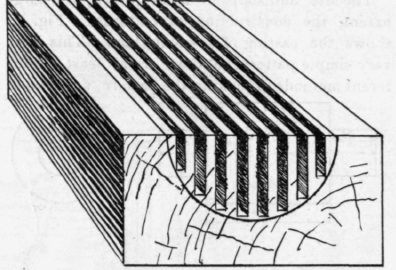
Fig. 25. Sawing Out Core Box.
When there are only a small number of castings required, a jointed or split pattern is generally used, since it greatly decreases the time required for molding the pattern. A split pattern for a recessed cylinder will be given in a later article.
Fig. 22 shows the solid form of pattern requiring a piece of clean, dry pine 4 1/2" long and 1 7/8" square. The pattern presents no difficulty in turning, the allowance for draft being made with a 1/4" skew chisel; be sure to give a little draft to the core print ends. The main body of the pattern is to be finished with black shellac and the core prints with orange shellac. The required number of coats of black shellac should be given to the pattern, and the core prints carefully cleaned free from black shellac before any orange shellac is applied.
The core box for this pattern is shown in Fig. 22 and Fig. 23. When small round cores are to be made, a core box of form a-b, Fig. 23, is used, c representing the core. To make such a core box, two pieces of stock are used, a little longer than the required length of core and of such size as to leave sufficient stock for strength, after the the core has been cut out.
We will require for one core box two pieces of clear dry pine 3 3/4" long and large enough to allow for planing on all sides to 2" wide and 5/8" thickness. The two pieces are to be held together

Fig. 26. Patternmakers Guage.
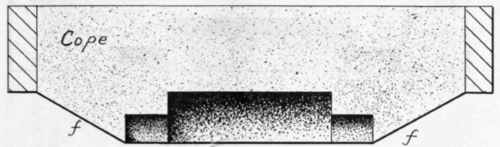

Fig. 27. Method of Molding Cylinder.
by two dowel pins 1" long and \" in diameter, holes being bored through the top piece and 7/16" into the bottom piece. The centers for the dowel holes are shown in Fig. 22. Having carefully marked the centres for these holes in the top sur-face'of one of these blocks, clamp the two blocks evenly together, either with wood clamps or a vise, and bore the holes absolutely straight, using a depth gauge on the bit to prevent boring too deep. Wood dowels can be bought cut usually in lengths of three feet, and are made of maple, hickory, ash and oak. These pins may be prepared by the amateur if a hardened plate of steel bored with holes of the various sizes of dowel pins required can be procured. The wood for the pins having been planed up for the required size, is driven with a mallet through the plate. This saves a great deal of time and makes the pins much more nearly round than is possible by hand work. Two dowels are cut off each 1" long and glued into the top piece. The projecting end is tapered off so that the two halves of the core box will fit loosely. Having the two halves of the core box dowelled, clamp them together and mark a circle on each end equal to that of the required core, 3/4", care being taken to locate the centres at equal distances from the joint sides, and to have the centre on the line of division between the two pieces, as shown in Fig. 24, c indicating the centre of the required circle.
Next take the two blocks apart and draw lines across the face of each piece, joining the ends of the half circles. The greater portions of the stock between these lines can be removed by


Fig. 28. Another Method of Molding Cylinder means of a back saw, a series of parallel cuts being taken to approximate the half circle shown in Fig. 24. The remainder of the stock, allowing sufficient for sandpapering, is to be removed with the paring gouge or pattern maker's gouge, one of which is shown in Fig. 26. This gouge is bevelled on the inside. Some pattern maker's gouges are straight in the shank and others are bent, being made in all sweeps (curves) and widths.
The core box should be tested with the end of a scale or steel try square to make sure that each half is exactly a half circle. This method of testing depends upon the following well known principle: - Every triangle inscribed in a semi-circle, having the diameter of the circle as one side (this side being the hypothenuse) will have a right angle formed opposite this side, by the meeting of the other two sides of the triangle. The point which is the vertex of this right angle must continually touch the curved outline of the hole in every point as the scale is moved around. Turn a cylinder 11/16" in diameter, and with sandpaper wrapped closely around it, sandpaper the two halves.
It will be remembered that I suggested making the core box 1/4" longer than the total length of pattern. This was done with our first core box in order that any breaking out of the curved surface at the ends of the box due to a cross grain or cutting outside of the lines at the ends might be removed. Of course in trimming up the ends of

FIG. 29. Pattern for Small Gland with Green Sand Core.

Fig. 30. Pattern for Small Gland with Baked Sand Core.
the core box generally a cylinder of just the size of the hole should be inserted in order that the wood may not break out. After a little practice with the gouge, however, no difficulty should be met with in finishing up parts of the core boxes that are squared off exactly the right length.
Holes for core boxes are sometimes bored out with a bit or drill; this will be discussed in a later article. The outside of the core box is to be finished in black shellac, and the hole with orange shellac.
Continue to:
My Books

