Small Gland
Description
This section is from the book "Amateur Work Magazine Vol3". Also available from Amazon: Amateur Work.
Small Gland
At the commencement of this present article I stated that the small gland, the casting of which is shown in Fig. 30, might be made in at least six different ways. I give below six different methods for making this pattern and give, very briefly, the advantages and disadvantages of each method. 1st method. Turn the pattern from a solid block, turning out or boring a hole tapered for draft, which, when the pattern is molded, will have a vertical green sand core. This is the simplest method, both as regards making and molding the pattern, since no baked sand core is required and the green sand is certain to be in the middle of the casting, which it rarely is where a baked sand core is used. The disadvantage of this is that decidedly more taper or draft to a hole in a pattern must be made than is necessary on the outside surface, and as the casting should have a parallel hole when finished, more metal must be removed in boring out than is the case where the hole had been cored parallel.
2nd method. Turn the pattern from a solid block and add core prints, using a vertical baked sand core. This is the method we shall follow in making the gland. The baked sand core will leave a parallel hole, therefore less metal will be required to be left for boring than would be necessary in the first method. Made in this way the gland is to be molded with the flange, Fig. 30, uppermost, the top core print being all that would be contained in the cope. The parting between cope and nowel comes, then, level with the top face of the flange. It will be noticed the top core print A, Figs. 30 and 31, is turned straight first and then tapered for 1/2". This taper is given so that the cope may be lifted off easily. When the core, which has its top end tapered exactly like the top core print, is set in position and the cope is set down on to the nowel ready for pouring, if the core has not been placed quite upright its tapered end may adjust itself to the tapered recess in the cope and thus correct any slight error of position of core. For large pattern work both top core print A, and bottom core print B, Fig. 30, should be tapered, starting from the shoulder where the core print enters the pattern proper; at this shoulder, however, the core print should be exactly the size of the core, otherwise with ex-cesssive taper a useless space will be left around the core print into which metal will flow, producing a web, called a fin, around the hole and projecting from the end face.
For small work core prints for vertical cores made as shown in Fig. 31, will be found to be entirely satisfactory.
3rd method. If the casting is to be finished all over and is to be a gland for a piston rod, the outside surface of the flange must be absolutely free from blow or air holes. This will necessitate the pattern being molded so that the flange shall be downwards, in which case the under surface comes even with the parting surface between the cope and the nowel, the remainder of the pattern being in the cope. The soundest part of a casting is always at the bottom of the mold and is more dense, heavier and stronger than at the top of the mold, as the air or gas which does not escape from the mold will leave holes in the top of casting. In molding a pattern in this manner it will be found that the pattern should be made with the flange separate, the body of the pattern and the core prints being in one piece. The flange should fit freely to a parallel surface cut on the bottom core print, the under surface of the flange coming, of course, up against the body of the pattern. For glands of medium size this method is very largely used. In cases, however, where the length of the body is about three times the diameter of the cored hole, the horizontal position is best.
4th method. If the pattern is to be molded horizontally the core prints are not tapered and the pattern must be made solid, as was the plain cylinder just described. The amount of time required for molding such a pattern will cause us to turn to the next two methods.
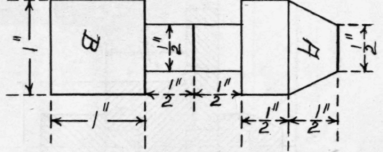
Fig. 31. Method for Turning Core Print
5th method. Using this method the pattern is made as a split pattern, core horizontally, with the flange, which is, of course, split with the rest of the pattern, turned solid with the pattern. If the hub is small and if the flange does not greatly exceed it in diameter, this method is satisfactory. The great objection is that considerable draft is necessary on the other sides of the flange in order that the sides of the mold may not be broken when the halves are drawn from the mold.
6th method. If the hub is small and the flange is large, make the pattern as a split pattern cored horizontally, and turn two pieces for the flange separately, fitting easily a shoulder recessed in at the end of the hub of the pattern.
We will use the second method for making and molding this pattern. The right end view of Fig. 30 is in sections and shows the flange turned from a separate piece of stock, but is to be glued and nailed to the hub, making a solid pattern. If a piece of stock 2" thick is available both flange and hub are to be turned from a solid block. In this mold we require a block 4 1/2" square and 2" thick. One side, which is to be the top surface of the flange, should be planed true. This side should come up against the screw centre plate. The hole for the lower core print B, Fig. 30, is to be turned out. The hole for the upper core print A, is to be bored out with a bit, the screw centre plate being removed from the lathe and placed in a vise. The pattern is removed from the lathe and turned around and screwed on the face plate, the screw entering the wood at the bottom of the hole previously turned out for the lower core print. In this way the hole for the upper core print can readily be bored without moving or jamming the pattern fastenings in a vise. If desired the pattern may be chucked and the second hole turned out.
Fig. 31 shows the methods of turning the core prints. A block 1 1/4" square and 4" long being used. The block is turned between centres and enough stock will be left at each end so that the centre marks can be removed. The core prints are to be glued into the pattern which should be held in a vise or a clamp until the glue is thoroughly hard. The two core prints must, of course, be exactly in line. No difficulty should be found in accomplishing this if the hole for the upper core print is carefully bored.
The core box for this pattern will be taken up in the next number together with other simple patterns requiring core boxes.
Continue to:
My Books

