


Pattern Making For Amateurs. VII. Methods for Making Split Patterns. Fillets
Description
This section is from the book "Amateur Work Magazine Vol3". Also available from Amazon: Amateur Work.
Pattern Making For Amateurs. VII. Methods for Making Split Patterns. Fillets
F. W. PUTNAM
A great portion of cast iron and brass work is so designed as to require the patterns to be "split ". That is, made up in two pieces. In a jointed pattern the moulding is greatly facilitated by making the pattern in halves.
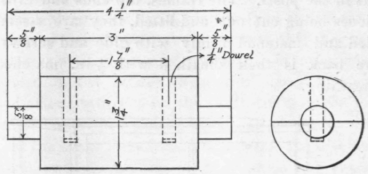
A casting for a recessed cylinder is, given in Fig. 38, the split pattern being shown in Fig. 39. Fig. 40 shows the pattern in position in the mold, the joint between the two halves of the pattern coming at the parting line between the cope and nowell.
Two pieces of clear dry pine will be required for the pattern, each being large enough to finish 6 in. long, 2 in. in width and 1 in. in thickness. The blocks are left If in. longer than the finished pattern in order that the marks made by the head and tail centres may be removed, and also that enough surface may be left for glue, which is often used in the ends of the blocks for holding the presses tightly together without its penetrating or reaching the surface of the pattern itself. These two pieces are to be carefully planed on the face and joint sides and should be of the same thickness. The face sides of the two blocks are the surface which form the joint and are shown in Fig. 41, where the two halves are placed face

Figs. 38 and 39. Casting and Split to face with the dowel pins (in this case, concealed dowels are shown) in place. Fig. 42 shows the blocks brought together with the outline of the required pattern drawn upon them, thus illustrating the allowances that are usually made for finishing the pattern.
The pieces should next be dowelled together, either of two general methods being used. The first method is as follows: Clamp the two pieces

Fig. 40. Split Pattern in Mold.
together with the face sides together, and from the joint side gauge a central line along the outside surface of one of the blocks, marking on this centre line the two points for the centre of the dowel holes. Fig. 39 shows these centres to be 1 7/8 in. apart. Bore holes with a 1/4 in. auger bit through the top piece and 3/8 in. into the bottom piece. Cut two dowel pieces long enough to extend 5/16- in. into the bottom pieces, and glue these dowels into the top pieces. The projecting pieces are cut purposely 1/16 in. less in length than the depth of the dowel hole, and are to be tapered so as to enter and leave the hole easily.
These projecting pins should be carefully tapered or they will cause the molder a great deal of annoyance, and the resulting castings may be
Pattern for Recessed Cylinder.
imperfect. Many workmen make the pins project a distance considerably larger than its diameter. A short pin, however, governs the position just as well as a long one and is also less liable to stick in the loose half of the pattern, so that for small or medium size patterns it will be found advisable to let the projecting ends stand out from 1/16 to 3/16- in. of the large part of the hole, the remainder being tapered off so as to make sure the pin can be freed easily. The dowel pin should be fairly large in diameter, for the larger the pin the longer it will remain free from warping. It is especially necessary that the dowel pin be absolutely round at the part that fits the hole.
If these precautions are neglected castings will probably result in which the halves will not match. The pins should not fit tight in the loose half of the pattern, as then the halves will not separate when molded.
It frequently happens that it is necessary to keep the outside surface of the pattern unbroken, and also there are many cases in large work where the holes would require boring so deep and the pins made so long that the second method is made use of as shown in Fig. 43 and Fig. 41. In such cases the centres of the holes must be very carefully located and are usually laid out in one of the following ways:

Fig. 41. Joint for Split Pattern.
Place the pieces side by side with the joint sides touching and the ends even. Make two notches at the joint the required distance apart and, after separating the pieces, square very fine lines with a knife across the face sides of the two blocks. Next set a guage at half the width of the pieces and mark the intersecting lines, thus giving the required centres.

Fig. 42. Marking Out Split Pattern.
A second method is to locate the holes by laying two small wire nails between the pieces and then tapping the other piece with a hammer or mallet. The heads of the nails will make impressions in each piece, which will indicate the centre of the holes to be bortfd.
A third method is to provide some ordinary lead shot and make the shallow holes with a brad awl slightly less in diameter than the shot. When pins are to be inserted, place the shot in the hole so that they project beyond the surface, and then proceed to apply a little pressure to the two locks.
It is often found necessary to place the dowel pins at uneven distances from the ends of the pattern, one being nearer the centre than the other, so that the molder can instantly put the two parts of the pattern together without having to turn them half round the opposite way.
Continue to:


My Books

