Pattern Making For Amateurs. Methods for Making Split Patterns. Fillets. Continued
Description
This section is from the book "Amateur Work Magazine Vol3". Also available from Amazon: Amateur Work.
Pattern Making For Amateurs. Methods for Making Split Patterns. Fillets. Continued
After gluing and inserting the pins the two halves of the pattern must be firmly fastened together in such a manner that they can be turned as one piece. There are four ways of doing this and a brief description of each follows:
1st method. The end surfaces for a breadth of 3/8 in. to 1/2 in. are brushed with hot glue, after which

Fig. 48. Joint for Split Pattern.
the pieces are firmly clamped together until the glue is thoroughly hard. Frequently a piece of newspaper is glued to each piece and glue placed between the two pieces at the ends only. It is not necessary that the newspapers eover the entire surface of the pattern, strips being glued simply between the ends. If this method has been followed the pattern, after being finished, may be separated by inserting a knife blade or chisel between them, leaving a strip of paper on each half. When patterns are secured by glue and paper, care must be taken in turning to avoid catching tools, because of the natural tendency of glued pieces to fly apart owing to the great speed at which they revolve in the lathe. The ends should be turned down to about 3/8 in. diameter and then sawed off and finished with a knife, chisel or file. 2nd method. It frequently happens that the pattern maker cannot wait for the glue to harden and set, or it may be, if the pattern is a large one, that it would be unsafe to trust entirely to glue, in which case wood screws are often used at the ends, as shown in Fig. 44.
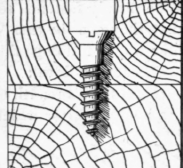

Fig. 44. Use of Screws in Split Pattern
3d method. For small and medium sized patterns corrugated steel fasteners are often used for fastening two blocks of wood together. They are made of the best cast steel and are so simple, effective and easily applied as to be very serviceable for a great variety of pattern work.
4th method. Dogs are also frequently used for this work. They are a kind of square staple made of steel, sharp pointed, two of them being driven in each end. While they are very handy both on large and small work, they are rather clumsy, and the use of screws or fasteners is preferable.
Fig. 45. Core Box for Recessed Cylinder.
Having fastened our pieces together by one of of the above methods, the block is next placed in the lathe and turned as though it were solid. Great care should be taken to have the centre spurs exactly in the joint; if any error is not corrected one half of the finished pattern will be larger than the other. To remedy any error, tap the pattern lightly with a hammer in the required direction, immediately screwing up the tail centre a trifle tighter so as to hold the pattern in the new position. An error can be detected provided the blocks were made the same thickness, by taking a light gauge cut across the block and then carefully comparing the width of the flat surface left on each half.
Figs. 46A and B. Use of Fillets.
Do not forget the necessary allowances for draft, shrinkage and finish. The draft in the core print ends, A, Fig. 39, is finished with a file and sandpaper after the extra stock on the ends has been cut off.
The half core box for this pattern is shown in Fig. 43. The-two parts, B, are of the same size and should be cut from a single block of wood long enough to allow for finishing to the required length of each piece after the half hollow has been cut out. It will be noticed that the end walls as well as the shell of the casting, Fig. 38, are only

Fig. 46C. Rounded Corner.
4; in. thick, so that the centre block of the core box, Fig. 45, must be made very carefully to the size required. No further directions should be necessary for making the core box, as the work is done exactly in the same way as explained in previous exercises.
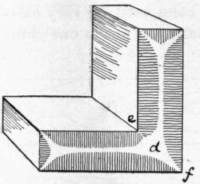
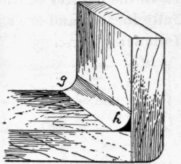
In a previous chapter I took up very briefly the necessity for fillets. Sharp corners on the inside of a pattern form sharp corners of round when molding and thus give the molder a vast amount of trouble. Sharp corners not only detract from the appearance of the casting, but also weaken the casting, as clearly shown at Fig. 46. At A is shown a casting with a sharp corner. As iron hardens crystals seem to form in such a way that their lines of strength, as they are called, are perpendicular to the surfaces, as shown by the lines in this figure. This leaves, of course, an open space or, rather, a space of irregular crystaliza-tion at d, and so the casting is liable to break along the line. For overcoming this difficulty a fillet is generally placed on the inside corner, as shown at B, Fig. 46, h being the fillet. It will be noticed that the outside corner of the pattern is also somewhat rounded.
At c, Fig. 46, is shown a casting for a pattern having a carefully rounded corner, there being now no space of irregular crystalization, as occurred at d in Fig. 46, A.
Continue to:
My Books

