Tool Making For Amateurs. Kinds of Steel. Forge for Tool Making. Set of Useful Punches. Continued
Description
This section is from the book "Amateur Work Magazine Vol3". Also available from Amazon: Amateur Work.
Tool Making For Amateurs. Kinds of Steel. Forge for Tool Making. Set of Useful Punches. Continued
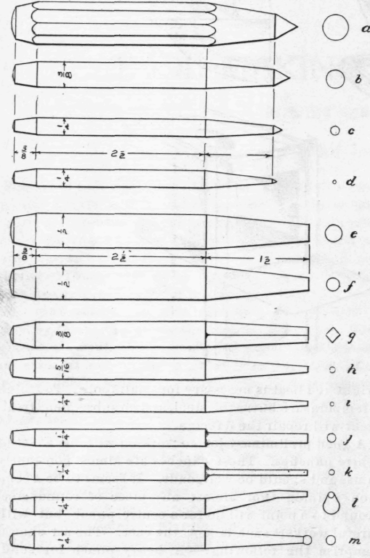
A good preliminary lot to work on will be a set of centre punches. These punches are almost constantly in use and should be well made. It seems to be a common opinion that almost any piece of round steel ground to a point will do for a centre punch, but with careful workers such is not the case. The set should comprise the following: - A heavy punch for solid, hard pieces, and in starting a large drill; it should be at least 5/8 in. diameter, with a conical point about 3/8 in. diameter at the base, as shown in a, Fig. 2; punches b and c, which are used for lighter work, and punch d, which is used only in laying off work. Accurate work cannot readily be laid off with a thick punch, owing to its hiding the intersections of the lines.
Many punches are turned from the rod and hardened without any forging, but the more work put into the steel at the working point the better will be its grade. Its grain will be finer and the working edge will stand up in service far better.
After the punch is forged to shape, heat the point to a dull red and instantly plunge the point only into the brine bath, immersing it about 1/2 in. When cold, or at least black, rub a bright spot thereon with a piece of emery cloth tacked to a flat stick, and then hold in the light until the heat in the stock of the punch begins to color the bright spot a straw yellow. At this point plunge the entire punch into the water and move it about until cool. Should the heat remaining in the punch be insufficient, lay the body of the punch over the top hole of the furnace and draw the color to that mentioned above. It must be remembered, however, that all work on each punch, except grinding the point. must be done before hardening, so each should be finished with file and emery cloth before hardening
It is upon the property possessed by steel of taking on certain colors at different temperatures that tempering depends. A steel may be made extremely hard in water, but it would be so brittle that the first blow would crack the point off completely. Upon reheating the hardened piece to a definite temperature, indicated by its color, this hardness is reduced and the tool is thus graded in its degree of hardness to suit the work upon which it is to be used. A list is given below showing the various colors and corresponding temperatures that are used in tempering various tools.
In Fig. 2 is also shown a set of punches very useful in general work. Punches e,f, n and i are for starting or driving pins, bolts, etc.; g is a square end punch often found useful in corners and in special work. Punches j and k are for driving pins through holes where a taper end punch would get stuck; l is an offset punch often used when it is impossible to reach with a straight one, and m is very handy in bending the end of a pin so as to make it hold, similar to riveting. Hammers often bruise the work, especially in close quarters. The head should always be kept slightly round, which prevents "brooming" and lessens the liability of an injured hand from a glancing hammer blow.
In hardening and tempering, only the points should be hardened and the temper drawn so as to leave the stock of the punch soft and able to withstand blows • without breaking. Always grind the points to shape after hardening and exercise care not to burn the thin edge on an emery wheel. When the edge of a tool blues, it shows that the steel has lost its hardness at that point and should be ground down until hard metal is reached.
Below is given a table of colors and temperatures for tempering, and the tools which are tempered at each particular color. These colors always refer to the color at the working point, and the color must "crawl" from the body toward the working edge. This insures the hardness decreasing in an even gradation.
Table Of Colors And Temperatures For Tempering.
Color. | Temp. | Tools. |
Very pale yellow | 480° F. | Scrapers for brass, steel-engraving tools, slight turning tools, hammer faces, planer tools for steel and iron, ivory and bone cutting tools, wood engraving tools. |
Straw yellow. | 460° F. | Milling cutters, wire drawing dies, boring cutters, screw cutting dies, taps, punches and dies, pen knives, reamers, half round bits and chasers. |
Brown yellow. 1 | 300° F. | Stone cutting tools, gouges, hand-plane irons, twist-drills, flat drills for brass, wood boring cutters, drifts. |
Light purple. | 530o F. | Edging cutters, augers, dental and surgical instruments, cold chisels for steel. |
Dark purple. | 550° F. | Axes, gimlets, cold chisels for cast iron, saws for bone and ivory, needles, firmer chisels, cold chisels for wrought iron, hack saws, framing chisels, circular saws for metal, screw-drivers, springs, saws for wood. |
Dark blue. | 570° F. | |
Pale " " | 610° F. | |
Blue, tinged green. | 630° F. |
A Few Don'ts For Forging, Hardening And Tempering.
Don't hurry.
Don't strike too hard.
Don't overheat the steel.
Don't heat the steel too quickly. This heats the outside and not the centre.
Don't hammer hard when the heat falls below dull red. Use light taps then in finishing.
Don't allow the red hot steel to "soak" in the furnace.
Don't use two heats where one will do.
Don't harden the tool where it is not needed.
Don't have tools too hard. It is easier to resharpen a dull tool than to reforge a broken one.
Don't hold the tool still in the bath. Move it constantly, except where hardening only the point.
Don't forge too thin an edge on a tool. Make the cutting edge on a grindstone or emery wheel.
The following article will treat of lathe tools.
Continue to:
My Books

