How To Build A Summer-House With Table And Seats
Description
This section is from the book "How To Make Common Things. For Boys", by John A. Bower. Also available from Amazon: How to Make Common Things.
How To Build A Summer-House With Table And Seats
A rustic summer-house is a structure we have frequently been asked about. How is it to be done? How shall we set about it? - and the like questions. Suppose we now give a few particulars that will help you to contrive such a shelter. First, pick the most suitable spot you may have, a corner which affords a nice situation, but do not select a spot where the drippings, and those likely to be heavy ones in rainy weather, will fall on to the roof of your house.
The frame-work of the house can either be made with squared wood or rustic; the latter gives a better appearance to a garden structure. If you can easily secure the wood it will well repay you. This is a larger piece of work than we have dealt with before, so that we must ask you to keep well to our general instructions.
If you cannot get any good strong rustic posts for uprights, get some quartering 3 inches square for a "lean-to " house, the back of which may come close to a wall, so that the wall may form the actual back of the house. Having fixed on the size, mark out with a line your ground-plan. Get the uprights sufficiently long, so that they be sunk a foot into the ground. Let them be quite vertical, and so sunk that above ground the front stand at the same height; and the two back ones at the same height, but six inches lower than these forming the front of the house. The end is shown in Fig. 49, a. Mark off the angle at which the uprights must be cut, for the top side piece to be nailed to, then nail it securely on the uprights at each end. For the front and back top rail, cut the ends, using the halving joint, Fig. 21.

Fig. 49.
Put it into position, as Fig 49, b. Bore two good holes, and drive in 3-inch nails. It would be as well to char or tar the ends before putting them into the ground, as we directed for the swing.
Now you must have a frame-work for the lower part, to which the door-frame can be fixed, and to which the floor-boards can be laid. This had better be of 3-inch quartering, halved into the uprights at front, back, and two ends. This will complete the outside and heavier framework.
The next thing, make up your mind as to the kind of doorway you would like. If you can make it with light crooked wood to give it a rustic appearance, so much the better; if not, take two lengths of 3-inch quartering ripped down the centre. Plane up the sawn side. Set a doorway 2 feet wide in the centre of the front of the house. Set these uprights into the threshold-piece to the depth of about an inch, and cut away the same in the upper part of the frame as in Fig. 49, c, taking great care that both pieces are upright. Secure them by some good nails, but bore holes first so that none of the wood gets split. Next determine the height of the doorway, and put on two pieces of the same material, halved 3-inch quartering ; cut off lengths so that they form posts, as in Fig. 49, d. The sides and back can be filled in with thin boards of any description; those most easily obtained by you. Then there is the roof, which must be laid on rafters; the number of the latter required depends upon the length of the summer-house.
Then it can be boarded, and afterwards covered with felt to make it water-tight; or sheet-zinc; or even Willesden paper, which is light, water-tight, and durable. In fact if this substance is employed, no wood is required for the roof; the same remark applies to sheet-zinc. A piece of zinc must also be used all along the back lower edge of the roof, if it comes near to a wall, to form a sort of "gutter" to drain off the water; if free from the wall, a ridge lapped over and turned downwards is all that will be necessary. The front will look nicely \i filled in with trelliswork, as in Fig. 49; this may be done with ordinary plasterer's laths, or light slips of wood. In arranging this trellis-work, be careful and let it be quite uniform. Creeping plants may be afterwards trained to cover any part of the outside of the summer-house, The outside may be stained and varnished, or painted according to taste and the character of the surround-ngs. If made in rustic wood, painting it will of course be out of character with the structure. If you require a very level floor you can pave it with tiles, cover it with gravel well rammed and rolled; with shingly stones levelled and spread over with a layer of cement; or the floor may be boarded.

Fig. 50. - Screw-drivers.
Now you want seats and a table. A permanent seat can be supplied by an inch board, 8 inches to 10 inches wide, supported on end-pieces of the same thickness, and cut off a suitable height and nailed to the back ends of the summer-house, so that it runs the whole length. The number of intermediate supports must depend on its length. The table is the last item we need describe. The size of course we leave to you. In your choice you must be guided by exactly what you want, and if made movable it may be used generally for out-door purposes.
Take some ¾-inch boards; cut them off each to the required length. Suppose the breadth is to be 3 feet, and made with four 9-incb. boards,plane, up the edges with your jack-plane, and see that the edges when brought together fit quite close. Cut off three lengths of wood 2½ inches wide and ¾ inch thick and 3 feet long for rails, one for each end and one for the centre; to these screw down securely the boards you have prepared with their edges close together. They will be the more secure if glue is spread along the edges before screwing them down. You should have two screw-drivers at least; one for heavy work, such as this we are now describing, and one smaller, as shown in Fig. 50. If you have the skill, the boards forming the top may be tongued and grooved instead of being brought together with the edges flush. This process we show in Fig. 51, a - the pieces before being put together; b, after they are glued together, For the support of the table, you want some red deal, cut in lengths of about 3 feet, and from 4 inches to 6 inches wide and 1 ½ inches thick, to bo fixed into one another where they cross, as in Fig. 51, c. You must make a good joint, or the firmness will be lessened. Next, screw the legs on inside the rail at the table-top with good 2½-inch screws; and to give greater firmness still, a rail, Fig. 51, c, must be made and fixed as shown, held in position outside by a stout wooden pin, f. This will make a strong substantial table, such a one as many of our backwoodsmen brothers would be glad of in their log-huts, and such as you may be able to knock up if ever so fixed yourself.

Fig. 51. - Summer-house Table.
Stools or forms may be made in the same style; but of all the simple seats to make, the three-legged stool is the easiest to accomplish. Take a slab of wood, round, square, or oblong - round is certainly best - in thickness it may be from 1½ to 2 inches thick. Bore three holes at equal distances from each other, and about 1½ inches from the edge; bore them not straight through, but sloping towards the centre. Into these holes drive some stout pieces of wood, as far as they will go; cut them off at the top flush with the seat; and from the direction of the holes the feet will project outwards beyond the seat; cut them off each the same length, and see that it stands firmly. Next cut a slit by means of a chisel into the top part of each foot, and drive in a wedge. This will firmly fasten the feet, and prevent their becoming loose when the wood gets thoroughly dry, should not that precaution have been taken at the first. For a square or oblong seat, four feet will do better than three, and if the seat is high, the legs must be strengthened by a ledge, which may be a half-inch rod let into holes bored into the legs and held firmly by glue.
A rough kind of chair may be made easily, of a seat or slab of wood, supported in a frame formed of four legs; where the legs on one side extend upwards to form the back, the legs and the back being strengthened with rails. The instructions already given, will, we think, enable you with exertion of a little ingenuity to make one, if you are so inclined.
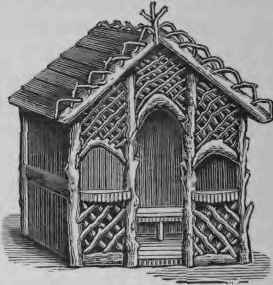
Fig. 51 a.

Fig. 51 b.
Designs for Rustic Summer-houses. For these we are indebted to Messrs. F. Rosher & Co.
Continue to:
My Books

