Colonial Doll's House
Description
This section is from the book "Things To Make In Your Home Workshop", by Arthur Wakeling. Also available from Amazon: Things to Make in Your Home Workshop.
Colonial Doll's House
No gift is apt to delight a small girl quite so much as a really fine doll's house. To her it is a fairy home where her doll children can live and play. She can devise new furnishings, redecorate the rooms, and sweep, dust, wash and cook to her heart's content.
And after all, isn't that the secret of a satisfying toy? It must allow the child to do something genuinely constructive and stimulate her imagination and ingenuity; at the same time, it should convey a sense of grown-up reality. A doll's house does all this, especially if it is as complete and realistic a model of a house as the one illustrated on this page.

Fig. 12. - How closely the model resembles a real house is shown by the plans and front view.
At first glance the doll's house in Fig. 11, which is based upon one of the most popular Colonial designs, may appear to be complicated in its construction, but when examined closely and studied well it will be found relatively simple for any handy man or boy to build in spare moments in his home workshop. Only household tools are needed and no high degree of skill or previous experience is called for.2

Fig. 13. - The floors, walls, and partitions before and after the roof and trimmings are added.

Fig. 14 - The house is made in three parts.
The small fittings are added before putting the sections together.
The first thing to do is to study the drawings (Figs. 12 to 16) until a clear understanding of the method of construction is obtained; the next is to examine the list of parts.
The best material to use is either plywood or wallboard, because they do not readily warp or split. The thickness for all the major parts of the house should be preferably ½. in., although 3/8-in. stock can be used if the other cannot be obtained. Of course, any difference of thickness will make a slight variation in the length of some of the parts. As many of these materials come in regular sizes of ¼ in., they may be glued together and used double thickness to make ½ in.
Veneered stock such as is found in some packing boxes may be made use of in the construction of the house. This usually is 3/8 in. thick and may be had very cheaply.
The drawings are for a house that is just one twelfth the size of a real house, and all of the furniture and parts are planned on this scale. A smaller house may be made by reducing the dimensions proportionately.
In Figs. 13 and 14 is shown the method of construction. With the two floor boards, Nos. 3 and 4, squared and sandpapered and the upper ceiling board No. 2 in shape, the position of the walls should be marked off carefully, using the plans in Fig. 12 as guide. Nos. 3 and 4 are each ½ by 27 by 33 in., while No. 2 is ½ by 29½ by 34 in. The main floor board is reinforced on the edges with a 1 by 2 in. strip marked 4A in Fig. 14; this extends all the way around the edge and across the middle.
As the second floor board (No. 3) serves as floor and ceiling, it is sandpapered on both sides.
The rooms will be so small when the house is assembled that it will be next to impossible to do much nailing or other work within them. For this reason it will be best to do all the fitting of doors, bases, casing, stairs, and the like before the house is completed. The three sections shown in Fig. 14 should each be assembled as separate units. Do all wall painting or decorating and floor
Materials For Doll's House
No. | Item and Remarks | T. | W. | L. | Rq. |
1 | Roof....... | ½ | 19 | 37 | 2 |
2 | Second floor ceiling. | ½ | 29½ | 34 | 1 |
3 | " " " | ½ | 27 | 33 | 1 |
4 | First " " | ½ | 27 | 33 | 1 |
4A | " " base . | 1 | 2 | 34 | 4 |
5 | Gable ends........ | ¾ | 29½ | 10 | 2 |
6 | Wall ...... | ½ | 9 | 23 | 1 |
7 | " ........... | ½ | 9 | 15¼ | 1 |
8 | "................ | ½ | 9 | 15¾ | 1 |
9 | "................ | ½ | 9 | 9¼ | 1 |
10 | "................. | ½ | 9 | 11¼ | 1 |
11 | "................. | ½ | 10 | 27 | 1 |
12 | ".............. | ½ | 10 | 18¼ | 1 |
13 | "............ | ½ | 10 | 16¼ | 1 |
14 | "................. | ½ | 10 | 20¼ | 1 |
15 | Columns 1 in. in diameter at large end | 1 | |||
16 | Left end...... | ½ | 21 | 27 | 1 |
17 | Right "...... | ½ | 21 | 27 | 1 |
18 | Back........ | ½ | 21 | 34 | 1 |
19 | Front....... | ½ | 21 | 34 | 1 |
20 | Small chimney... | 3 | 3 | 4 | 1 |
21 | Large " (proper) | 1 | 6 | 21 | 1 |
21A | " " (top).. | 2 | 5 | 15 | 1 |
22 | Fireplace..... | ½ | 6½ | 4 | 1 |
23 | Front porch roof............ | ¼ | 6¾ | 2¾ | 2 |
24 | Back " " .. | ¼ | 2¾ | 1½ | 2 |
25 | Return roofs at ends | 1½ | 1½ | 4 | 4 |
26 | Front porch steps.. | 1½ | 4½ | 14 | 1 |
27 | Back " " .. | 1½ | 3¼ | 5 | 1 |
28 | Front porch arch.. | 2¼ | 10 | 4 | 1 |
29 | Back " frame . | ½ | 3½ | 9¼ | 1 |
30 | Stair horse......... | ¼ | 3 | 15½ | 1 |
31 | Steps - triangular .. | ¾ | 29/32 | 3 | 13 |
32 | " - treads ... | 1/8 | 1¼ | 3 | 13 |
33 | Stair posts (clothes pins) ...... | 1 | |||
34 | Stair posts (clothes pins)...... | 1 | |||
35 | Stair rails..... | 3/16 | ¼ | 8½ | 3 |
36 | " balustrade (of match sticks) .. | 30 | |||
Doors and windows made like drawing to fit. Casings 1/8 by ½ in. wood or cardboard. Small brass hinges, 3 pairs. All dimensions are in inches. All material wood except where otherwise specified.
2 Larger drawings are contained in Blueprint No. 72, listed in the appendix, and designs for a variety of suitable furniture for the doll's house appear in Blueprint No. 73, polishing while the sections are still open.
Next, the outside walls should be made up. The door and window openings should be marked out accurately on both sides of the board and cut out with an ordinary coping saw or keyhole saw.
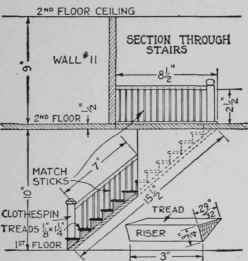
Fig. 15. - The stairs are made by gluing triangular steps to a thin board and adding tiny treads.
For casing and finishing the doors and windows see Fig. 16. The casings may be made of 1/8-in. wood. The cheap yardsticks that some firms use as advertising mediums, if planed smooth and ripped through the center, are just the thing for the purpose. If these cannot be found, heavy cardboard or berry crates will serve quite well. If the casings are placed even with the edge of the openings, frames will not be needed. The baseboards should be ¾ in. wide and the same thickness as the casings.
The stairs (Figs. 15 and 18) will be found to be the most difficult part of the construction. It is hardly possible to show their construction fully enough, but the details can be supplemented by the reader's observation and ingenuity. The stair steps may be glued to a thin board, each step being a solid block. Another plan would be to cut the steps from a solid block. Only the six lower steps are exposed to view, the other seven being hidden between walls Nos. 12 and 14. The stair well in the second floor is 3 by 7¼ in. and cut so that it is directly between walls 12 and 14.
Continue to:
My Books

