How To Do Veneering
Description
This section is from the book "Things To Make In Your Home Workshop", by Arthur Wakeling. Also available from Amazon: Things to Make in Your Home Workshop.
How To Do Veneering
Amateur woodworkers are prone to consider veneering a phase of woodworking entirely beyond the range of their abilities and to speak of it with a note of awe and longing in their voices. To demonstrate that the simpler forms of veneering are not beyond the abilities of any home worker with a fair degree of skill, the making of a veneered box will be described. It is such a box (Fig 38) as any young lady will value as a gift from her father, her brother, or even more from some other girl's brother.
The box itself (Fig. 39) may be made of any easily worked, thoroughly seasoned 1/2 in. thick wood, but the veneer should be mahogany, rosewood, walnut, or other fancy wood. Veneers can be purchased from some lumber dealers, from many plywood manufacturers and dealers in fancy woods, and usually from cabinetmakers and furniture repair men.
The corners and the top and bottom of the box should be made with halved joints to reduce the amount of visible end wood, which might show beneath the veneer under certain circumstances. Fit the joints carefully to insure squareness, and glue and nail the parts together with 1-in. No. 16 brads, being careful that the nails will not interfere later on with sawing the box at C.
Before the top and bottom are glued in place, cut ¼-in. pieces the width of the space between the top and bottom inside of the box (about 3½ in.) and just the length to fit snugly as indicated by dotted lines D. A drop or two of glue on the end wood will hold these pieces, which are to resist the pressure of the hand screws and prevent the sides and top from bending inwards when the veneer is clamped on.
Be sure the outside of the box is planed smooth, for rough and imperfect places will almost always show through thin veneer. As this article is primarily a discussion of veneering, the box itself can be left to the skill of the worker without further directions.
The veneers for the ends should be cut about 1/2 in. larger each way than the size of the box, as at E. Make straight, smooth cauls (blocks) of some soft wood about the size suggested at F. Provide pieces of folded newspaper to be placed between the veneer and the caul as at G; the paper will absorb moisture coming through the veneer from the glue. Set hand screws or clamps as at H ready for immediate use. Two may do but four will be better.
You are now ready for gluing. The room should be warm - at least 80° F., although 100° would be better. Heat the ends of the box, the veneer, and the cauls. Wax the latter with a piece of paraffin to prevent any danger of sticking.
Use rather thick glue of good grade, newly mixed and very hot. Equally important are the speed and skill of the worker. Spread the glue on one end of the box, not on the veneer; place the veneer on the glue, then add the paper and the caul. Turn the box to rest vertically on this caul and repeat the process on the other end.
Fig. 38. - Attractive pieces like this trinket ease or jewel bos can be made by any woodworker who learns the art of veneering.
Put the hand screws on without disturbing the cauls, and apply enough pressure to insure perfect contact. Too much pressure on such a small surface will force the glue out around the edges and "starve" the joint just where the greatest strength is needed. Another pair of hands to hold pieces in place, if you can get someone to help you, will simplify this process.
When the squeezed-out glue has hardened to a gummy texture, cut it away and save some trouble later on. Allow the box to remain at least twenty-four hours, and longer if possible. On a broad surface more time would be necessary.
Trim the veneer to the other surfaces of the box with the utmost care. Prepare veneer, paper, and cauls for the sides of the box and repeat the gluing process, using six hand screws if they are available, although four will answer the purpose if placed judiciously. Allow the same time for setting and repeat the process upon the top. No veneer will be needed on the bottom, although a piece of felt, glued on the last thing, will finish the bottom correctly.
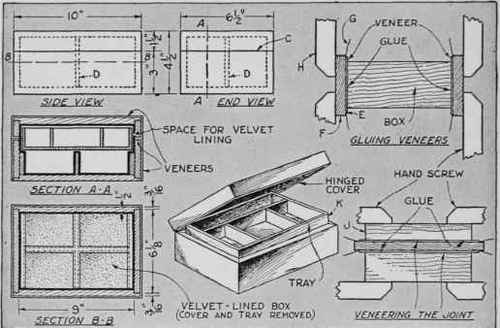
Fig. 39. - This box is a typical example of veneering within the range of home workshop equipment. Note the use of paper G, blocks F, and hand screws H.
Sandpaper all the veneered surfaces. Round the corners slightly to prevent splintering, but not more than the thickness of the veneer.
With a sharp gage make an accurate line C 1 ½ in. from the top. Saw very carefully around the box and remove pieces D. With a perfectly conditioned plane, smooth the sawed edges, being sure that no splinters are broken from the veneers. Be sure to make the joint fit accurately.
Cut strips of veneer ¾ in. wide and glue them around the joining edges of both box and cover. Gently rub each piece in place, after all are cut and fitted, with the flat face of a hammer. This must be done rapidly.
Glue the box edges first, for example, and place a piece of paper and a caul on the veneer and weigh it down while the veneer is being placed on the cover. Remove the weights from the caul and place paper and the cover upon it as shown at J. Apply hand screws with moderate pressure, and allow the work to set. Later trim and sandpaper the edge veneers.
Hang the cover with ¾-in. narrow butt hinges or place small butterfly hinges on the back; the latter is by far the simpler. Cut in a small lock or catch, although either would be more ornamental than useful.
Make the tray about 3/16, in. smaller than required to allow for the velvet lining which should cover the inside completely. Make the tray of 3/16-in. wood with butt joints throughout. Plane the front face of the tray back on a slight angle as at K to allow the cover to close without striking the front of the tray.
Finish with three or more thin coats of shellac, rubbed with No. 4/0 sandpaper between coats, and polish with a first-class grade of furniture wax.
Continue to:
My Books

