Planing A Hardwood Surface
Description
This section is from the book "Things To Make In Your Home Workshop", by Arthur Wakeling. Also available from Amazon: Things to Make in Your Home Workshop.
Planing A Hardwood Surface
If you have a glued-up hardwood surface to plane, first support it firmly on the bench against one or two strips thinner than itself as shown at A, Fig. 25. It is essential, too, that the bench be absolutely rigid. If your bench happens to give when pushed against, brace it in any convenient way.
Level off diagonally at B, and then plane straight with a jointer plane.
Adjust the smooth plane blade and back iron by holding the sharpened iron as shown at C, and pushing the cap forward with the thumb until the cutting edge appears no wider than a thread. Hold it in place with the left hand and tighten the screw.
Plane lengthwise with the smooth plane as at D. Have the iron exceedingly sharp and adjusted accurately to make the thinnest possible shavings.
Scrape the surface with the grain, but at a slight angle as at E. Sharpen the cabinet scraper by the method described and illustrated on pages 17 and 18.

Fig. 24. - Steps in planing a board accurately. Testing the surface and ends for trueness, gaging for thickness, sawing off to length, and marking for width.

Fig. 25. - Planing a glued-up hardwood surface. Methods of leveling, adjusting the smoothing plane blade, using the cabinet scraper, and sandpapering.
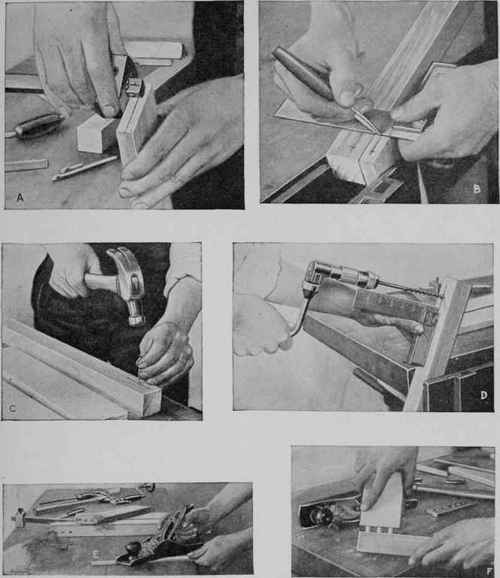
Fig. 20. - How to make doweled butt joints. Gaging and marking for the dowel holes, boring them, making the dowels, and testing the joint.
Next sandpaper with No. 1, ½. or 0 paper, depending upon the wood and quality of surface desired. Wrap the paper around a block and make straight strokes back and forth with the grain as at F. Crosswise or circular strokes are certain to leave scratches that will later show through the polish.
Continue to:
My Books

