Ship Model Makers' Club. Part 4
Description
This section is from the book "Things To Make In Your Home Workshop", by Arthur Wakeling. Also available from Amazon: Things to Make in Your Home Workshop.
Ship Model Makers' Club. Part 4
Fig. 31. - Comparing this view with Fig. 29 will make clear the stern construction.
Across the stern there may be a little balcony. It is a thin platform % in. wide by 4½ in. long. On each corner erect a 1/8-in. post, 5/16 in. high; onto these glue and nail a very thin handrail, half-lapped at the corners, and connect the rail to the platform, between posts, with thin round sticks. Bore entirely through the platform and halfway through the handrail for these. Glue and nail the balcony from underneath to the sternboard at its lower edge, so that the platform will slope with the sheer of the ship. This can be placed in position when made.
The hawse pipes for the forward anchors are 5/16-in. holes, 1½ in. from the stem, between the first and second wales. They should have wooden or gesso (glue and whiting) rims. The cat-holes for the after-anchor cables are smaller holes, 1 in. from the stern and ½ in. above the lowest wale (in line with the tiller hole).
There should be circular mooring ports on either side, just above the level of the main deck and near its extremities; these also should have lips. They are for mooring ropes and to let the water off the deck.
The rudder can be seen in Fig. 33. It is the same thickness as the sternpost and extends 4 in. up from the keel line. The top is cut square to take the tiller, which fits on it and extends into the hull, through a semicircular hole, with its lower edge 3½ in. in from the keel. The rudder may be hung with double-pointed nails driven into it and the sternpost or with regular pintles and gudgeons. The pintles may be made from thin nails clipped in the center of strips of thin brass or tin; the strips are then brought around the edges and nailed to the flat of the rudder. The gudgeons are similar, except that the nails are withdrawn, leaving holes for the pintle nails to fit into; they are nailed to the sternpost, so that both parts lie horizontal. The lower edge of the pintle straps coincides with the upper edge of the gudgeon straps, allowing the rudder to turn.
A good compromise method is to make eyes from pins and hooks from other pins and drive them into the edges of the sternpost and rudder respectively.
The hull may now be finally colored. An antique effect for this model is desirable. This antiquing is difficult to describe and the result will necessarily depend considerably on the builder.
The lower part to the water line should be white, but with a lot of Vandyke brown rubbed in, with here and there touches of raw sienna, green and a mi-nute amount of red.
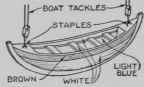
Fig. 32. - How to whittle the ship's boat. It is only 3¾ in. long.
The upper parts outside will be various shades of brown stain - mahogany and old oak stain, both separately and blended, to get a rich effect, with here and there some verdigris green (artist's oil color) rubbed in. The skids are the darkest, and on the wales some Harrison red is rubbed to look as if they had once been painted red but most of the color had been rubbed off. For all decks and uprights use an irregular and lighter shade of brown, making the uprights and skids always darker than the decks.
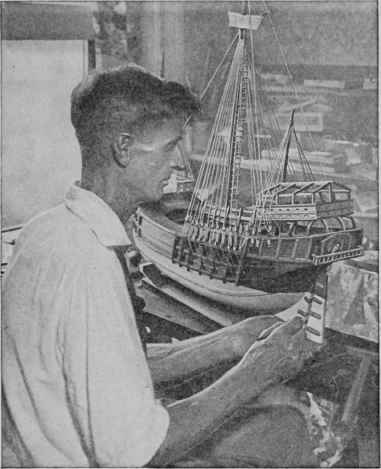
Fig. 33. - Captain McCann putting the finishing touches on the hull of his own exhibition model of the ship, which is half as large again as that in the accompanying drawings.
When all the coloring is done, the whole (excepting the white) may be given a thin coat of varnish - enough to bring up the color but not to make anything shiny. Shiny parts should be rubbed flat with pumice-stone powder.
All the spars (Figs. 34 and 35) can best be made from straight-grained dowel sticks. The mainmast will set about ¾ in. into the deck and extend 17 in. It is 3/8 in. at the base and tapers to about one half that at the top, as do all the masts. The foremast is 9 in. long and the mizzen 7 in., each measuring ¼ in. in diameter at the base.
The main yard is in two pieces of ¼-in. dowel, each 8 in. long. They overlap 4 in. where they are lashed (bound) together with four cord lashings. The main topsail yard is 4 in. long and 3/16 in. in diameter; the fore yard is 6 in. long and a bare ¼ in. in diameter, and the lateen yard at the mizzen is in two pieces, each 6½ in. long by 3/16 in., overlapping 2% in. All the yards taper to nearly half their diameter at the ends. They and the masts should be stained and lightly varnished a reddish brown to represent antique pitch pine.
The foremast should be almost upright. The mainmast lies aft at an angle of 6 degrees, the mizzen at about 11 degrees, and the bowsprit rises at an angle of about 32 degrees.
The bowsprit is ¼ in. in diameter, tapered; it extends 5½ in-from the deck. The hole to step it in is bored in the hull through the square hole in the forecastle deck, close up to the right side of the foremast. Have it firmly fixed and nailed down if necessary so that it will not lift from the strain put upon it by the forest ay. The chainwales (the modern name is channels) to spread the rigging are wooden platforms ¾ in. wide, 4½ long and 3/16 thick. They extend from the first skid abaft the mast to the fifth. They arc notched inside to fit on the skids and lie on the upper wale. The outside edge of each has nine equidistant notches to take the chains.
When these are on it will be necessary to make 56 heart-shaped deadeyes, ¼ in. high, 3/16 wide and 1/8 thick. I believe they should have three holes each, but it is possible that the original deadeyes had only one large one. They have a groove round their narrow edges. For the sake of brevity and clearness, a few nautical terms must be used in describing the rigging. Most of these are self-explanatory, and all of them are defined and many are illustrated in unabridged dictionaries.

Fig. 34. - The rigging plan. As in all conventional drawings of sailing ships, the yards are shown diagramniatically fore and aft, although in the actual model they should be braced diagonally.
Continue to:
My Books

