How To Use The Microscope. Part 3
Description
This section is from the "Histology of Medicinal Plants" book, by William Mansfield. Also see Amazon: Histology of Medicinal Plants.
How To Use The Microscope. Part 3
Cutting Sections
Specimens prepared as described above may be cut with a hand microtome or a machine microtone
Hand Microtome
In cutting sections by a hand microtome, it is necessary to place the specimen, embedded in paraffin or held between pieces of elder pith, carrot, or potato, over the second joints of the fingers, then press the first joints firmly upon the specimen with the thumb pressed against it. If they are correctly held, the specimens will be just above the level of the finger and the end of the thumb, and the joint will be below the level of the finger.

Fig. 33. Hand Microtome.
Hold the section cutter (Fig. 33) firmly in the hand with the flat surface next to the specimen. While cutting the section, press your arm firmly against your chest, and bend the wrist nearly at right angles to the arm. Push the cutting edge of the microtome toward the body and through the specimen in such a way as to secure as thin a section as possible. Do not expect to obtain nice, thin sections during the first or second trials, but continued practice will enable one to become quite efficient in cutting sections in this manner.
When the examination of drugs is a daily occurrence, the above method will be found highly satisfactory.
Machine Microtomes
When a number of sections are to be prepared from a given specimen, it is desirable to cut the sections on a machine microtome, particularly when the sections are to be prepared for the use of students, in which case they should be as uniform as possible.
Great care should be exercised in cutting sections with a machine microtome - first, in the selection of the type of the microtome; and secondly, in the style of knife used in cutting.
For soft tissues embedded in paraffin or collodion, the rotary microtome with vertical knife will give best results. The thickness of the specimen is regulated by mechanical means, so that in cutting the sections it is only necessary to turn a crank and remove the specimens from the knife-edge, unless there is a ribbon-carrier attachment. If the sections are being cut from a specimen embedded by the quick paraffin method, it is best to drop the section in a metal cup partly filled with warm water. This will cause the paraffin to straighten out, and the specimen will uncoil. After sufficient specimens have been cut, the cup should be placed in a boiling-water bath until the paraffin surrounding the sections melts and floats on the water. Before removing the specimen from the water-bath, it is advisable to shake the glass vigorously in order to cause as many specimens as possible to settle to the bottom of the cup. The cup is then placed in iced water or set aside until the paraffin has solidified. The cake-like mass is then removed from the cup, and the sections adhering to its under surface are removed by lifting them carefully off with the flat side of the knife and transferring them, together with the sections at the bottom of the cup, to a wide-mouth bottle, and covered with alcohol, glycerine, and water mixture; or if it is desired to stain the specimens, they should be placed in a weak alcoholic solution.
Specimens having a hard, woody texture should be cut on a sliding microtome by means of a special wood knife, which is especially tempered to cut woody substances. Woody roots, wood, or thick bark may be cut readily on this microtome when they have been embedded by the quick paraffin process. The knife in the sliding microtome is placed in a horizontal position, slanting so that the knife-edge is drawn gradually across the specimen. After cutting, the sections are treated as described above.
The thickness of the sections is regulated by mechanical means. After a section has been cut, the block containing the specimen is raised by turning a thumb-screw. In this microtome the knife, as in the rotary type, is fixed, and the block containing the specimen is movable.
If the specimen has been infiltrated with, and embedded in, paraffin or collodion, the treatment of the sections after cutting should be different.
In the case of paraffin, the sections are fastened directly to the slide, and the paraffin is dissolved by either chloroform or xylol. The specimen is then placed in 100, 95, and 45 per cent alcohol, and then washed in water. These sections are now stained with water-stains, brought back through alcohol, cleared, and mounted in Canada balsam.
If alcoholic stains are used, it will not be necessary to dehydrate before staining, and the dehydration after staining will also be eliminated.
Sections infiltrated with collodion are either stained directly without removing the collodion or after removal.
Forms Of Microtomes
The hand cylinder microtome (Fig. 34) consists of a cylindrical body. The clamp for holding the specimen is near the top below the cutting surface. At the lower end is attached a micrometer screw with a divided milled head. When moved forward one division, the specimen is raised 0.01 mm. This micrometer screw has an upward movement of 10 mm. The cutting surface consists of a cylindrical glass ring.
The hand table microtome (Fig. 35) is provided with a clamp, by which it may be attached to the edge of a table or desk.
The cutting surface consists of two separated but parallel glass benches. The object is held by a clamp and is raised by a micrometer screw, which, when moved through one division by turning the divided head, raises the specimen 0.01 mm.
The sliding microtome has a track of 250 mm. The object is held by a clamp and its height regulated by hand. The disk regulating the micrometer screw is divided into one hundred parts. When this is turned through one division, the object is raised 0.005 mm. or 5 microns, at the same time a clock-spring in contact with teeth registers by a clicking sound. If the disk is turned through two divisions, there will be two clicks, etc. In this way is regulated the thickness of the sections cut. When the micrometer screw has been turned through the one hundred divisions, it must be unscrewed, the specimen raised, and the steps of the process repeated. The knife is movable and is drawn across the specimen in making sections.
The base sledge microtome (Fig. 36) has a heavy iron base which supports a sliding-way on which the object-carrier moves.
The object-carrier is mounted on a solid mass of metal, and is provided with a clamp for holding the object. The object is raised by turning a knob which, when turned once, raises the specimen one to twenty microns, according to how the feeding mechanism is set.
Sections thicker than twenty microns may be obtained by turning the knob two or more times. The knife is fixed and is supported by two pillars, the base of which may be moved forward or backward in such a manner that the knife can be arranged with an oblique or right-angled cutting surface.
The Minot rotary microtome (Fig. 37) has a fixed knife, held in position by two pillars, and a movable object-carrier. The object is firmly secured by a clamp, and it is raised by a micrometer screw. The screw is attached to a wheel having five hundred teeth on its periphery. A pawl is adjusted to the teeth in such a way that, when moved by turning a wheel to which it is attached, specimens varying from one to twenty-five microns in thickness may be cut, according to the way the adjusting disk is set. When the mechanism has been regulated and the object adjusted for cutting, it is only necessary to turn a crank in cutting sections.

Fig. 34. Hand Cylinder Microtome.
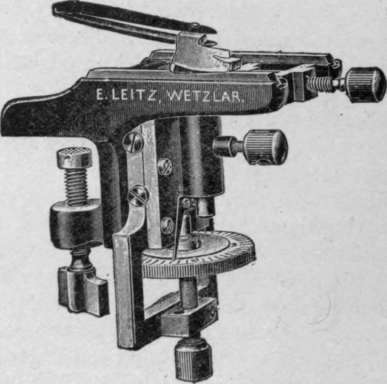
Fig. 35. Hand Table Microtome.

Fig. 36. Base Sledge Microtome.

Fig. 37. Minot Rotary Microtome.
Care Of Microtomes
When not in use, microtomes should be protected from dust, and all parts liable to friction should be oiled.
Microtome knives should be honed as often as is necessary to insure a proper cutting edge. After cutting objects, the knives should be removed, cleaned, and oiled.
It should be kept clearly in mind that special knives are required for cutting collodion, paraffin, and frozen and woody sections. The cutting edges of the different knives vary considerably, as is shown in the preceding cuts.
Continue to:
My Books

