Types Of Water Supply. Part 2
Description
This section is from the book "A Working Manual Of American Plumbing Practice", by William Beall Gray, Charles B. Ball. Also available from Amazon: Plumbing.
Types Of Water Supply. Part 2
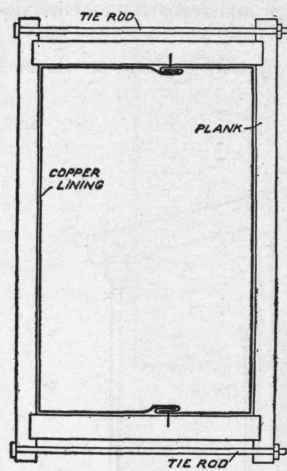
Fig. 55. Plan of Storage Tank in Case Made of Planks Bolted Together..
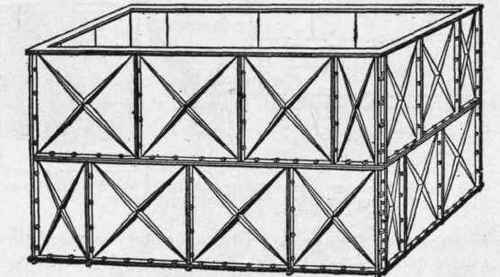
Fig. 56. Cast-iron Sectional Tank..
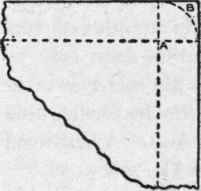
Fig. 57. Marking Off Bottom Sheet of Lead for Tank Lining. Leaving Edge to be Turned Up..
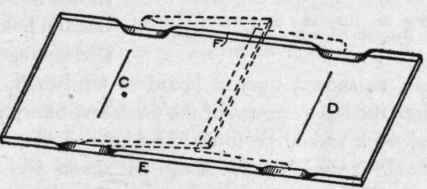
Fig. 58. Bending Bottom Sheet of Lead Ready to be.
Put in Tank.
When the edges and corners of the bottom are formed, clean the edges and about three-eighths of an inch down the outside all around, and rub the clean part with sperm candle. Next make a mark, say three feet from one end on each side, as at E and F, Fig 58. Then, on lines C and D, push the edges down inside, and fold the ends over as indicated by the dotted lines.
The bottom is now ready to be put in the tank, but it must wait until the sides and ends are in. If the sides and ends are light enough to be handled after joining like a ring, cut out a strip half an inch longer than will exactly go around the tank inside, equal to its depth plus the thickness of the tank wood for a flange at the top, as shown at J, Fig. 63. Then clean a half-inch of the under side and edge of the end that is to show in the seam, and three-quarters of an inch of the side that comes in contact with it, at the other end. The lead may then be propped up in the position shown in Fig. 59, by means of trestles and poles Or in any other convenient manner; and the seam may be set, as shown, upon a board of hardwood, and the solder sweated into the lap by means of the torch and blowpipe. Solder for this kind of work should be three-fifths tin and two-fifths lead. A hardwood board is used because it will not smoke and burn like soft wood.
When the seam is made in this way, it shows inside the tank, and a good joint where the bottom seam crosses it can be made with ease, while one is never quite sure of the result if the seam crossed is on the other side.
Another method is to cut the lead the exact length that will go around the tank, clean the edges, butt them together over a hardwood board, as shown in Fig. 60, and burn them together instead of soldering. This can be done by using, instead of solder, a well-cleaned strip of lead about half an inch wide. Sperm candle will also answer as flux for burning. A piece of steel or iron is best to place under the seam when burning, as more heat is required to do the work. An old crosscut saw blade, fastened to a board, serves well for such seams. The bottom edge of the side lining should be cleaned 1 1/4-inches wide, as shown at H, Fig. 61, which indicates how the cleanings on the bottom and the side and end lining come together in the tank. It is a good plan to run the soil brush around the bottom edge of the lining, as shown at 0 and P, Fig. 61. The soil keeps the solder from sweating too deep, and enables the seam to fill quickly.
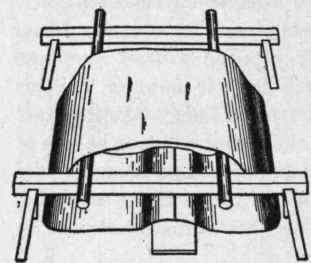
Fig. 59. Side and End Sheet of Lead Propped Up to Enable Seam to be Set and Soldered.
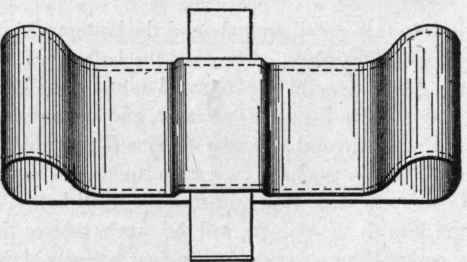
Fig. 60. Another Method of Joining the Two Ends of the Lead Sheet. The Ends are Butted against Each other Over the Hardwood Board and Fused Together..
Further than this, however, soiling, as in the preparation for wiping, is not necessary for sweated seams.
When the side lining "loop" is ready, lift it into the tank, square it out, flange over at the top, and secure the flange with brass, copper, or galvanized nails. Next, mark distances in the tank corresponding to those at E and F in Fig. 58. Then catch the bottom at the folded edges (Fig. 58), and lower it into the tank. As the ends are folded, there is room to stand inside the tank at the ends. Pull the folds upright so that marks E and F can be seen, and slide the bottom back or forward until E and F correspond with the marks made on the side lining. The ends may then be pushed down in place, and will be found to fit exactly if the measures have been properly taken.
After dressing down the bottom and pressing the turned-up edges against the sides and ends, sweat the bottom to the sides in the same way as the other seam was made, being sure that the solder and Side Linings to Bottom "takes" well to both pieces of lead.
When a tank is large, handle the sides and ends in two or more pieces, always having the seams that are to be made in place come at the ends of the tank, as the ends are stiffest and best to brace against.

Fig. 61. Method of Joining End Lining.
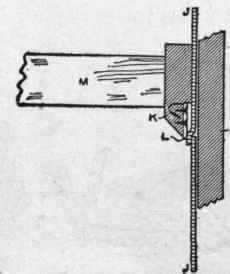
Fig. 62. Method of Keeping Lead in Place While Making Upright Seam in Tank..
Fig. 62 shows the method of keeping the lead in place while making the upright seam in the tank, I being the tank wood, J J the lining, K the straight edge, and M the brace. K is a piece of hardwood fastened to a strip of steel (a piece of an old framing square), as shown in the cut, the wood being about four inches wide by two feet long, and the steel L sticking half an inch out from the beveled edge of the wood. This steel edge keeps the lead from buckling under influence of the flame while blowing the seam, and is much better than a wood straight-edge, as it can be applied at the proper place with no fear of its burning or annoying the operator by smoking from the heat.
Continue to:
My Books

