How to Make Flag Wall Rack
Description
This section is from the book "Box Furniture", by Louise Brigham. Also available from Amazon: Box Furniture.
How to Make Flag Wall Rack

The collection of national flags, as seen in the Dining-room Interior, is a pleasing Scandinavian custom. An additional charm is added to the dining-table when, as guest, your country's colors blend in decoration with those of your host. The rack may also be used for pottery or plants, or the open pockets for books, as in the Den Interior.
Requirements
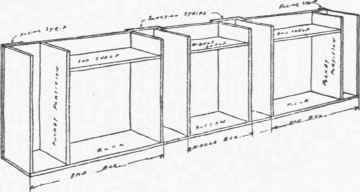
Body. 3 Condensed-milk Boxes (about 7 1/4 in. deep, 13 in. wide, 19 3/4 in. long).
Bottom. 1 Piece 3/4 in. thick, width equal to the outside depth of the box, 10 1/4 in. longer than three times the outside length of the box.
Facing Strips. 2 Pieces 1/2 in. thick, 3 1/2 in. wide, the length equal to the inside width of the box.
Junction Strips. 2 Pieces 1/2 in. thick, 7 in. wide, the length equal to the inside width of the box.
End Shelves. 2 Pieces 1/2 in. thick, the width equal to the inside depth of the box, and 12 3/4 in. long.
Middle Shelf. 1 Piece 1/2 in. thick, the width equal to the inside depth of the box, and 181/4 in. long.
Pocket Partitions. 2 Pieces 3/4 in. thick, the width equal to the inside depth of the box, and length equal to the inside width of the box. The ends from a fourth condensed-milk box will serve for pocket partitions.
Construction
Remove the cover and both sides from each box. Stand the remaining portion of all the boxes in a line end to end on their sides, with the end and bottom edges up, having the bottoms all facing the same way, and lay the rack bottom piece across the ends upon them, and nail it to the end edge of the end boxes, having the end of the rack bottom even with the outside end face of the boxes, and allow it to project 1/2 inch over the outside bottom face of the boxes. Set the third box midway between the other two, with the same projection of rack bottom over the bottom face of the box, and nail the rack bottom to the bottom edge of the box. With the try-square set each end of each box square, and at the same time nail through the rack bottom into their ends. Turn the piece over so that the bottoms of all three boxes face up. Nail on the junction pieces which join the bottoms together, and at each end nail the facing strips on the back, having the edge of the facing strips even with the ends of the rack. Turn the rack right side up and fit and nail in place the pocket partitions and shelves, keeping the tops of the shelves 3 inches below the top edge of the rack, and the pockets all of an even width of about 5 1/8 inches.
The rack may be hung with picture wire and hooks or nailed to the wall, as circumstances permit.
Continue to:
My Books

