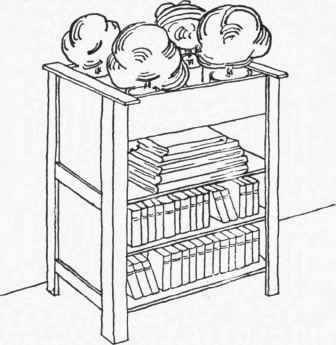
How to Make Flower-Stand And Book-Stand
Description
This section is from the book "Box Furniture", by Louise Brigham. Also available from Amazon: Box Furniture.
How to Make Flower-Stand And Book-Stand

Requirements
Body. 2 Soap Boxes (about 103/4 in. deep, 14 1/4 in. wide, 20 in. long).
Flower Receptacle Side. 1 Piece 1/2 in. thick, 6 in. wide, and length equal to the inside length of the box.
Arms. 2 Pieces 1/2 in. thick, 3 in. wide, 3 in. longer than the outside depth of the box with the cover removed.
Facing Strips. 4 Pieces 1/2 in. thick, 3 in. wide, 3 in. shorter than the outside depth of the box with the cover removed.
Legs. 4 Strips 1/2 in. thick, l 1/2 in. wide, 3 in. longer than twice the outside width of the box. 4 Strips 1/2 in. thick, 2 in. wide, 3 in. longer than twice the outside width of the box.
Cleats. 4 Strips 1/2 in- thick, 2 in. wide, and length equal to the inside depth of the box.
Construction
Make the legs 3 inches longer than twice the outside width of the box. Remove the covers. Take one box, which will form the two lower compartments. Turn it on its side; remove the top side; cut the side removed to the inside length and width of the box. Set it in halfway down to form the shelf, having previously nailed a cleat on each end to support it. Take the other box and turn it upon its side and remove the top side. Across each inside end of the box nail a cleat. Keep the top of the cleat 6 inches below the top of the ends to support the bottom of the flower receptacle. Set both boxes on the floor, side by side, on their original bottoms, and hold them close together while the legs are nailed in place. Keep their top ends even with the edges of the open side of the box which will form the flower receptacle. Fit the front side of the flower receptacle and nail it to the inside face of the legs. Turn the stand right side up on its legs. From the spare side removed from the box, cut and fit the bottom of the flower receptacle and nail it to the cleats. At each end of the stand cover the joint midway the height with a facing strip placed centrally over the joint and nailed to the ends of both boxes. Nail another facing strip at each lower end of the stand, keeping the bottom of the strip even with the under side of the stand. Set the arms giving them a projection over the legs of 1 inch at the ends and side. Nail the shelf in lower compartment to the cleats, and stain or paint as may be desired.
Continue to:
My Books

