Chapter IX. Closet Fittings
Description
This section is from the book "It's Fun To Build Things", by W. T. R. Price. Also available from Amazon: It's Fun To Build Things.
Chapter IX. Closet Fittings
We have already covered a little work in die closet, but there are still a few things we might do to enhance its convenience.
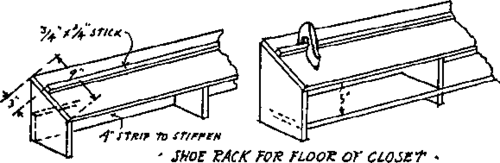
Foremost among these is the slanting shoe rack, which does away with shoes forever kicking around loose on the closet floor and perversely getting themselves mixed up. The best material is 9" wide board, preferably No. 1 grade white pine. Cut supports at a 45 degree angle (for which you should have a celluloid triangle), nail a board on these, of length determined by the number of shoes you have, or hope to have, and on the board a square stick 3" down from the top.
A variation on the shoe rack is a slightly higher one allowing for a shelf under it, on which to park less-used shoes, overshoes, or your roller-skates (if any). If either type of rack is wanted more than 4' 0" long it might be well to put an extra support in the center, and in any case you had better nail in a stiffening strip, (21/2"x 3/4") as shown. In case you've never seen one of these shoe racks, the idea is to engage the heels of all the shoes on the square strip. The advantage is that you can sweep out the floor of the closet without having to drag all the shoes out into the room, and the shoes, also, cease to mingle around and get mixed up as they seem to do when left on the floor.

For a truly useful gadget, this is an easy one to build.
The storage capacity of most closets is greatly increased by building in end shelves. If you cut these accurately they will not need any nailing against the walls, which in most cases would be a mean job anyway due to cramped space. For shelf-rests simply build ladder supports, which may rest on the base-board in the closet (if there is one) or directly on the floor. The shelves themselves may be of 8" boards, using two to make a 16" shelf, or may be of masonite or thin plywood, resting on cross-sticks made of the same stock as the ladder. In either case, these should be cut so snug that you need to drive them down into place with a hammer, thus wedging the whole construction tightly in place without need of nailing it into the wall. Whenever you are driving any piece of wood into place, by the way, use the carpenters' technique of driving with a small block of wood so as to avoid marring the finished work with hammer blows.
An alternative for the shoe rack is a sort of "filing cabinet" for shoes, which means simply a tall set of pigeon-holes which may be fitted to the depth of the closet, to the right or left of the door. This should be made with compartments dimensioned to shoe boxes, for you may want to use shoe boxes to keep evening shoes from getting dusty. In any case, this size compartment would be the right size for filing shoes, even if they weren't in boxes. The case of this cabinet may be of plywood, or could even be of masonite, and the shelves would be nailed and toenailed into the center support and through the sides. Two 6" boards would give the needed depth of 12", and the same 6" board could be used for the center supports. Obviously, this piece may be made with any number of compartments required, and if you had such a piece you wouldn't need the slanting shoe rack.
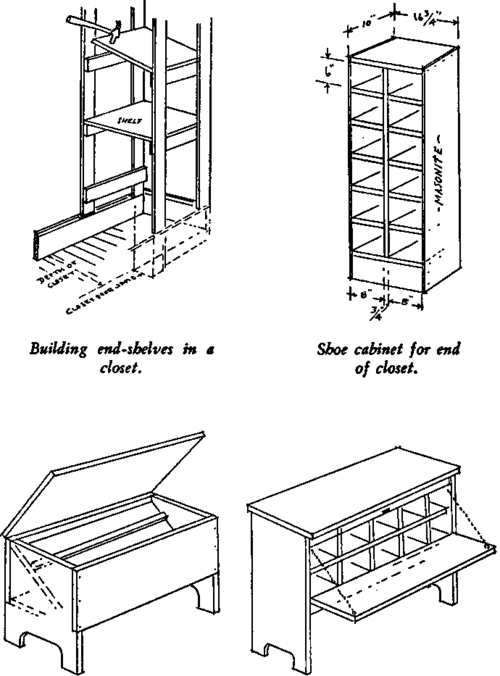
A shoe chest-and a fling-cabinet chest for shoes.
A shoe chest is something else again, and might be used if you kept shoes in the dressing room, or elsewhere than in the closet. The idea is a long narrow box, built with ends that form a stand as high as your fancy may dictate. In this is nailed a 45 degree sloping rest, with the 3/4"x stick as specified for the closet shoe rack.
Another version of the shoe chest would be one with a stationary top and a front that lets down on two short lengths of brass chain like a desk flap.
The technique of cutting the end supports of these chests involves the use of brace and bit, compass saw, and regular saw. First space two 1" diameter holes, as shown, cut between them with compass saw and cut out the piece with regular saw. This cut is designed to take the place of legs, and is much easier to make. (See page 82.)
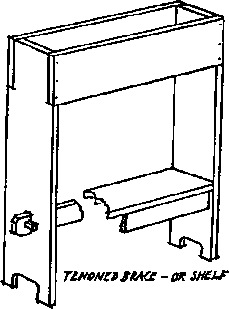
A flower box, or stand for flower pots to place before a window would be made in the same fashion, but would be higher and would necessitate a brace or a shelf a little above the floor. Also, it would need only 8" wide lumber, and the front and back would be set into a cut made in the two uprights. If you didn't want a shelf to brace the construction, you could use the mortice-tenon-and-dowel manner of putting in a brace, or you could just nail it in from the ends with 2" finishing nails, though this would not be so strong.
Flower boxes, generally speaking, should have a heavy zinc lining, removable (a job for ye tinsmithe), and garden-wise people believe that the earth keeps in better condition if the zinc box has a number of holes in it and an air-space under it. This simply means providing blocks in the bottom of the wooden box to both rest the zinc box and also provide the space beneath it-and then the whole inside of the wood box should have so many coats of paint that it will resist damp-rot for a long time. A window-sill flower box that is to be fixed to the outdoor side of the sill may well have small drain-holes bored at the bottom of its outer face.
Continue to:
My Books

