Bench-Stop
Description
This section is from the book "Woodworking For Beginners: A Manual for Amateurs", by Charles G. Wheeler. Also available from Amazon: Woodworking For Beginners.
Bench-Stop
You must have something on the forward end of the bench-top to push your work against for planing and other operations. A simple and good way is to use one or two stout screws (Fig. 68). These can be screwed in so as to project about a quarter of an inch, which will answer for the greater part of your work, and the height can be changed when necessary with the screw-driver, The heads of the screws will be sharp enough to hold the work, and a stop of this kind will answer your purpose very well for common work. The wooden stop (Fig. 69) has the advantage of not making any nicks in the end of the wood, which is important in nice work, such as furniture, but for common work screws are just as good, except that, as they are left permanently sticking from the bench, you may dull your tools against them or scar your work. This applies to a common bench. Of course for a really nice bench with a tail-screw the regular stops should be used (Fig. 143)Carpenters sometimes nail a small piece of board, with a V-shaped notch at one end, to the top of the bench to hold boards or joist for planing on the edge (Fig. 70). Simply nailing a strip across the end of the bench (Fig. 71), and setting the nails well in, will do to push boards against for planing for common work. Iron contrivances (which can be raised or lowered) can be bought for a small sum and are convenient for common work, especially for thin pieces. Sink them deeply enough in the bench-top so that when lowered nothing will project to injure the tools or the work.
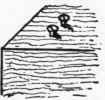
Fig. 68.
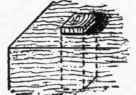
Fig. 69.
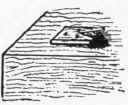
Fig. 70.
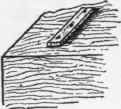
Fig. 71.
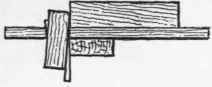
Fig. 72.
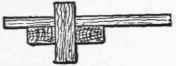
Fig. 73.
The old-fashioned bench-stop shown in Fig. 69 consists merely of a square stick of hard wood, one or two inches square, fitted quite tightly to a hole in the top of the bench, so that it will slide up or down by a blow from the mallet or hammer. This stop will not damage the work or the tools. To make the mortise for this bench-stop, see Mortising. Take care to keep within the lines, so as not to make the hole too big. You can easily make it larger if too small.
The stop should fit tightly and should be set with a very slight slant toward the work (Fig. 72), - that is, the mortise should be cut slightly slanting. The stop should be of hard wood, such as maple. If the top of the bench is only of board thickness, screw cleats of hard wood on the under side to give more bearing surface (Fig. 73), or the continued pushing against the stop will be liable to get the hole out of shape so that the stop will slant the wrong way, when the work will be apt to slip or, in case of a thin board, jump over the stop (Fig. 74). If the stop wears loose in the hole, a saw kerf is sometimes made lengthways in one side and a bent piece of springy wire inserted, or a flat spring fastened on the side (Fig. 75).
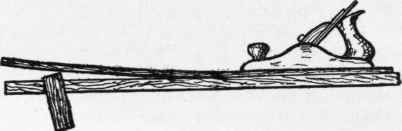
Fig. 74.
A loose stop can easily be wedged (preferably from underneath), and it is sometimes made loose on purpose, the wedging tightening the stop and at the same time giving the required slant (Fig. 72). An iron plate with teeth can be screwed on top of a wooden stop (Fig. 76), or a screw can be inserted (Fig. 77).
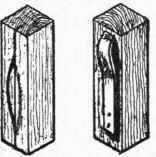
Fig. 75
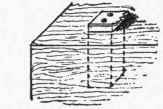
Fig. 76.
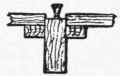
Fig. 77.
Two strips, like Fig. 78, can be nailed or screwed on the top of the bench so as to separate V-fashion (Fig. 79). Two wedges, like Fig. 80, can then be made of such a taper that when fitted between the strips their inner faces will be parallel. By tapping in the wedges on each side of the work to be held (Fig. 79), it will be securely fastened without injury. If the inside edges of the strips and the outside edges of the wedges are slightly bevelled, which you can do with a plane or a knife, the wedges cannot jump out of place. The best way to fit this contrivance is to make the wedges first, place them in position on the bench with the square sides inside (facing each other), and then fasten the fixed strips outside of them. Pushing the work tends to tighten this vise. This is much better for permanent use than the notched board shown in Fig. 70. If you have a good vise you will not often have occasion to use such contrivances, but they are sometimes useful as makeshifts.

Fig. 78.
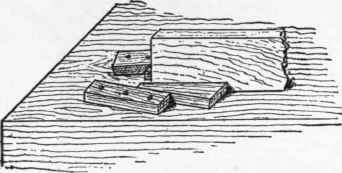
Fig. 79.
The top of a good bench should be as true and as smooth as possible (see Plane and Scraper). Rub it with linseed oil, wipe it off with a rag, and after a few days give it a couple of coats of shellac (see Finishing).
You should place your bench so that when you stand at it you will face the light and not have it come from behind you. If it can come from the forward end of the bench and also from behind the bench, as shown in the frontispiece, it will be best, for a cross-light is often very useful, not merely that you may have light enough, but also that when testing your work with the try-square, straight-edge, and the like, any inaccuracy may be detected by the light passing through the crack between the testing tool and the work, and also when sighting by the eye alone. Fasten the bench firmly to the floor (and wall if you can) with screws, cleats, or L irons.'

Fig. 80.
Avoid chopping on the bench top or whittling it or boring holes or marring it by saw-cuts or chisel-marks. Do not use paint, varnish, or glue at the bench if you can help it. If necessary to do so, clean the bench-top carefully when you get through. Lumps of hardened glue will hinder you and deface your work.
Continue to:
My Books

