Mortising (Mortise And Tenon)
Description
This section is from the book "Woodworking For Beginners: A Manual for Amateurs", by Charles G. Wheeler. Also available from Amazon: Woodworking For Beginners.
Mortising (Mortise And Tenon)
If you can get out two pieces and fit them together accurately with a mortise-and-tenon joint, and do the work well, you will be competent to handle a great many of the difficulties of ordinary woodwork.
You will often have occasion to use this joint. The mortise is the hole in one of the two pieces to be joined. The tenon is the pin or projection in the other piece, shaped to fit the mortise.
To lay out a mortise and tenon (Fig. 577), select and mark the working faces for each piece. First take the piece in which the mortise is to be cut (Fig. 578). Square two lines, ab and cd, across the face and the same distance apart as the width of the piece on which the tenon is to be cut. Carry these lines across the side X (ae and cf) and also across the side opposite to X (that is, the side where the tenon will come through).

Fig. 577.
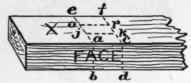
Fig. 578.

Fig. 579.
Next take the tenon-piece (Fig. 579) and measure from the end a distance a little greater than the width of the face of the mortise-piece, and at this point square a line, gh, across the face of the tenon-piece. Continue this line, gi, around the piece, with the square.
Now take the gauge and, setting it at the distance from the face settled upon for the mortise, scribe the line jk on the side X and also on the side opposite X. Also from the face of the tenon-piece, without changing the gauge, mark the line lm on the side X, on the opposite side, and on the end. Set the gauge to measure from the face to the other side of the mortise, - that is, add the width of the mortise to the figure at which the gauge was set,-and scribe another set of lines, op and rs, in the same manner as before, remembering to gauge all the time from the same face.
In the coarser kinds of work, where marks on the surface do no harm, the gauge marks can be run across the other lines, as being easier and more distinct, but in fine work, especially that which is to be finished, care should be taken not to make scratches that will be seen when the work is finished. The parts to be cut away are indicated by cross marks (Fig. 580) and it will be seen at once that the tenon and mortise are laid out correctly.
To cut, take first the mortise-piece and fasten it securely by vise or clamp in a convenient position. The simplest way to remove the wood is to bore a series of holes with a bit of a diameter as nearly the width of the mortise as you have (Fig. 580), but a trifle smaller. This removes a large part of the wood with but slight danger of splitting. The rest can easily be trimmed away to the lines with the chisel, taking care not to jam the chisel down lengthways of the mortise when the latter is blocked with chips or firm wood, or the wood may split off at the side of the mortise.
To cut out the wood with the chisel only (or to trim the ends of the mortise after using the bit), bear in mind the way the chisel acts when you drive it into the wood. If both sides of the chisel were bevelled (as is the case with carving chisels), it would tend to go straight down into the wood, and if held vertically would make a vertical cut (Fig. 581), but the chisels you use for mortising are flat on one side and bevelled on the other. Being one-sided in this way, the edge of the tool is forced by the inclined bevel to slide off, so to speak, more or less, in the direction of the side which is flat. You can prove this easily by holding a chisel across the grain of a board and driving it in. If you hold the tool lightly, you will see that as you drive it in it will incline to cut under, always on the side which is flat (Fig. 581).
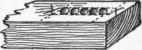
Fig. 580.
This shows how to go to work to cut a mortise so as to keep the sides square and true. If you put the chisel at the end, flat side outward, the cut will tend to run under and make the hole too large below the surface. If you turn the tool the other way, it tends to slip in towards the middle of the mortise. So, to cut out the wood, take a chisel just a trifle less in width than the mortise, and, beginning near the middle of the mortise, hold the chisel as in Fig. 582 and make successive cuts, working toward the end, first in one direction and then in the other, giving the chisel handle a slight pull toward the centre of the mortise each time you move it, to loosen the chips (Fig. 583). You can thus work safely toward the ends, which will be left slanting (Fig. 584). After cutting about half through the piece in this way, turn it over and repeat the process from the other side, the result being a hole like that shown in Fig. 585. Now turn the chisel around with the flat side toward either end of the hole, and you can pare down the ends to the line without danger of undercutting (Fig. 585).
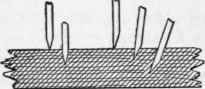
Fig. 581.
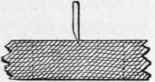
Fig. 582.
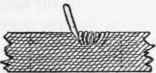
Fig. 583.
Fig. 584.
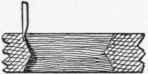
Fig. 585.
Care must be taken not to jam the chisel down lengthways of the grain until the hole is practically cleared of wood, or the side of the mortise may be split off. Use the chisel lengthways of the grain only at the end of the process, to pare the sides of the mortise evenly, with light strokes, down to the line.
Continue to:
My Books

