Mortising (Mortise And Tenon). Continued
Description
This section is from the book "Woodworking For Beginners: A Manual for Amateurs", by Charles G. Wheeler. Also available from Amazon: Woodworking For Beginners.
Mortising (Mortise And Tenon). Continued
In all the use of the chisel, take pains to hold it vertically as regards the sides of the mortise - that is, do not tip it over sideways, or the mortise will be slanting or too wide at the bottom.
The common firmer- or paring-chisel can be used for all light mortising, but for heavy work the regular mortising-chisel should be used (see Chisel).
To cut the tenon, simply saw carefully on the line gh and its opposite (Fig. 579) and then on the lines Im and rs. Be careful not to cut beyond the line, so as to make the tenon too small. It is easy to trim it a little with the chisel if it is too large. Cut a little bevel around the end of the tenon, so that it will drive through smoothly without catching and tearing the sides or ends of the mortise. When it goes through properly and the tenon and shoulder fit snugly, the projecting end of the tenon can be sawed off after the whole job is done.
The tenon should be just large enough to drive through with a slight pressure and fit snugly without any wobbling around. It should not be so tight as to require much force to drive it home, or there will be danger of splitting out the sides of the mortise.
There is no absolute rule as to how wide to make the mortise and tenon in proportion to the width of the pieces. It depends on the kind of work, the kinds of wood, the kind of strain to be put on the joint, and various circumstances too complex to be gone into here. If the tenon is very thin it will be weaker than the sides of the mortise (Fig. 586). If very thick, the sides of the mortise will be too thin and will be weaker than the tenon (Fig. 587). One third of the width is as thin as a tenon is often made, It will then sometimes be weaker than the sides of the mortise, as you can see from Fig. 588. But it all depends on what the joint is for. If it is to stand violent wrenching, the tenon in this case might break before the mortise-cheeks, and had best be made a little thicker, with the sides of the mortise a little thinner ; but, on the other hand, if the joint is merely to hold the tenon-piece in position, as in case of a post resting on a sill, one third is plenty wide enough for the tenon, as it will be best not to weaken the sill by cutting any larger mortise than is necessary. Sometimes the tenon-piece is simply let in to the other piece for its full width. This is called housing (Fig. 589). Two thirds of the width of the piece is thicker than you will be likely to have occasion to make a tenon, as this leaves the cheeks of the mortise very thin. It is wholly a matter of judgment (between, say, one third and two thirds of the width), according to the conditions of each job.
Fig. 586.
Fig. 587.
Fig. 588.
The length to which a mortise can safely be cut is also a matter of judgment according to circumstances. If the tenon is thin, the mortise can be longer than if the tenon is thick, as the cheeks will be thicker and stronger, but, as a rule, avoid trying to make very long mortises, unless the tenon is very thin and the wood very strong, as there will not be strength enough left in the cheeks of the mortise (Fig. 590). Six times as long as it is wide is about as long as it is well to make a mortise under ordinary circumstances, though, as just said, it all depends on the conditions of the particular piece of work. When a wide piece is to be mortised into another piece, two or more tenons are sometimes cut, thus avoiding too long a mortise, but this will not do for very wide pieces, unless some of the tenons are fitted loosely, for the expansion and contraction of the wide piece may cause it to buckle or split if all the mortises fit snugly (Fig. 591).
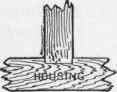
Fig. 589.
Fig. 590.

Fig. 591.
In such cases as a door-frame or when the end of a board is to be fitted into the side of a post, a tongue and groove is often used in addition to the tenon, and this (known as " relishing") is a good way to do (Fig. 592).
The mortise and tenon given above is a very simple form. Sometimes the tenon is short and does not go through (Fig.
593). This is a common form, and is used a great deal in the best work. It is sometimes called blind mortising, the tenon being known as a " stub " tenon.
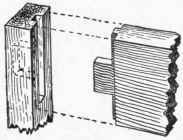
Fig. 592.
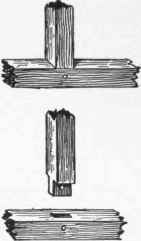
Fig. 593.
Mortise and tenon joints are sometimes merely fitted together, but can also be glued (see Gluing), pinned, wedged, or dovetailed and fastened with a key.
To pin a mortise and tenon, simply mark a point with square and gauge upon each side of the piece containing the mortise (Fig. 593), fit the tenon in place, and bore in from each side (or in rough work bore right through from one side until the spur appears on the opposite surface) (see Boring). Then drive through a snugly fitting pin and trim off the projectig ends. The pin should be slightly pointed before driving, on the same principle that the end of the tenon is bevelled. It is not necessary to round the pin. An eight-sided one is just as good.
Do not use too large pins. In ship-building, bridge-building, and old-fashioned house-framing pins and treenails from 1" to 1 3/4" or more in diameter, are used. Dowels of various sizes will usually answer for such framing as you may have to do (though a rift-pin is stronger). For such work as pinning a joint in a chair, you will not need anything larger than a 1/4" hardwood pin.
You must use judgment as to how near the edge to place the pin. If you put it too far from the edge, its hold on the tenon will be weak and the end of the tenon may break out (shear). If you put it too near the edge, the sides of the mortise may tear or split out.
Sometimes, particularly in timber work, to insure a snug fit at the joint, " draw-boring " is resorted to (Fig. 594). The hole for the pin is not bored through the tenon as just shown, but is bored a trifle nearer the shoulder of the tenon than the other holes (in the mortise-piece). The result is that when the pin is driven through it draws the tenon-piece down to a snug fit at the shoulder. But this has to be done with judgment. If the hole in the tenon is too much out of line, driving the pin through tends to split (strictly speaking to shear) the end of the tenon, and too much strain is put on the pin.
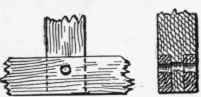
Fig. 594.

Fig. 595.
In the mortising just shown, there are only two shoulders where the tenon begins- that is, the tenon is made by only four cuts. This is good for all common or rough work. In nice work a shoulder is also cut at each edge of the tenon (Fig. 595). This makes a neater-looking joint, as these shoulders cover the ends of the mortise completely. When the joint comes at the end of the mortise-piece, the tenon can extend to the edge on the outside and the mortise be cut clear out to the end, forming an open mortise-and-tenon joint (Fig. 543), or a wide shoulder can be left on the outside of the tenon - the tenon itself being made narrower (Fig. 596). This course is adopted in doors and frames of various kinds (see Fig. 334).
A good way to fasten tenons is to wedge them. This can be done whether the tenon goes through the mortise-piece or only part way, as in a blind joint. The wedges can be driven between the tenon and the ends of the mortise (Fig. 597), or, as is often better, driven into cuts made in the tenon itself, thus spreading the tenon toward the end, dovetail fashion, making it extremely difficult, or impossible, to pull it out of the mortise. Before wedging, the mortise should be cut under or enlarged toward the side on which the tenon comes through (Fig. 598). The wedges can then be dipped in glue and driven as in Fig. 599. To spread the tenons themselves, one or two or even three saw-cuts should be made in the tenon, lengthways and farther than the wedges will extend (Fig. 600). The tenon and mortise having been properly glued, the tenon is fitted in place, and the wedges, previously prepared of some strong wood and tapering quite gradually, are dipped in the glue and driven down into the saw-cuts, thus spreading the end of the tenon into a dovetail until it fills the mortise (Fig. 601). It is often best to drive the outer wedges nearer the edge of the tenon than is shown in Fig. 600, lest the tenon-piece be split.
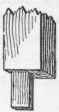

Fig. 596.
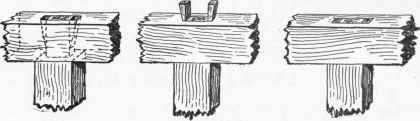
Fig. 597.
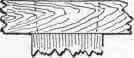
Fig. 598.
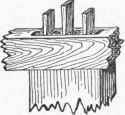
Fig. 599.
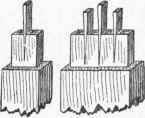
Fig. 600.
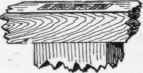
Fig. 601.
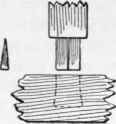
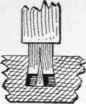
Fig. 602.
The process is much the same when the tenon does not go through the mortise-piece (Fig. 602). The mortise is undercut as before, and saw-cuts are made in the end of the tenon. The wedges are carefully planned and cut so that, when the tenon is finally in place, they will be of the right size to spread it so as to fit the mortise. The wedges must not be too long, so as to interfere with the tenon being driven home or to break off. When you are sure the whole will go into place and fit snugly, glue everything, start the wedges in the cracks, and drive the tenon quickly to place. This will of course drive in the wedges, which will spread the tenon at the end and fix it firmly. In fact, if well done, you cannot get it out again.
There are other forms of mortise and tenon, but they will be seldom required by the amateur. See Joints.
Continue to:
My Books

