Doors And Panels
Description
This section is from the book "Woodworking For Beginners: A Manual for Amateurs", by Charles G. Wheeler. Also available from Amazon: Woodworking For Beginners.
Doors And Panels
It is important to have some understanding of the theory of framing panels, doors, and the like. The simplest form of door is, of course, a piece of board. This will do for some cases, but it is liable to warp or wind, - if a large door, sometimes to such a degree as to be useless. It is also, if large, liable to swell or shrink so as to be either too loose or too tight, and to break. Cleating can be resorted to (see Clearing), but will not prevent the swelling and shrinking, nor is a cleated door especially ornamental. Besides, there are limits to the width of ordinary boards. Several boards can, however, be joined, edge to edge, and cleated on one side, in which way a large door can be made (Fig. 405), and, if the boards are not fitted too closely together, there may be no trouble caused by the swelling and shrinking. Another way to make a very strong door is to make it of two thicknesses, or layers, one running up and down and the other crossways, or diagonally, the two thicknesses being firmly nailed or screwed together.
All such arrangements are, however, suited for the rougher class of work. When we come to nicer work we must have something more scientific, that will swell and shrink as little as possible and that will look better. So, instead of using a broad flat surface with the boards all running one way, we try to overcome the faults of the flat door by framing the pieces together. Suppose, for a theoretical case, that you make a door like Fig. 498. It will not warp or curl because of the cleats at the top and bottom, but it will swell and shrink in width because there is such a wide surface of board to be affected by the atmosphere, etc., and it may become winding. To lessen these objections the middle part of the board can be removed - all but a strip at each edge (Fig. 499). It will not now swell and shrink much in width because most of the board has been removed. This frame will hold its shape quite well, but it is only a frame, not a door. How can you fill up this open frame to make a door, so as to avoid the trouble about warping, winding, swelling, and shrinking ? First, however, as this frame is considerably taller than it is wide, you will readily see that it will be a better arrangement to make it as shown in Fig. 500, with the cross-pieces between the uprights, according to the usual custom in such cases. Suppose, now, that you fill up the open space with a thin board, fastened on one side (Fig. 501), instead of the thick wood which occupied the space at first. The thin board will tend to warp and twist, but, being thin, it will not exert force enough to change the shape of the thick frame. That will prevent the warping and winding from doing much harm. If the screw-holes in this thin piece are reasonably loose, they will allow play enough for the board to expand and contract without putting any strain on the frame. This arrangement does not, however, look very nice on the side to which the board is screwed, though it can be used in some situations. Suppose, finally, that you cut a groove around the inside edge of the frame of the door (Fig. 502) into which this thin board can be fitted loosely, making the groove deep enough to give the board room to shrink and swell in width without dropping out or pushing against the frame. You now have a complete door (Fig. 503), and the warping, winding, swelling, and shrinking will do as little harm as possible. That is all there is to the theory of framing doors, panels, and the like.
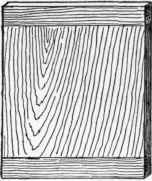
Fig. 498.
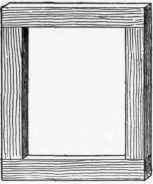
Fig. 499.
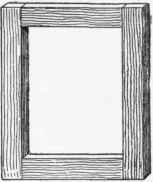
Fig. 500.
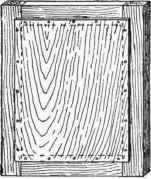
Fig. 501.
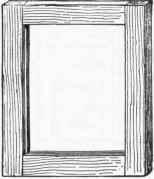
Fig. 502.
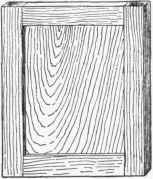
Fig. 503.
The panel should fit closely into the groove, but at the same time be loose enough to slide in and out as it expands and contracts, and should not be wide enough to reach to the bottom of the grooves, but room be left for all possible change in width, as shown in Fig. 504, which shows sections on the line AB. All this is important and has many applications to other things than doors. It is not very uncommon for amateurs, ignorant of these simple principles, to make a door-frame properly, but in fitting the panel to make it the full width of the space from the bottom of one groove to the bottom of the opposite, and also to make it such a snug fit in the groove as to be stuck tight, all with the idea of making such a good fit as to prevent any of the gaping cracks so often seen, but really taking the very course to ruin the work. So important is it that the panel should have play, that it is quite common in nice work to rub wax or tallow around the edge of the panel, lest some of the glue from the joints of the frame should cause it to stick when the frame is glued up. If the panel is badly fitted or stuck, it may buckle or split, or the frame be split or forced apart at the joints.
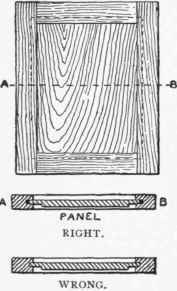
Fig. 504.
There are many more elaborate ways of arranging the details of door-framing and panelling (too numerous to be described here, as they will not often be required by the beginner); but if you understand the general principles upon which this simple door is put together, you will understand the principles upon which all panelling is based; and, though you may never do much of it, it is quite important to have a clear understanding of the theory, which is really quite simple - for it has many applications which may save you much trouble, labour, and expense.
The best way to fasten the frame of a door together is by mortise and tenon (see Mortising). This method is almost invariably adopted for house doors. Dowelling is often used for smaller doors, but is inferior to the mortise and tenon.
A common way nowadays to make light doors, and such as are not to be subjected to much strain, is to run the grooves in the stiles through to the ends and cut tongues or short tenons on the ends of the rails to fit these grooves, as shown in Figs. 508 and
509. The whole door, panel and all, can thus be quickly got out and fitted accurately with a circular saw at any wood-working mill, without any hand-work being required, except the smoothing of the pieces and the putting together. In this way you can have a door made for a small sum, smoothing and putting it together yourself. Such a door is not fitted, however, to stand great strain. A house door made in that way would last but a short time. Any heavy door, or one to have much strain, or liable to be slammed, should be framed with mortise and tenon. You can have grooving for a door-frame done at the mill very cheaply and do the mortising yourself, or you can have the mortising done 24 by machine at slight expense. Sometimes the grooving and mortising are combined, - an excellent way (Fig. 592).
In using any of these methods mark distinctly one side of each piece for the " face " and lay out all the work from that side only. If the job is to be taken to a mill, see that the work is all gauged from the face side.
In laying out such work never cut off the stiles (Fig. 505) to length at first. Leave them too long (Fig. 507). The projecting ends will be useful when you knock the frame apart for gluing, after first putting it together to see if everything fits. Besides, the extra length makes the ends stronger for the mortising and less likely to split out. The rails in door-framing and panelling are usually wider than the stiles.
In laying out a door or panelled frame, place the stiles together, with the inside edges uppermost, and square lines across the edges to mark the positions for the rails (Fig. 506). Carry these lines across the faces of the stiles, and mark the rails and stiles with some symbols to indicate the way they are to be fitted together (Fig. 507).
The whole should be put together once to see that everything is right before beginning to glue. Before putting together permanently, the panel and the inside edges of the frame (the edges which come next the panel) must first be planed and smoothed, as this cannot well be done afterwards. Then fit the panel in the grooves of the rails (Fig. 508), glue the tenons of one end of the rails and the grooves or mortises of the corresponding stile (see Gluing), taking care not to put any glue where it may cause the panel to stick, and fit these parts into place (Fig. 509). Drive the rails home. Then glue and fit the other side of the frame in the same way (Fig. 510) - all being done as quickly as possible. Finally clamp the frame securely (see Clamps). The tongued and grooved joint represented in the accompanying illustrations is not as good as a mortise and tenon, as already stated, but is shown as a simple way for making a light door. Leave the work to dry, and when dry remove the clamps. Saw off the ends of the stiles, and dress off the surface of the frame with the plane (see Plane), after which you can smooth with scraper (see Scraper) and sandpaper (see Sandpaper), and the door or panel will be done. When there is objection to the end of a tenon showing on the outside edge of the stile, and a blind mortise is not desired (see Mortising), the end of the tenon can be cut a little short and the mortise-hole on the edge plugged with a piece of wood, with the grain running the same way as that of the stile. Fit the piece with a very trifling bevel on the edges, glue, drive tightly into place, and when dry smooth off (Fig. 511).
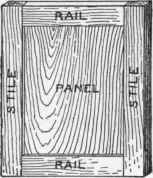
Fig. 505.
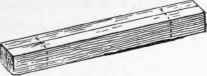
Fig. 506.
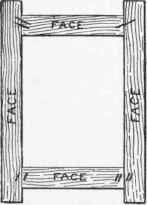
Fig. 507.
It is hardly worth while to work out the grooving or grooved and tongued joints by hand in these days when it can be so cheaply done by machinery. If obliged to do it by hand, you should have the proper plane for the purpose, as it will be very difficult and slow work otherwise.

Fig. 50S.
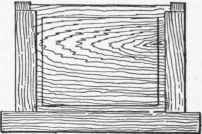
Fig. 509-
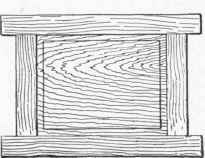
Fig. 510.

Fig. 511.
A panel is sometimes made flush with either side of the frame, by having a deep rabbet on that side, as in the case of a desk lid, for instance, but this is a form which can well be avoided by the beginner.
Continue to:
My Books

