Paring
Description
This section is from the book "Woodworking For Beginners: A Manual for Amateurs", by Charles G. Wheeler. Also available from Amazon: Woodworking For Beginners.
Paring
In paring or trimming a piece of wood to a line, if there is much surplus wood to be removed, you can sometimes chop pretty boldly with the hatchet until you get near the line, provided you watch the direction of the grain carefully to see that the split cannot run up to the line ; sometimes you can chop safely in one direction but not in the opposite (Fig. 613), but as a rule keep well away from the line for the first cut. Even wood that appears to be quite straight-grained will often split differently from the way you expect. To trim a piece of wood, like the edge of a board, down to a line, with a hatchet, for instance, you can first score the piece with a series of short cuts, stopping short of the line, to break up the grain of the wood, and then trim these loosened chips off down to the line with the plane, chisel, draw-knife, or whatever tool may be suitable. The main point is to cut in such a direction that the grain will not cause the cuts to extend farther than the line or to run into the main piece of wood (Fig. 614). The same principle can be applied often in trimming and removing superfluous wood with a chisel, a draw-knife, or a knife. The cuts can often be made with the saw to better advantage (Fig. 614). It takes a little more time to make these cross-cuts with hatchet, knife, chisel, or saw than to whack away furiously lengthways, as if you were chopping kindling, but after you have spoiled a few pieces by splitting beyond the line you will conclude that the former is the more workmanlike and reliable way.

Fig. 613.
Fig. 614.
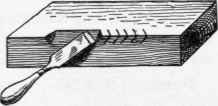
Fig. 615.
This same principle is applicable to making chamfers or bevels with a chisel or knife (Fig. 615). You will find frequent occasion to apply this principle of breaking the grain into small pieces before making the final cuts in many kinds of work. It is in constant use in " roughing out " carving.
To trim to a curve as shown in Fig. 616, begin at the edge just outside of the end of the curve and work with the grain from a to b. It is often a help in such cases to first remove part of the wood with the saw, as on the lines be and then ef. Finally trim the curve smoothly close to the line. Frequently this can be done to better advantage with the work held in the vise instead of lying horizontally on the bench.
Paring off superfluous wood down to a given line or trimming off an irregular edge with the chisel is very easily done provided the grain of the wood is straight, or runs in the same direction, even if slanting, as in Fig. 617, because you can then cut with the grain. It is often better, however, to cut across the grain, or diagonally, with the chisel, as the wood is less likely to be split by the tool.
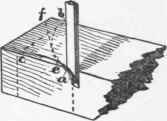
Fig. 616.

Fig. 617.
When the grain runs in several directions, and keeps cropping up to the surface and dipping down again as shown in Fig. 701, it becomes more difficult to pare the surface smoothly with the chisel. In such a case remember the sliding or drawing stroke and traverse the surface with a diagonal crossways motion (Fig. 619) that will trim off the fibres with a slanting stroke without causing them to be torn up. Slant the cut so that if the wood should tend to split, it will be in the direction of the part cut away and not towards the piece to be kept - i. e., so that the chips will spilt and not the body of the wood. Reverse the chisel and cut in the opposite direction when a change in the direction of the grain re-quires it. Some pieces are, however, so extremely irregular that you cannot do this, but must slice away the best that you can and leave the rest to other tools. In cutting off a corner or rounding or bevelling an edge you can use the slanting cut (Fig. 620).
In using the chisel for paring, let the left hand, which is nearer the cutting-edge than the right, act as a brake or countercheck or drag to check the progress of the tool. It is largely by the varying balance of these two forces - the pushing forward of the tool with the right hand and the checking and controlling with the left - that correct and effective control of the tool is gained. The left hand should in many cases rest upon or grasp the wood as well as the blade. See Chisel.

Fig. 619.
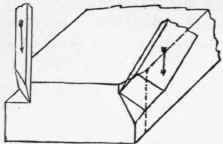
Fig. 620.
Continue to:
My Books

