Tools And Their Uses. Part 3
Description
This section is from the book "Carpentry for Boys", by J. S. Zerbe. Also available from Amazon: Carpentry for Boys.
Tools And Their Uses. Part 3
Chisels
Two kinds are found in every kit - one called the firmer (Fig. 7) and the mortising chisel. The firmer has a flat body or blade, and a full set ranges in width from three-eighths of an inch to two inches. The sizes most desirable and useful are the one-half inch, the inch and the inch-and-a-half widths. These are used for trimming out cross grains or rebates for setting door locks and hinges and for numerous other uses where sharp-end tools are required.
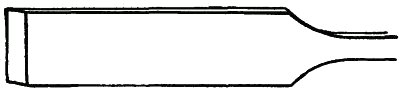 Fig. 7.
The Mortising Chisel
The mortising chisel (Fig. 7a), on the other hand, is very narrow and thick, with a long taper down to the cutting edge. They are usually in such widths as to make them stock sizes for mortises. Never, under any circumstances, use a hammer or hatchet for driving chisels. The mallet should be used invariably.
 Fig. 7a.
 Fig. 8.
Trusses
There should be at least two, each three feet in length and twenty inches in height.
Saw Clamps
These are necessary adjuncts, and should be made of hard wood, perfectly straight and just wide enough to take in the narrow back saw. The illustration shows their shape and form.
The Grindstones
It is better to get a first-class stone, which may be small and rigged up with a foot treadle. A soft, fine-grained stone is most serviceable, and it should have a water tray, and never be used excepting with plenty of water.
An Oil Stone is as essential as a grindstone. For giving a good edge to tools it is superior to a water stone. It should be provided with a top, and covered when not in use, to keep out dust and grit. These are the little things that contribute to success and should be carefully observed.
The Miter Box
This should be 14 inches long and 3" by 3" inside, made of hard wood ¾" thick. The sides should be nailed to the bottom, as shown.
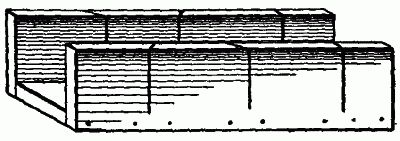 Fig. 9.
The Work Bench
In its proper place we show in detail the most approved form of work bench, fitted with a tool rack to hold all the tools, conveniently arranged. In this chapter we are more particularly concerned with the uses of tools than their construction; and we impress on boys the necessity of having a place for everything, and that every tool should be kept in its proper place. A carpenter's shop filled with chips, shavings and other refuse is not a desirable place for the indiscriminate placing of tools. If correct habits are formed at the outset, by carefully putting each tool in its place after using, it will save many an hour of useless hunting and annoyance.
One of the most important things in laying off work, for instance, on trusses, is the disposition of the saw and square. Our illustration shows each truss with side cleats, which will permit the user temporarily to deposit the saw or the square so that it will be handy, and at the same time be out of the way of the work and prevent either of the tools from being thrown to the floor.
In the same way, and for the same purpose, the work bench has temporary holding cleats at the end and a shelf in front, which are particularly desirable, because either a saw or a square is an encumbrance on a work bench while the work is being assembled, and tools of this kind should not be laid flat on a working surface, nor should they be stood in a leaning position against a truss or work bench.
Strictly observe these fundamentals - Never place a tool with the cutting edge toward you. Always have the racks or receptacles so made that the handle may be seized. Don't put a tool with an exposed cutting edge above or below another tool in such a manner that the hand or the tool you are handling can come into contact with the edge. Never keep the nail or screw boxes above the work bench. They should always be kept to one side, to prevent, as much as possible, the bench from becoming a depository for nails. Keep the top of the bench free from tools. Always keep the planes on a narrow sub-shelf at the rear of the bench.
If order was Heaven's first law, it is a good principle to apply it in a workman's shop, and its observance will form a habit that will soon become a pleasure to follow.
Continue to:
My Books

