Chapter V. How Work Is Laid Out
Description
This section is from the book "Carpentry for Boys", by J. S. Zerbe. Also available from Amazon: Carpentry for Boys.
Chapter V. How Work Is Laid Out
Concrete Examples Of Work
A concrete example of doing any work is more valuable than an abstract statement. For this purpose I shall direct the building of a common table with a drawer in it and show how the work is done in detail.
For convenience let us adopt the Mission style, with a top 36" × 42" and the height 30". The legs should be 2" × 2" and the top 1", dressed. The material should be of hard wood with natural finish, or, what is better still, a soft wood, like birch, which may be stained a dark brown, as the Mission style is more effective in dark than in light woods.
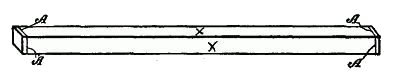 Fig. 27.
Framework
As we now know the sizes, the first thing is to build the framework. The legs should be dressed square and smoothed down with the fore plane to make them perfectly straight. Now, lay out two mortises at the upper end of each leg. Follow the illustrations to see how this is done.
Laying Out The Legs
Fig. 27 shows a leg with square cross marks (A) at each end. These marks indicate the finished length of the leg. You will also see crosses on two sides. These indicate what is called the "work sides." The work sides are selected because they are the finest surfaces on the leg.
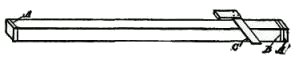 | 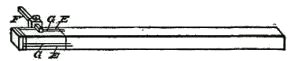 |
Fig. 28. | Fig. 29. |
The Length Of The Mortises
Then take a small try square (Fig. 28) and add two cross lines (B, C) on each of the inner surfaces, the second line (B) one-half inch from the finish line (A), and the other line (C) seven inches down from the line (A). The side facing boards, hereafter described, are seven inches wide.
When this has been done for all the legs, prepare your gage (Fig. 29) to make the mortise scribe, and, for convenience in illustrating, the leg is reversed. If the facing boards are 1" thick, and the tenons are intended to be ½" thick, the first scribe line (E) should be ½" from the work side, because the shoulder on the facing board projects out ¼", and the outer surface of the facing board should not be flush with the outer surface of the leg. The second gage line (F) should be 1" from the work side.
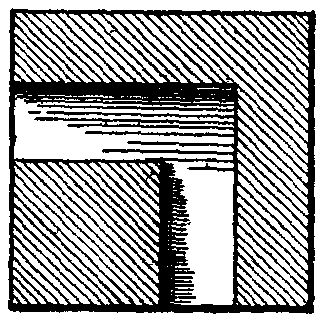 Fig. 30.
The Mortises
When the mortises have been made they will appear as shown in the enlarged cross section of the leg (Fig. 30), the total depth of each mortise being 1½". The depth of this mortise determines for us the length of the tenons on the facing boards.
The Facing Boards
These boards are each 1 inch thick and 7 inches wide. As the top of the table is 42 inches long, and we must provide an overhang, say of 2 inches, we will first take off 4 inches for the overhang and 4 inches for the legs, so that the length of two of the facing boards, from shoulder to shoulder, must be 34 inches; and the other two facing boards 28 inches. Then, as we must add 1½ inches for each tenon, two of the boards will be 37 inches long and two of them 31 inches long.
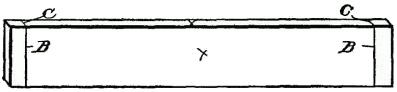 Fig. 31.
 Fig. 32.
The illustration (Fig. 31) shows a board marked with the cross lines (B) at each end for the end of the tenons, or the extreme ends of the boards.
Continue to:
My Books

