22. Braces
Description
This section is from the book "Constructive Carpentry", by Charles A. King. Also available from Amazon: .
22. Braces
Braces. In making the cuts, and finding the lengths of braces shown in Figs. 20 and 21, the steel square is used. All measurements generally are worked out upon the scale of 1" to 1'. The square most conveniently marked for the use of the framer is divided on the outside into twelfths of an inch. This division may be used easily in working to an inch scale, each inch being read as one foot. In using the steel or framing square, the tongue or short side should be held in the left hand, and the blade or long side in the right, thereby bringing the square into the position shown in Fig. 27. This brings the 1" scale upon the outer edge.
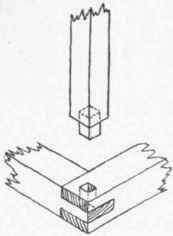
Fig. 24. - Joint be-tween Corner Post and Sills.

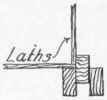
Fig. 25. - Built Corner Posts.
Fig. 26. - Ledger Board, or Ribband.
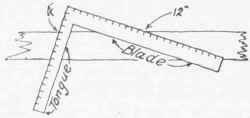
Fig. 27. - Position of the Framing Square in finding the Length of a Brace.
If the brace is to be of 45 degrees, that is, to extend the same distance on each side of the angle it is to strengthen, say 48", find upon the tongue of the square the figures 67.88, the two equal figures giving the distance from the angle, and the other giving the length of the brace, or its hypothenuse. If for any angle other than one of 45 degrees, take the distance from the corner to the brace, say 4', upon the tongue of the square, and the other distance, say 12', upon the blade; as we are working to the inch scale, this means that the measurements to be used are 4" and 12", as in Fig. 27. By marking along the two edges of the square, we have the angles of the cuts, 4" giving the horizontal cut and 12" the vertical. To find the length of the brace, measure across the angle from 4" to 12", the distance given as inches being read as feet. The accuracy of the result depends entirely upon the accuracy with which the work has been done.
To find beveled shoulder cuts, as shown in Fig. 28, find and mark the length and angles of the brace, as if it had HO shoulder, by the method above described, and make the mark upon the brace denoting the length as shown at ad. Lay the square with the size of the shoulder, {de, or af), say 1", upon the tongue, at point a or d, and bring the square around until the blade coincides with point b or c. Connect e with d and with c; f with a and with b. These lines denote the cuts of the shoulders at each end. The entire length of the brace, including the tenons, should be from f to e. The ends of the tenons, (g, g), will allow sufficient wood for drawboring. Upon common work, the joints of the brace usually are cut to the lines ab and cd, and the joint firmly spiked.
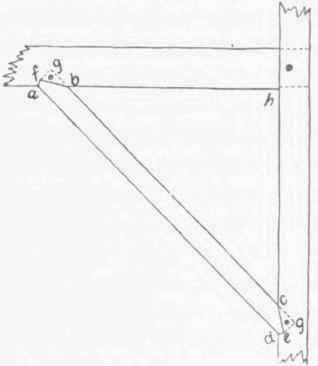
Fig. 28. - Beveled Shoulder Brace Joint.
To cut the post, and the sill plate, or girt for the brace, or the horizontal and vertical members to be braced, measure from the corner h, to points a and d, and from them mark points b, c, and lay off lines af, fb, de, and ce, by the same method used in obtaining the corresponding lines upon the ends of the brace. The length of the brace is always between the points a and d.
Continue to:
My Books

