8. Damp Proofing
Description
This section is from the book "Constructive Carpentry", by Charles A. King. Also available from Amazon: .
8. Damp Proofing
Damp Proofing. Dampness in a cellar may be due to different causes; generally the safest way to insure a reasonably dry cellar is to drain it from the outside, thereby preventing the water from soaking through the foundation. This may be done by laying drains of open-joint tiling outside of the cellar wall, as at a, Fig. 4, the bottom of the tiling being at least 6 inches lower than the level of the cellar floor at the highest place in the drain, with the pitch toward the outlet of at least 3 inches to every 50 feet in its length, and by connecting them with the sewer by a trap outside of the cellar wall, to prevent sewer gas from entering the house by way of the drain tile. The tiling or drain pipe should be laid straight upon a carefully prepared bottom, with no low places in it where sediment may collect and thereby impair the efficiency of the drain.
Above the drain, to about two feet or less from the grade line, the trench outside of the foundation wall should be filled with broken stone or coarse gravel, as at b, Fig. 4, which allows the water in the ground and the surface water to go directly to the bottom of the trench and into the drain, thus preventing the water with which the earth is filled from standing against the wall of the cellar during a long wet spell. In order to assist the wall to resist the dampness, Portland cement should be plastered upon the outside, as at a, Fig. 8. All places which would catch water and conduct it into the wall, as at b, should be carefully cemented, so that the water will be carried away. It is a good plan to give the outside of the walls a thick coat of asphalt pitch underground, as at c, directly upon the stone, or cement if that is used. Either of these methods of waterproofing will be satisfactory if well done, and, in very wet locations, both are sometimes used, the asphalt being outside of the cement. In constructing any kind of building in a damp location, it is wise to take all possible precautions against dampness entering the basement. The top of the footing course should be well covered with a thick coating of asphalt as at d, Fig. 8; a piece of asphalt paper should be pressed into all the inequalities, and allowed to project several inches into the cellar, as at e, to connect with the asphalt which is to make the cellar floor waterproof. After this another coat of pitch should be added and the asphalt floor spread. The asphalt should be below the level of the cellar floor, and the foundation laid upon it, as usual; in wet places the foundation should be laid in cement and carefully pointed throughout. If a ledge comes through a cellar floor, as at f, it should be cut down at least six inches below the level of the finished floor and, to obtain the best results, should be covered with at least two inches of dry sand and broken stone well pounded down and leveled off. Over this should be spread evenly about a half inch of asphalt continuous with d. Above this should be laid the concrete floor. If this damp proofing is well done, there is little likelihood that the cellar will be damp from the water in the ground passing through the walls or floor.
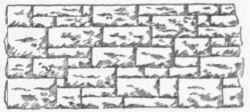
Fig. 7. - Broken Ashlar.

Fig. 8. - Damp Proofing.
A cellar often is damp because during the construction proper precautions were not taken to prevent it. In such an event, if it is plain that the water comes through the walls, and since it is considerable expense to lay a drain as at Fig. 8, after the house is built, it will help greatly to dig a trench around the cellar inside of the wall as in Fig. 9, and to lay a tile or blind drain with the pitch as described above, connecting it with the drain outside of the wall by means of a trap. The trench should then be filled with broken stone, and made flush with the cellar floor. If all the moisture comes through the floor, this method will only help; the floor should be cemented as described elsewhere.
Another method of keeping the moisture where it belongs is to cement the cellar floor, and the walls for two or three feet from the floor or as high as the surface of the ground. If Portland cement is used, and sufficient ventilation is provided, this generally gives fair satisfaction, unless the house is in a very damp location. Unless the draining is properly done while the house is being built, it will be difficult to make a perfectly dry cellar.
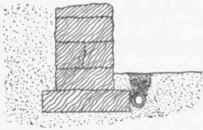
Fig. 9. - Inside Blind Drain.
If it is not desirable to go to more expense than that of cementing the floor after the cellar is finished, lay a tapered piece of joist, 3" X4", or 3" X 5", with its bottom at the desired pitch, as close as possible to the inside of the cellar wall, and cement around it, as in Fig. 10. After the cement is set the joist may be removed, leaving a trench or open drain around the cellar, which, if connected with the drain outside, will carry off any water coming in during a long rain. Any connection of this sort with the sewer should be made with a trap, to prevent sewer gas from coming into the house. Neither of these inside drains is recommended except as a makeshift, as they will only carry off the water, and will not prevent the cellar, on account of the wet walls and floor, from being very damp.
Continue to:
My Books

