Number XXIII. Turned Frames
Description
This section is from the "Elementary Turning" book, by Frank Henry Selden. Also available from Amazon: Elementary Turning.
Number XXIII. Turned Frames
Frames, either square, as shown in Fig. 228, or round, as shown in Fig. 229, may be turned on the face-plate. They should be securely fastened by using four screws the same as in securing the wooden facing for the screw chuck, Fig. 268, the candlestick base, Fig. 195, or the blank for the molding, Fig. 259.
Sometimes frames are held only by a central screw the
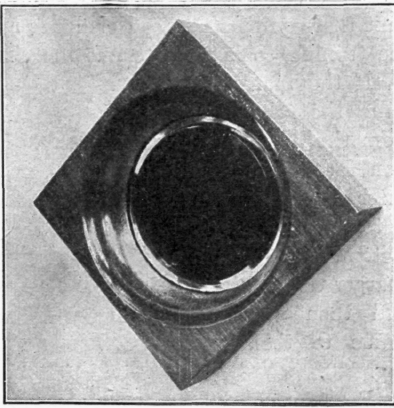
Fig. 228. Square Frame.
same as the rosette (Fig. 125). This will be sufficient to hold them, if care is exercised in doing the turning. For the first attempt you had better use the four screws.
If the frame is to be square, it should be of an even thickness before placing it on the chuck, so that there will be no need of doing more work with the turning tools than to cut the circular opening. If the blank is so large that the screws from the holes in the iron face-plate would enter the part which is to be cut out, first fasten to the face-plate a larger wooden facing, and then secure the frame to this, as in
Fig. 230.
Be very careful in placing the frame on

Fig. 229. Round Frame.

Fig. 230. Frame Blank on Face-plate.
the chuck so that the opening can be cut from the center. A good way to center the piece is to locate the center by either of the methods shown in Fig. 2 or 3.
Place the face-plate on the spindle, and crowd the blank for the frame against it by moving the tail-screw against the center of the blank.

Fig. 231. Using Gouge on Frame.
Mark the. position of the blank, and after removing the fade-plate from the lathe, fasten the blank to place with the screws. Fig. 230 shows the blank in place and the diagonal lines used in locating the centers. It also shows the
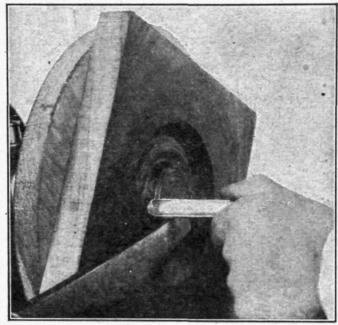
Fig. 232. Using Gouge on Frame.
small center made at the intersection of the lines by the end of the dead-center.
The opening should be worked with the gouge, holding it as shown in Figs. 231, 232, and 233. First hold the gouge as in Fig. 231, being careful to roll it so that it will not run towards the outside edge of the frame. The principle which governs its action is the same as in starting the cove (Fig. 47). If the cutting edge lies in the circle, it will not tend to run either way, but will cut freely and rapidly.
After starting the opening at the outer edge, reverse the gouge and cut from the center, as in Fig. 232. Do not remove a larger amount of material than is needed to form the curve; the remaining waste material at the center will fall out as the gouge cuts through to the chuck.
After the opening has some depth, the gouge may be held at a greater angle, as shown in Fig. 233. If you are careful to hold the gouge properly, the curve will be shaped in a very few minutes.
Be very cautious to keep your hands and clothing away from the corners of the revolving piece.
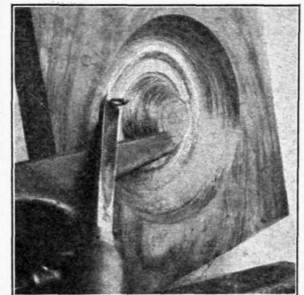
Fig. 233. Using Gouge on Frame.
After the frame has been shaped with the gouge, finish the curves with the scraping tools (Figs. 102 and 128). Do not touch the surface, which is to remain flat, with any of the lathe tools.
After the center has been removed, and the curve properly finished by scraping, sandpaper the curve. Do not allow any sandpaper to touch the flat face. Remove the tee rest, and then hold the sandpaper as shown in Fig. 234. By holding one hand with the other, you will avoid the danger of your hand slipping and being hit by the corners of the frame. Entirely finish the turned parts before removing the frame from the face-plate.
The opening may be cut only a part of the way through, and the mirror or picture be held in place by using a small reed, as shown in Fig. 228; or it may be cut entirely through, and the picture or glass placed against the back, as shown in Fig. 229.
If a space at the back is desired, first secure the frame to the face-plate with screws, passing into the waste material. After the back opening has been finished, reverse the piece, and work from the face side. An easy way to center the piece for reversing

Fig. 234. Using Sandpaper on Frame.
is to bore a small hole through the center, and with the dead-center in this hole, force the piece to place. After the piece has been removed from the faceplate, finish the face and edges by using plane,
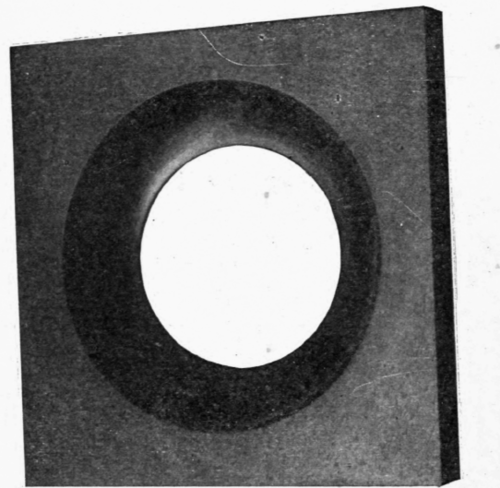
Fig. 235. Square Frame, Finished.
scraper, and sandpaper, and then polish the same as the turned part. The round frame (Fig. 229) is made in the same manner, except the edge which is turned the same as the rosette (Figs. 125 and 126).
The face also may be finished in the lathe. There will then be no hand finishing to do after the frame is removed from the lathe. It is better to finish the flat surface parallel with the grain of the wood, after removing the piece from the lathe.
Continue to:
My Books

