Lesson XXVII Half Blind Dovetail
Description
This section is from the "Elementary Woodwork" book, by Frank Henry Selden. Also available from Amazon: Elementary Woodwork for Use in Manual Training Classes.
Lesson XXVII Half Blind Dovetail
Stock and finished sizes the same as in Lesson 26 (Common Dovetail).
Lay out and work the pins the same as in Lesson 26 (Common Dovetail), Fig. 90, except that the narrow edges of the pins do not extend through to the back or outer surface, about 1/4 inch of material being left to conceal the

Fig. 91. Half Blind Dovetail, joint, as shown in Figs. 91 and 92. The leaving of the 1/4 inch to conceal the joint requires the mortises to be made 1/4 inch less in length than the thickness of the piece which is to receive them. This length must be exactly correct before putting together, as there is no opportunity to dress them off afterwards, as is the case with the common or open dovetail. The pins may be dressed off after the joint has been put together, and are therefore left long. This extra length may be used to batter down after the joint is glued, the same as described in Lesson 26 (Common Dovetail).
Make this joint so perfect that it will not require gluing and finish it with two coats of shellac. This form of dovetail was used for many years for the fronts of drawers, but machine dovetailing has now taken its place almost entirely except for expensive hand-made work.
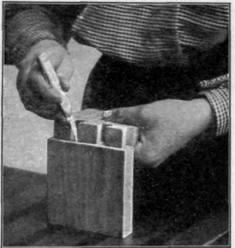
Fig. 92. Scribing in the Mortises for the Pins.
Continue to:
My Books

