Exercise 23. - Marking And Cutting The Tenons
Description
This section is from the book "Exercises In Wood-Working", by Ivin Sickels. Also available from Amazon: Exercises in Wood Working.
Exercise 23. - Marking And Cutting The Tenons
Material. - The end pieces of the dovetailed box. Work. - 1. Marking and cutting the tenons. 2. Gluing together the sides.
Mark with a sharp pencil 5/8" from the ends all around the end pieces. Stand the front, back, and end pieces on the bench in the positions which they will have when the box is completed. Mark the outer and upper corners of adjoining parts with the same sign or number.
Fasten the end piece numbered 1 in the vise, with its number up and out; place the front piece on the end piece as shown in Fig. 1, resting the back part on a plane-stock or block of wood. Adjust the two pieces with the try-square, its handle against the face-edge of the front piece, and its blade up against the end piece. Hold the upper piece in this adjusted position, while with a knife or point you mark along the sides of the mortise on the top of the end piece. The marks should appear like those of a, Fig. 2. Mark the other ends in the same way. With try-square and knife mark from the ends of the lines a, Fig. 2, down to the pencil-mark, as at b and c.
Saw with the back-saw as shown in Fig. 3, keeping the kerf in the waste wood.
Saw the corner waste pieces, and chisel out the middle ones, making the surfaces a, a, Fig. 4, as flat as possible. Carefully fit the corresponding parts, using the chisel for paring where neccessary.
With a sharp finely set smoothing-plane clean off the inside surfaces of the pieces. Open two hand-screws ready for use in the positions shown in Fig. 5.
The pieces are now warmed, the tenons and mortices glued, the parts pressed together and placed in the hand-screws, which are tightened sufficiently to close the joints but not bend in the sides. The gluing process should be performed quickly, and the student should have a fellow-student assist him.
Clean off as much excess glue as possible, wiping the inside with a wet sponge or cloth, and set aside the box for several hours.
Ex.23.
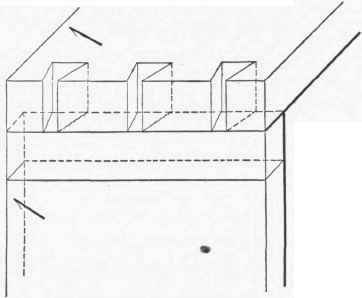
Fig. 1
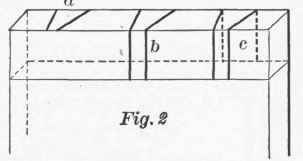
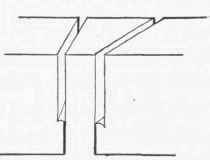
Fig. 3
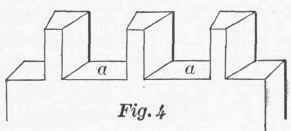
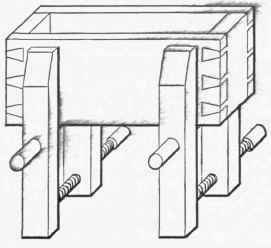
Fig. 5
Continue to:
My Books

