Exercise 25. - Hinging The Top To The Box
Description
This section is from the book "Exercises In Wood-Working", by Ivin Sickels. Also available from Amazon: Exercises in Wood Working.
Exercise 25. - Hinging The Top To The Box
Material. - 1" middle-size wrought-brass butts, 3/8" brass screws to fit. Work. - 1. Prepare the upper edge of the box for the top.
2. Smooth the top piece and square its back edge.
3. Fit and fasten the hinges.
4. Finish the edges of the top piece.
The hinges may have either of the three positions shown in Figs. 1, 2, and 3. For that of Fig. 3, narrow-size butts should be used, and the edges of the back piece and top chamfered, as at a and b.
Hold the hinge on the back piece 3/4" from the corner, and mark with the knife (a, a, Fig. 4). Repeat for the other hinge at the other end. Set the gauge, using the hinge for the distance (c, Fig. 1), and mark the lines (b, Fig. 4). Set the gauge, exactly one half the thickness of the hinge (d, Fig. 1), and mark the lines (c, Fig. 4). Hold the hinge so that it coincides with the marks a, a, and b, Fig. 4, and extend the lines a, a, up to b with the knife.
Cut down on the line d, Fig. 5, with the knife about the depth required; with the chisel cut out the corners, as shown at a, a, Fig. 5; and with the chisel in the position c, Fig. 5, make several cuts to finish the recess for the hinge. Place the hinge in the recess; with a brad-awl make holes smaller and not as deep as the length of the screw, and fasten the hinge with the screws. Repeat the cutting and fasten the other hinge. Close the butts, and place the top in position, resting on them; mark with the knife points on the top to correspond with the marks a, a, Fig. 4. From these marks as guides repeat the marking and cutting as for the back piece.
Screw the butts to the top, using one screw for each; then test the top by closing it, and remedy any defect by cutting or placing strips of cardboard under the butts, if cut away too much. Then put in the other screws. Finish the edges of the top piece, using the box as a guide. Smooth the face of the top.
The top may be secured with a brass hook and eye. Screw the eye in the middle of the front edge of the top; place the hook in the eye to determine the place for the screw.
Fig. 6 shows a table-hinge, and Fig. 7 a door-hinge.
Ex. 25.


Fig. 4

Fig. 5

Fig. 6
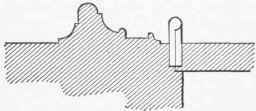
Fig. 7
Continue to:
My Books

