Exercise 26. - Construction Of A Drawer
Description
This section is from the book "Exercises In Wood-Working", by Ivin Sickels. Also available from Amazon: Exercises in Wood Working.
Exercise 26. - Construction Of A Drawer
Material. - One piece of ash, to work 4" wide, 7/8" thick, and 9 1/2" long.
Two pieces of maple, to work 4" wide, 5/8" thick, and 14 3/4" long.
One piece of maple, to work 3 3/8" wide, 1/2" thick, and 8 1/2" long.
One piece of whitewood, to work 14" wide, 1/2" thick, and 8 3/4 " long. Work. - 1. Plane the pieces to the proper dimensions.
2. Cut the dovetails on the front piece.
3. Cut the mortises and grooves for the back piece in the sides.
4. Plow the grooves in the front and sides for the bottom.
5. Fit the back piece.
6. Glue and nail the front sides and back together.
7. Fit and place the bottom in position.
The pieces may be cut from boards, allowance being made for working, so as to produce a drawer of the dimensions given in Fig. 1.
In marking for the dovetails in the ash front, use the measures given in a, Fig. 2. In cutting out the dovetails, use the back-saw, as shown in Fig. 4. Chisel out the waste wood, being careful not to undercut the spaces, which should be frequently tested for squareness.
The mortises (shown at c and d, Fig. 2) are marked from the tenons. The grooves for the back are sawed and chiseled out 1/8" deep, 1/2" wide, and about 3/4" from the ends.
Place the 1/4" iron in the plow (a, Fig. 3), adjust it for a fine cut; set the bridge b so that the iron is 3/8" from it; set the stop c so that the iron will plow to a depth of 1/4"; and first try the plow on some waste block before grooving the pieces.
The dovetail-joints are glued. The back piece is nailed with 1 1/4" finishing or wire nails, which should be driven a short way below the surface with a nail-punch.
After the glue has hardened, the bottom is fitted and pushed in place. The edge of the bottom is marked with the gauge set at a little less than 1/4", and beveled with the jack-plane to about 1" back from the edge.
The entire drawer is now finished with the smoothing-plane, and may be furnished with handle or lock. A lock is fitted somewhat like a hinge, the key-hole being the guide for its position.
Ex. 26.
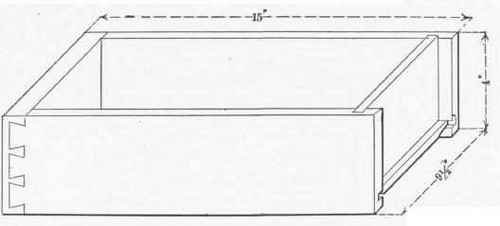
Fig. 1
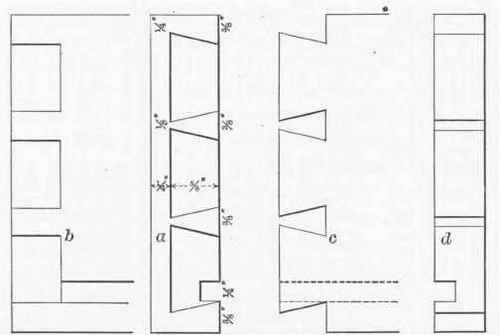
Fig. 2
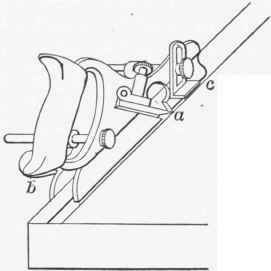
Fig. 3
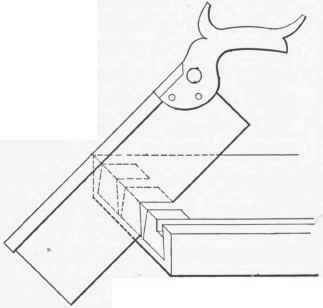
Fig. 4
Continue to:
My Books

