On The Grindstone
Description
This section is from the book "Exercises In Wood-Working", by Ivin Sickels. Also available from Amazon: Exercises in Wood Working.
On The Grindstone
The grindstone must be kept constantly wet with water while in use. Of the many positions in which the tool may be held against the grindstone, that shown at a, Fig. 1, is the easiest for a student. The handle, held in the right hand, rests on a board at b, the bevel is pressed against the stone at c, with the palm of the left hand, which is applied to the face of the tool. The angle of the ground surface is regulated by moving the handle nearer to or away from the stone.
At d, Fig. 1, the angle of the bevel is regulated by moving the handle on the rest, and maintained by a finger held against the rest. At e, Fig. 1, and b, Fig, 2, are shown positions used by workmen.
The tool must not be held on one part of the stone, but constantly moved so as to wear the face of the stone evenly, as shown at a, Fig 2.
For chisels, gouges, and planes, the angle is tested by a gauge, shown full size in Fig. 3, made of steel or brass, with an opening of 20° to 25°, as shown at c, the value of the opening stamped on the gauge, and a hole at one end for a small chain fastened to the grindstone-frame. The bevel of the tool, 6, is placed in the opening, c, and its angle tested; if too thin, the handle, b, Fig. 1, must be drawn away from the stone, or brought nearer if too thick. When once determined a mark may be made on the rest at 6, and the grinding continued until the bevel is brought down to the face. The edge is then tested with the try-square.
Care must be taken to preserve the correct shape of plane-irons (see a, 6, Fig. 3, Ex. 5), and particularly the edge, which must be square.
Gouges are ground as shown in Fig. 4, so that the edge slants, and is square to the whetted surface, as shown by c, d, Fig. 4. For special work some gouges are ground just the opposite to the ordinary tool - that is, with the edge on the outer surface, at 6, instead of a, Fig. 4.
Fig. 5 represents a simple means of obtaining the bevel surface on a chisel. It is supported on the rest, b, and held against the side of an emery-wheel. The wheel should be constantly oiled or wet with water.
To remove hollows or grooves in the grindstone, hold a wrought-iron bar, pointing downward, resting on the support 6, Fig. 1, and with its end cutting into the high parts of the face; after which, smooth the stone by holding a coarse sandstone against it.
Plate E.

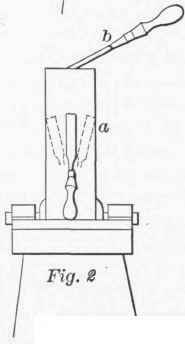
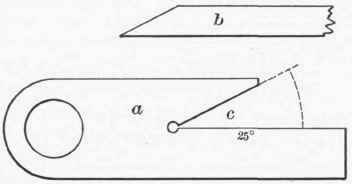
Fig. 3
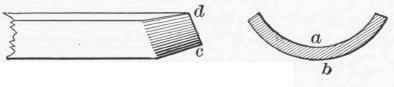
Fig. 4
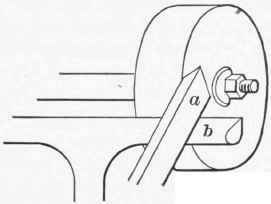
Fig. 5
Sharpening Tools. (Plate F.)
Continue to:
My Books

